[ORDER] Distribution Amplifiers
Category: Unknown · Tags: — · Posts: 36
#1 — Fox · 2020-12-08
My first official order thread!
To fund the next (and hopefully final) revision of my RGB Switcher, I made two different Buffered Multiples. I only have 17 of each of these for sale. I will likely have more made at a later date.
Description:
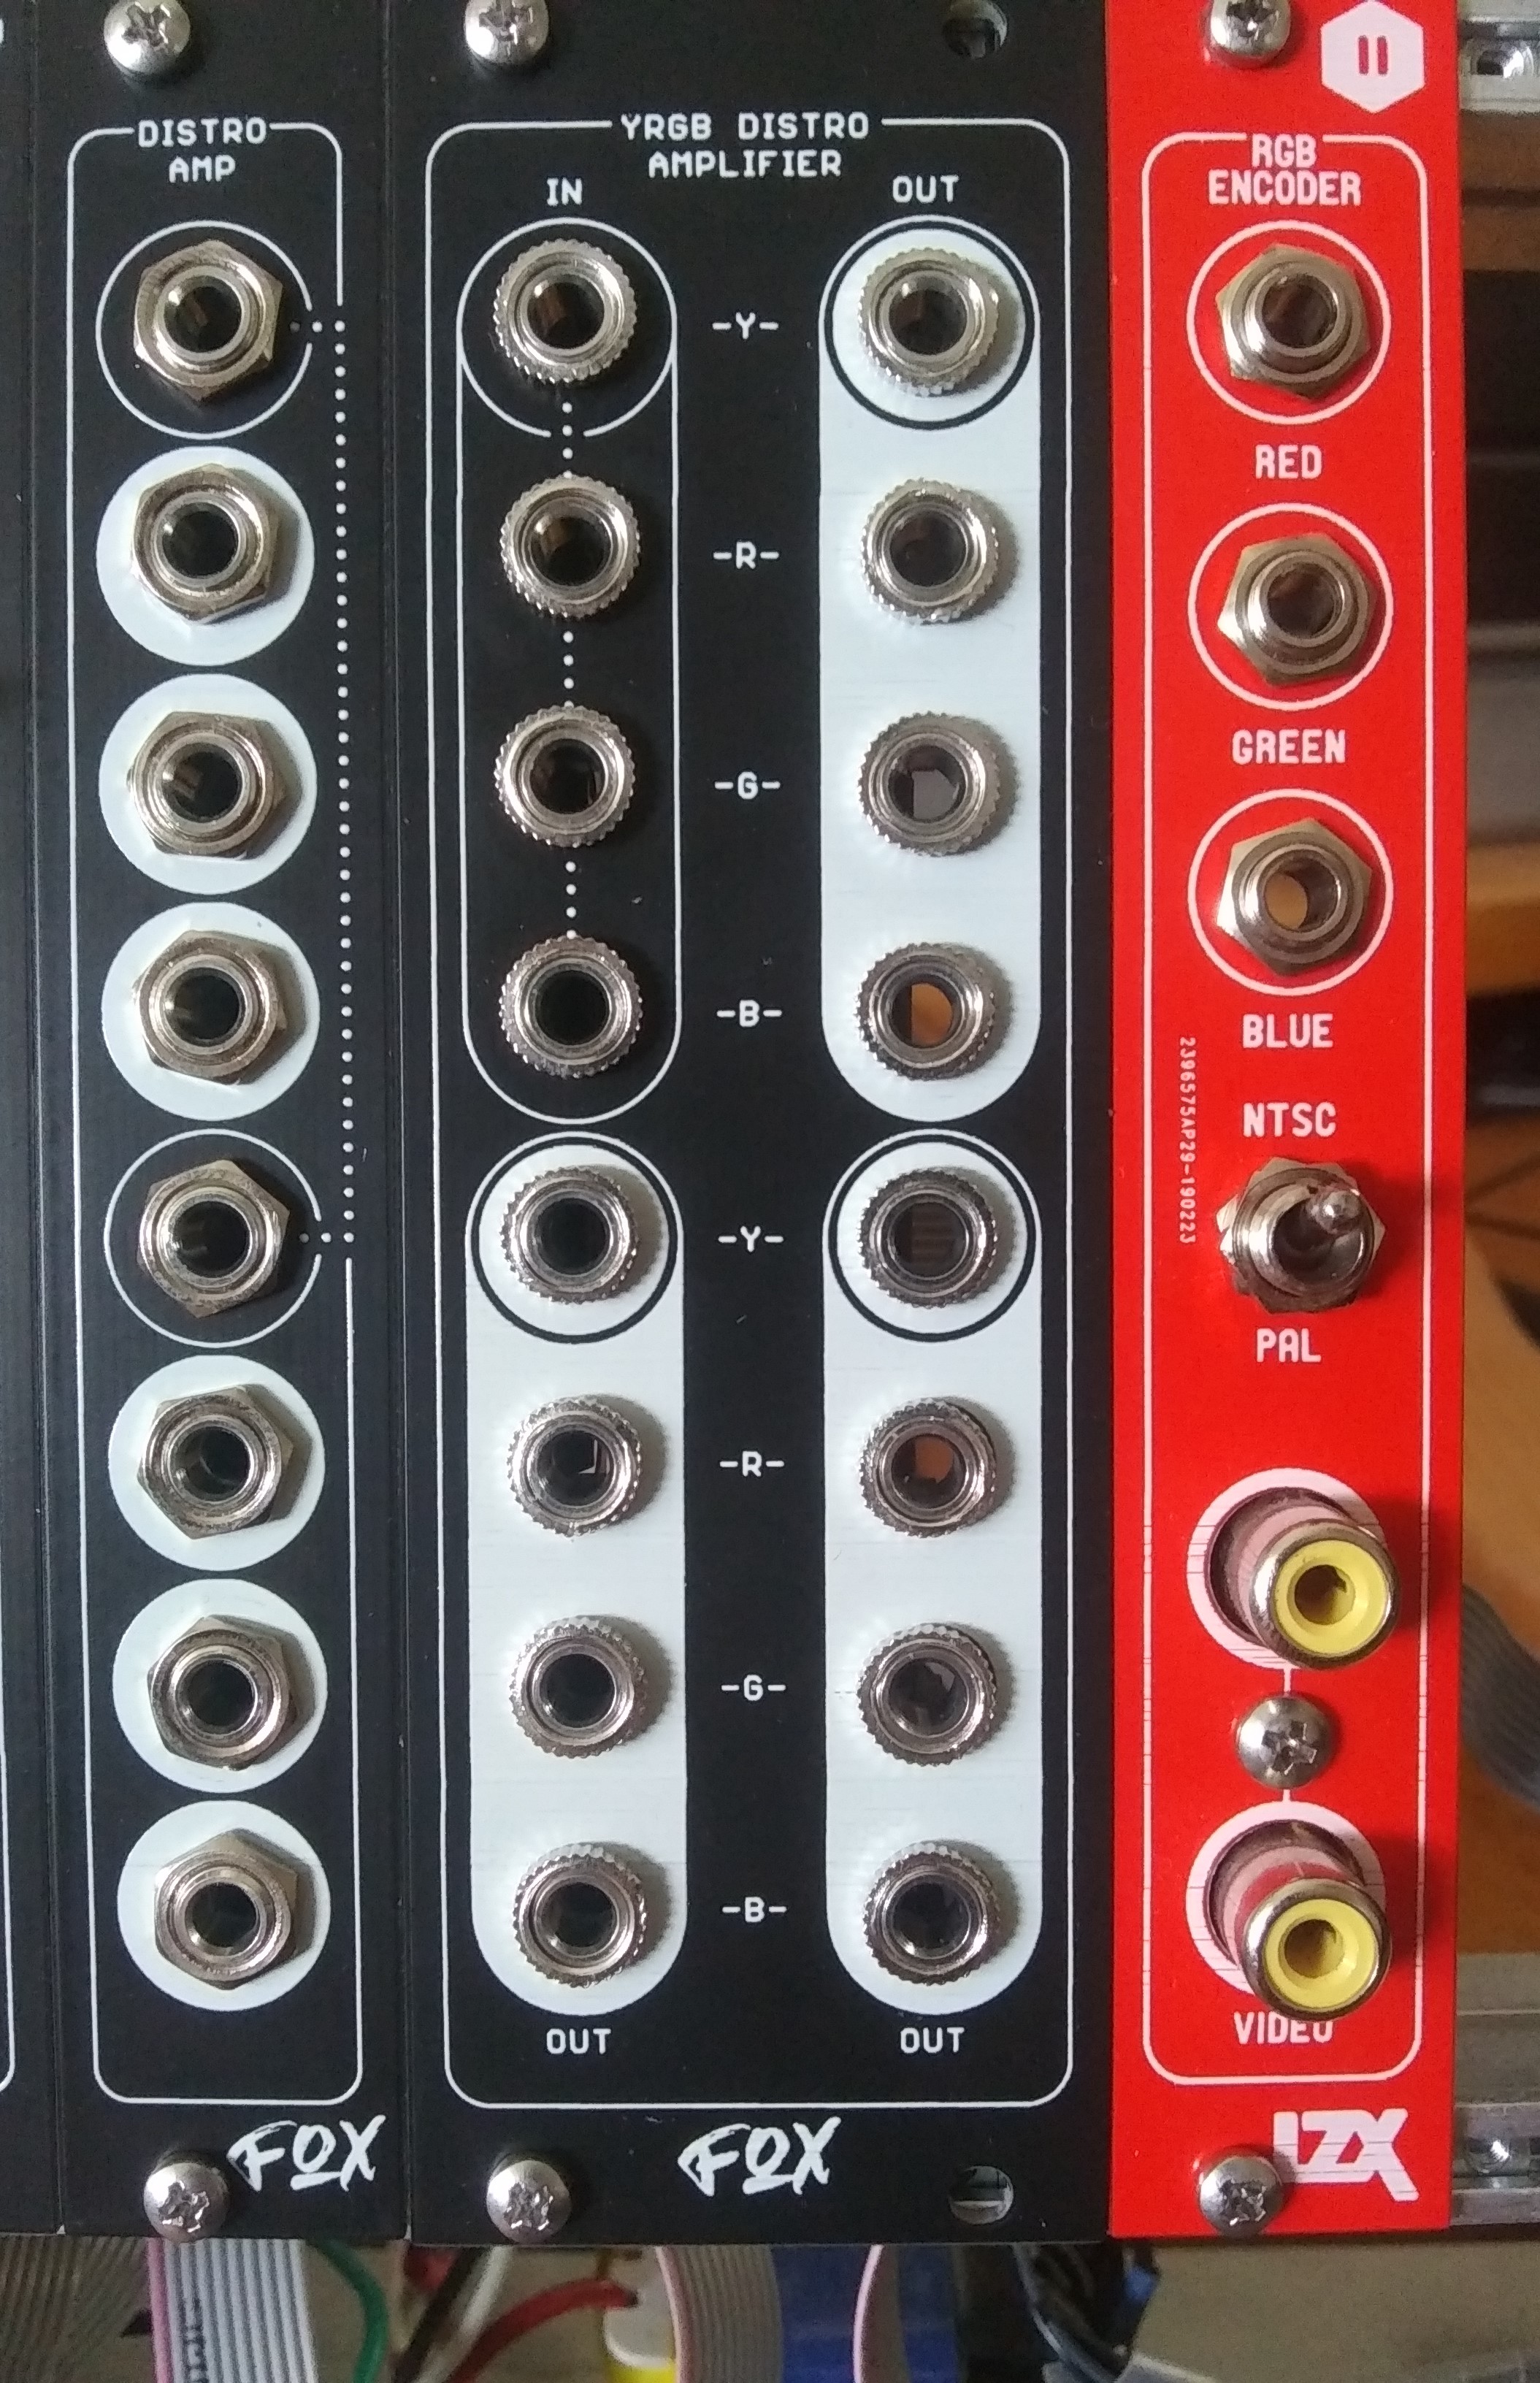
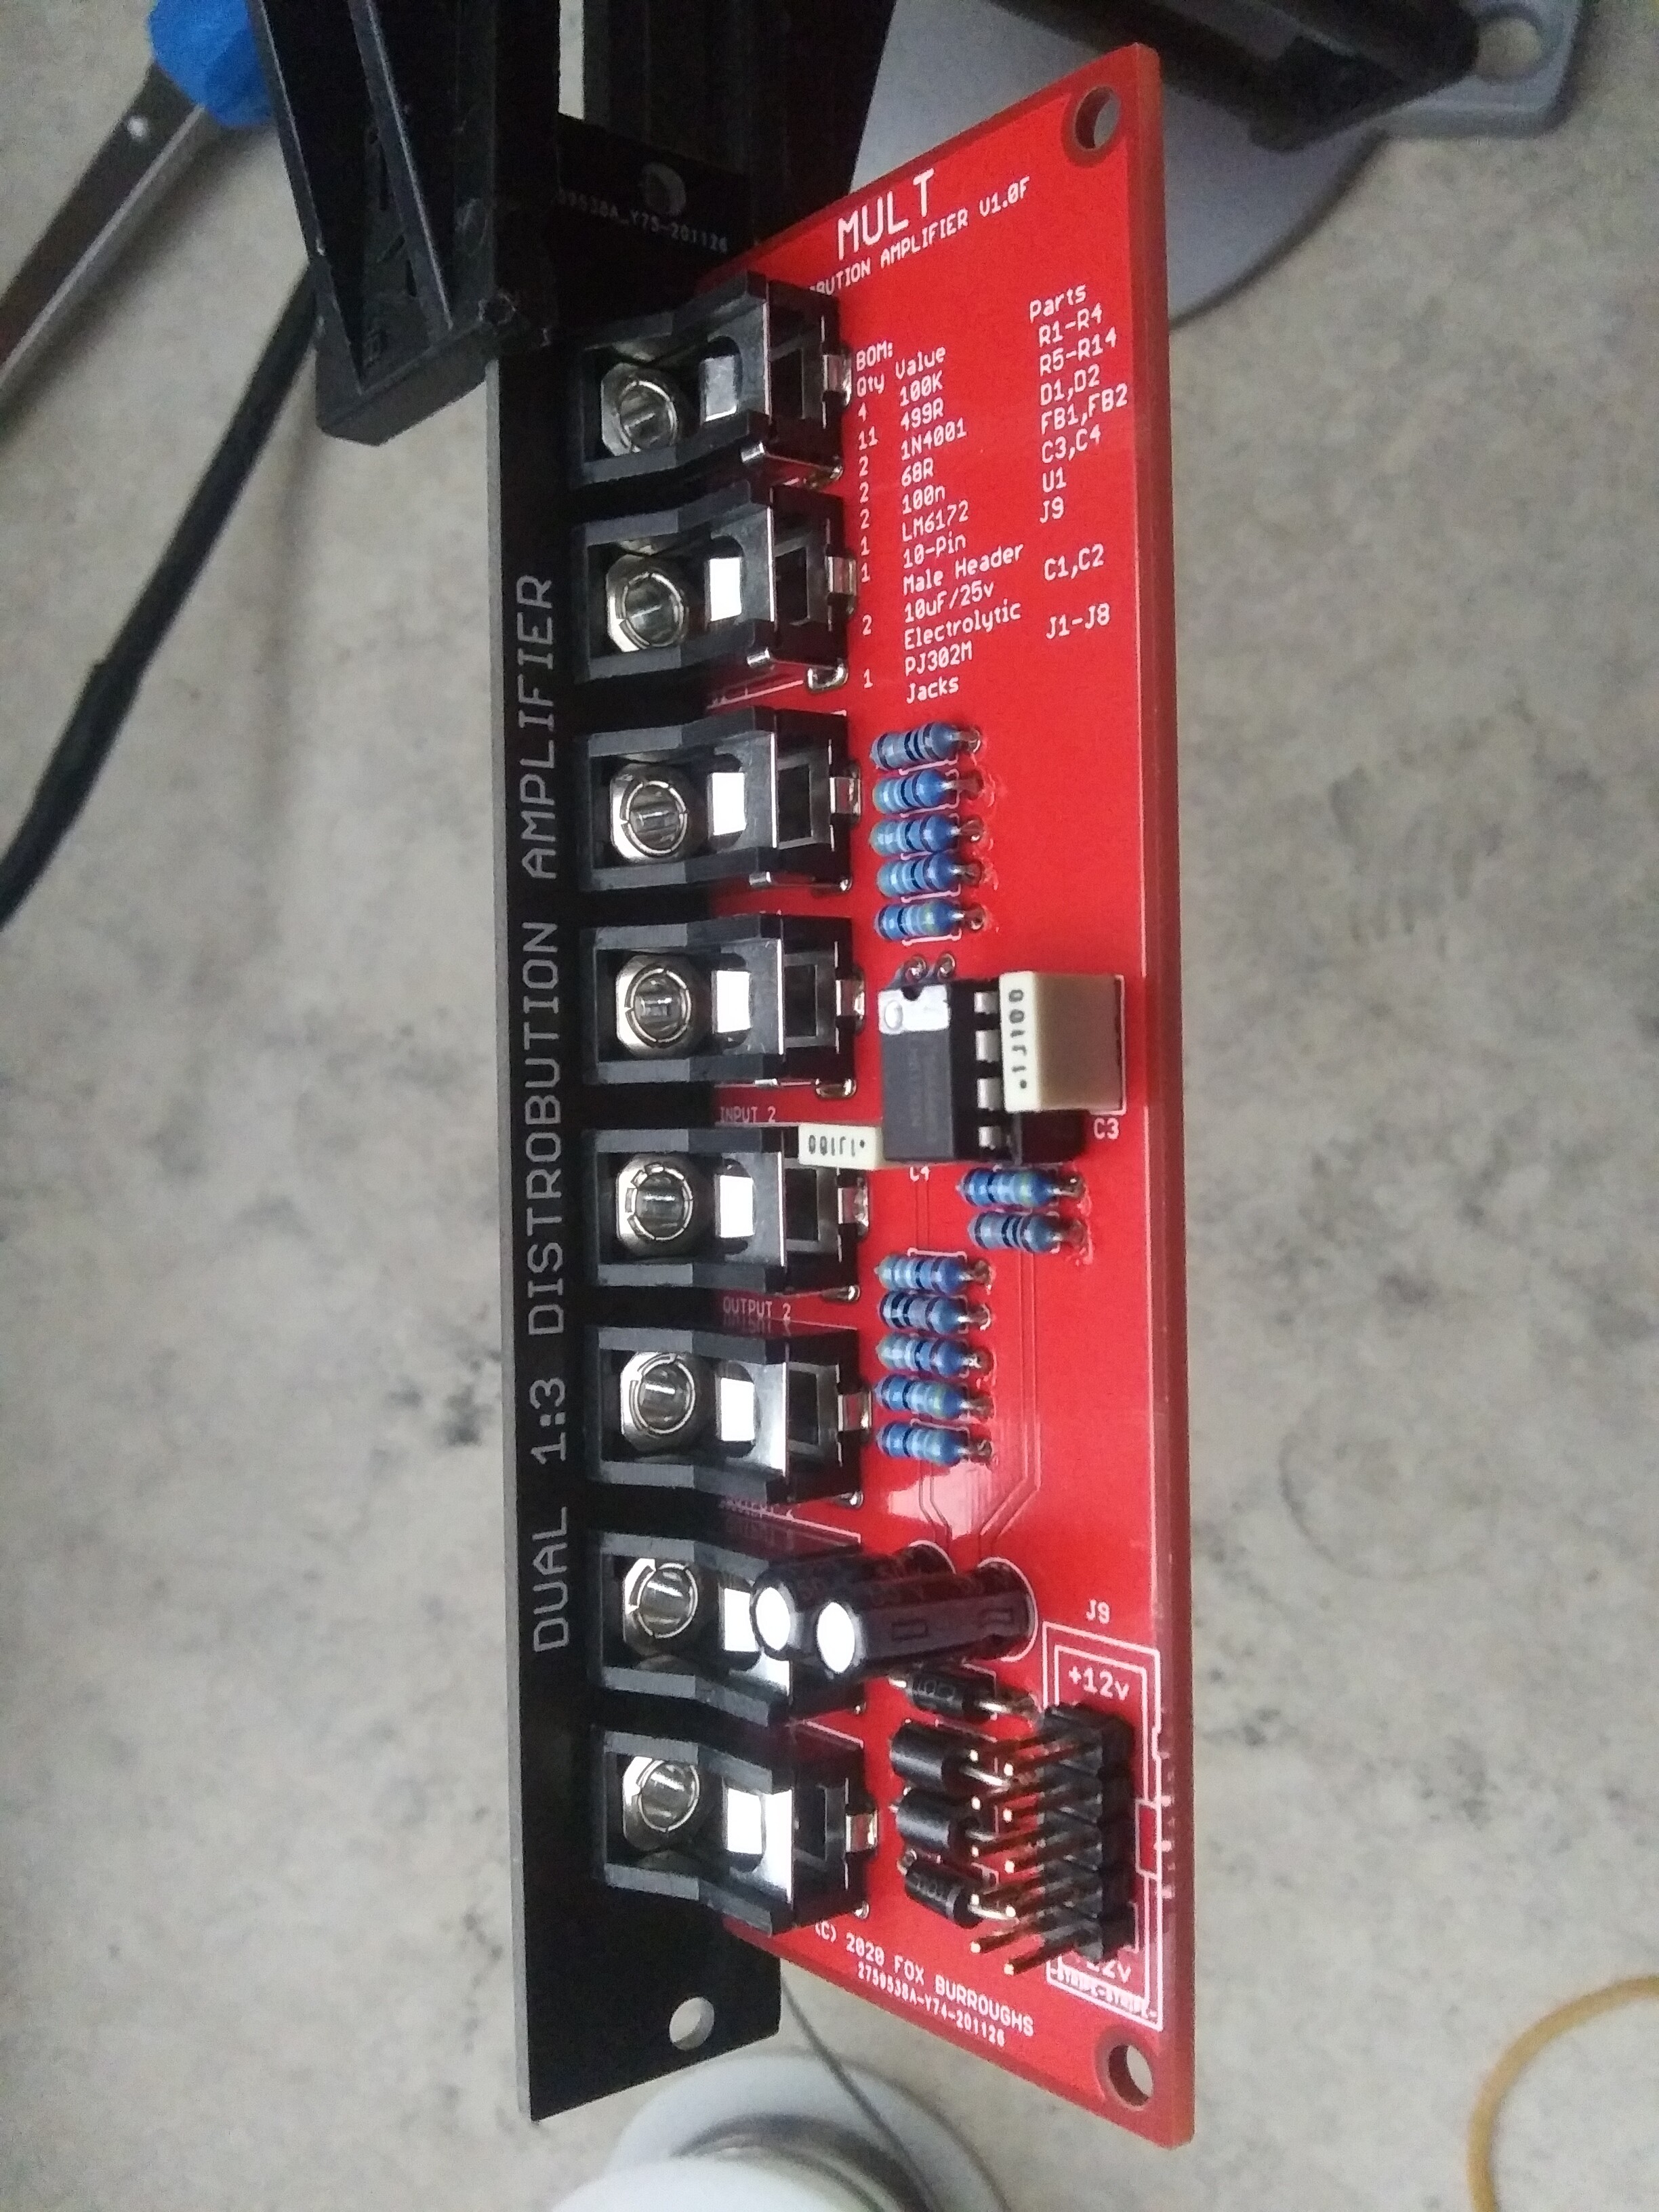
- Module (A) - Dual 1:3 Distro Amp
– 3U, 4HP, 40.64mm (1.6in) deep
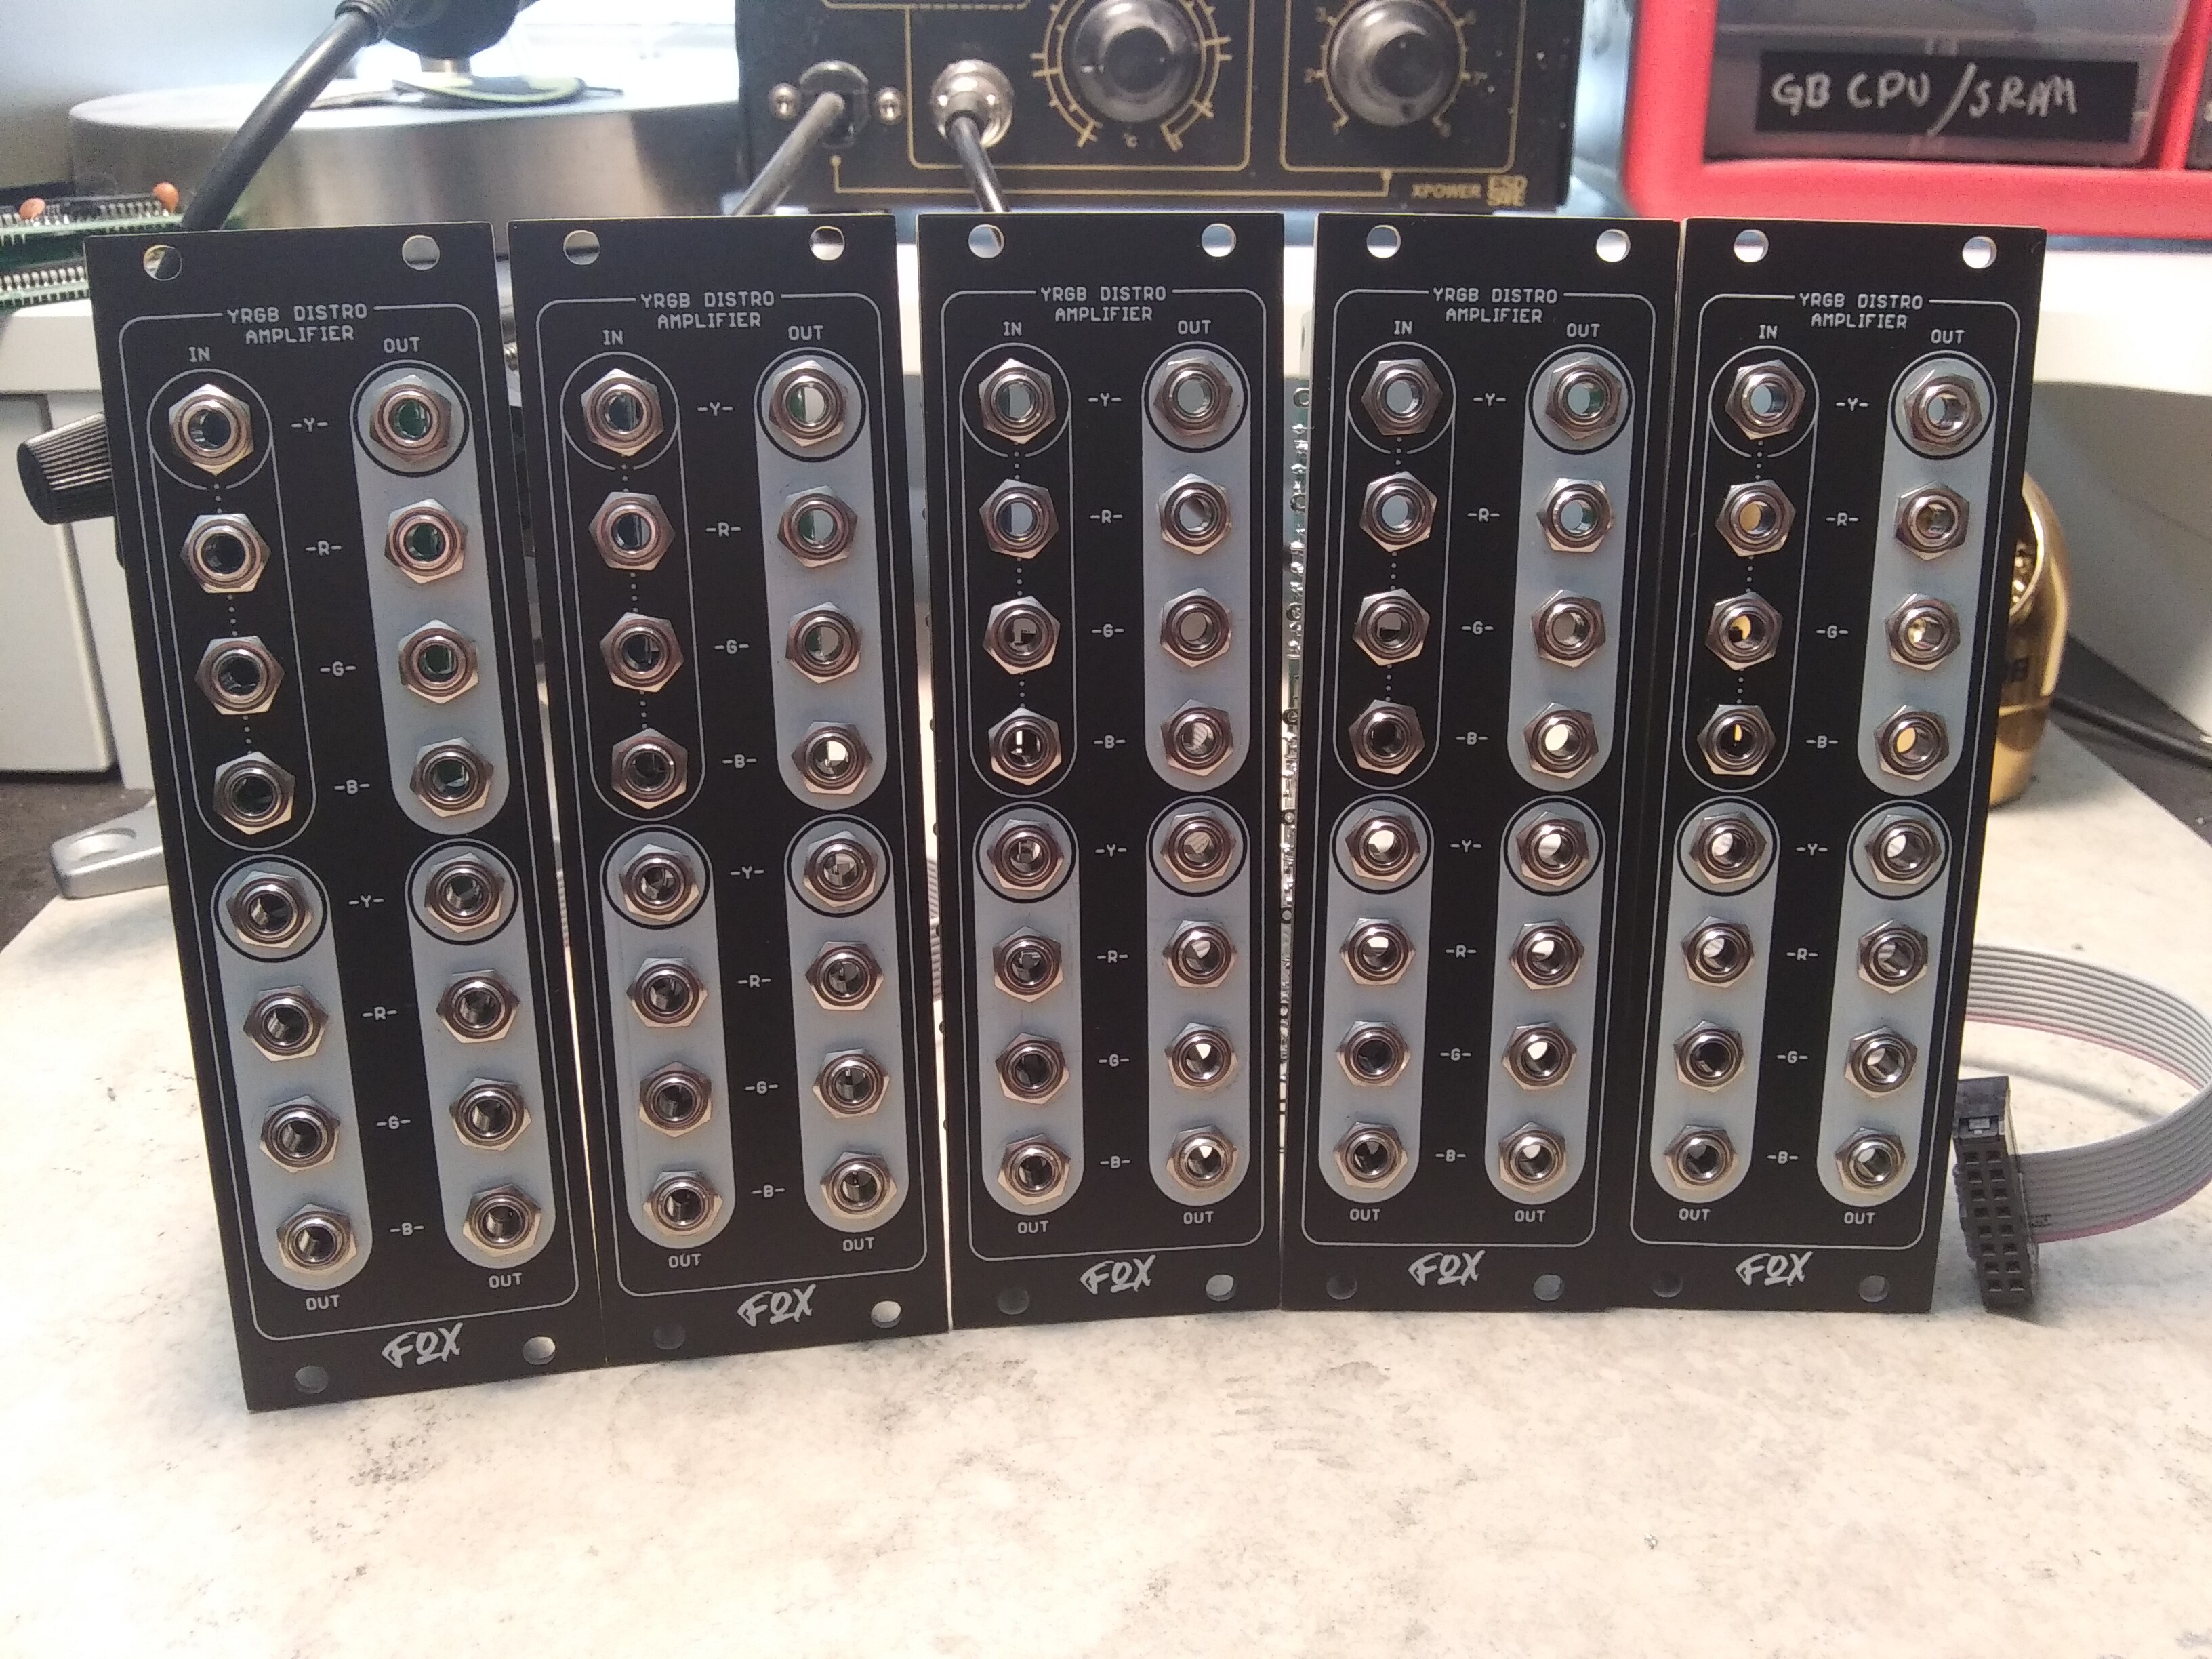
– 2pcs: 1xFaceplate, 1xPCB - Module (B) - Triple YRGB Distro Amp
– 3U, 8HP, 40.64mm (1.6in) deep
– 3pcs: 1xFaceplte, 2xPCB
Both modules are of course video-rate multiples and with cascaded inputs, each module can be used in several ways. the Dual 1:3 mult may be used as a Single 1:6 mult and the YRGB mult may be used as a 1:12 mult, Dual 1:6, 1:9 & 1:3, and more!
These would be great companions for the upcoming RGB switcher which will now have a switched VC input for the threshold pot. While these are labelled for YRGB, consider using the “Y” for several daisy-chained RGB switchers.

Available Options:
- Module (A) DIY PCB - 1:3 Distribution Amplifier - $16
- Module (B) DIY PCB - Triple YRGB Distro Amp - $19
- Module (A) Built/Tested - 1:3 Distribution Amplifier - $74 (2 available)
- Module (B) Built/Tested - Triple YRGB Distro Amp - $80 (5 available)
Shipping:
- First Class to lower 48 states - $4
- UK/Germany (1-2 modules) $14.50
- Other Accommodations - please ask
I’ll combine shipping for anyone who wants more than one. Reply below, or PM me to get yours!
Below you will find the BOM and photo build guides.
Thanks everyone!
-Fox
List:
- 337is: 2x Each - Shipped
- rempesm: 1x Each - Shipped
- meudiademorte: 1x Each - Shipped
- dr_how: 1x Module (B) - Shipped
- Robertunist: 6x Module (A), 4x Module (B) - contacted
- brdaniel: 2x Each - contacted
- wide_closed: 1x Each - Shipped
- Jestern: 3x Module (A) - contacted
- Mr. Fang: 2x Each - Shipped
- cinema.av: 1x Each - Shipped
- Saiteron: 3x Module (B) - Shipped
- csboling: 1x Module (B) - Shipped
- AnalogMonster: 1x Module (B) - Shipped
- allthesixes666: 2x Module (B) - Shipped
- DesertMuseum: 2x Module (B) Built - Shipped
- MayToast: 1x (A), 1x (B) Built - Shipped
#2 — Fox · 2020-12-08
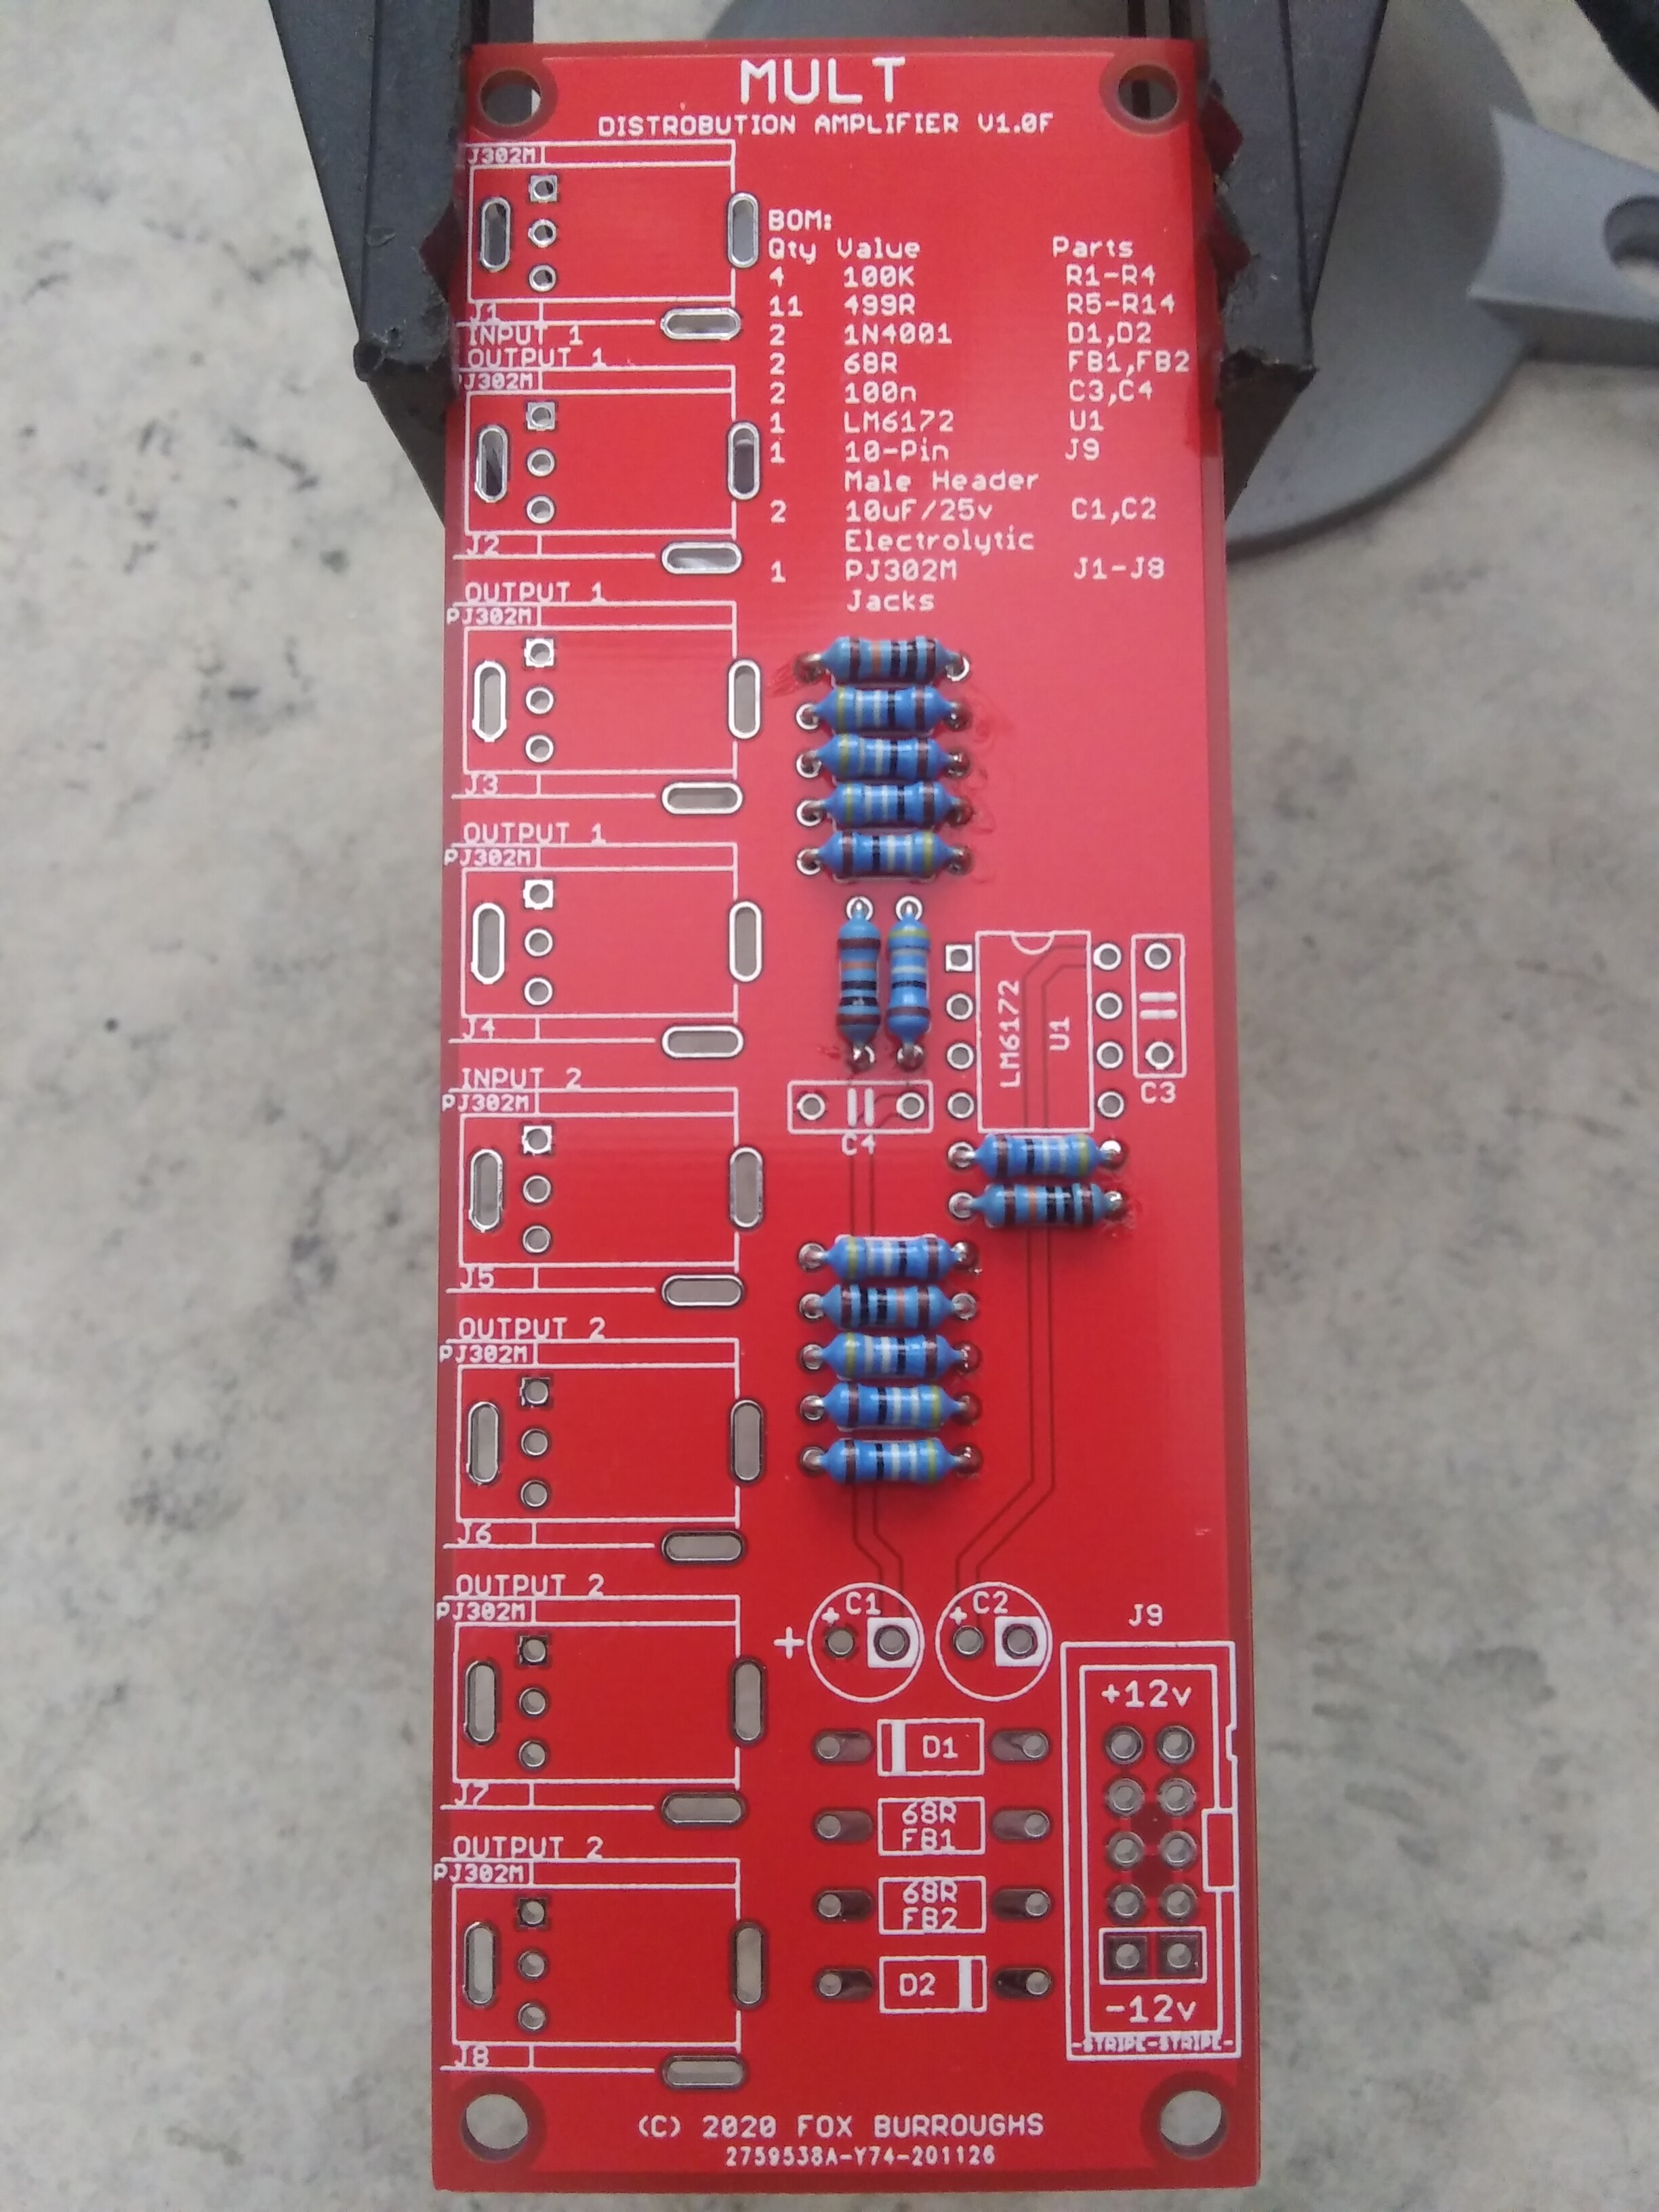
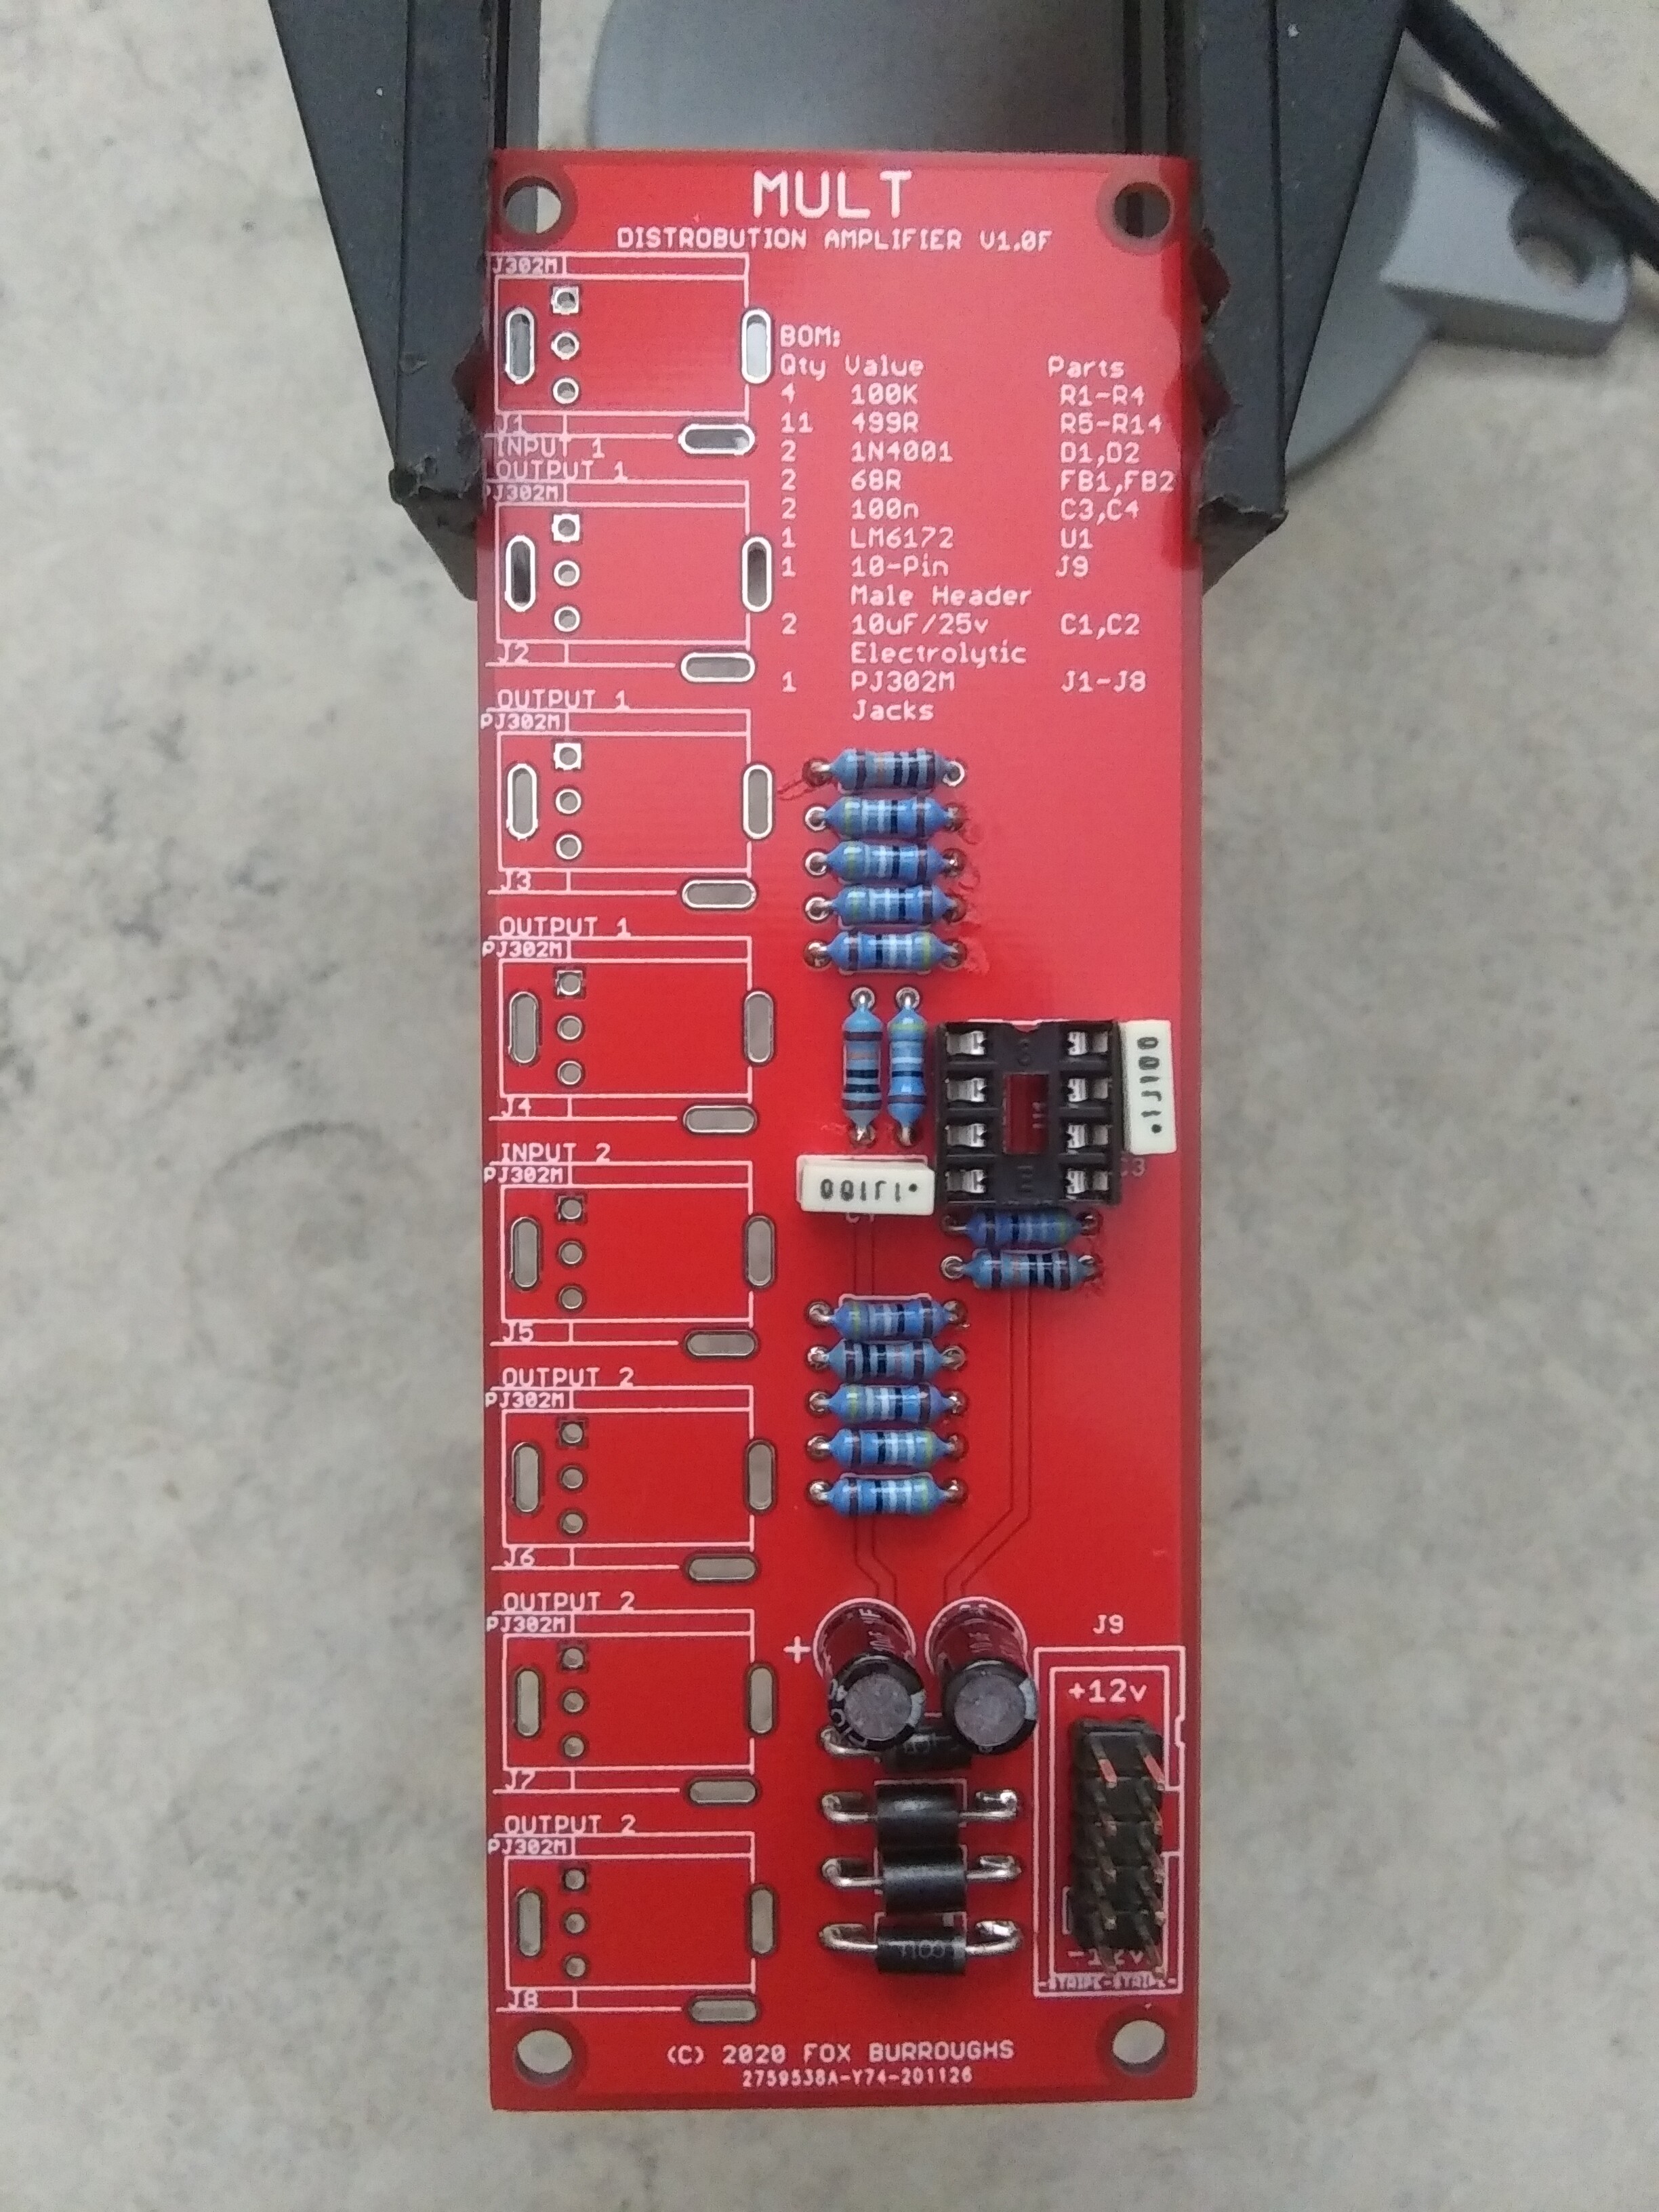
Dual 1:3 Distribution Amplifier
BOM, Build guide and Schematics
Expand for BOMQtyValueParts4100K resistorR1 - R410499R resistorR5 - R142100n capacitorC3, C4210u 25v Electrolytic CapacitorC1, C221N4001 diodeD1, D2268R Ferrite BeadFB1, FB28PJ302M JacksJ1 - J812x5 (10-Pin) male headerJ91LM6172U1
Expand for Build GuidePopulate shortest parts first.

Step 1: Resistors
R1-R4: 100k Ohm
R5-R14: 499 Ohms
Step 2: Diodes, Beads
D1, D2: 1N4001 (Alternate 1N5819)
FB1, FB2: 68 Ohm @ 100MHz
Pay attention to the diode’s stripe.
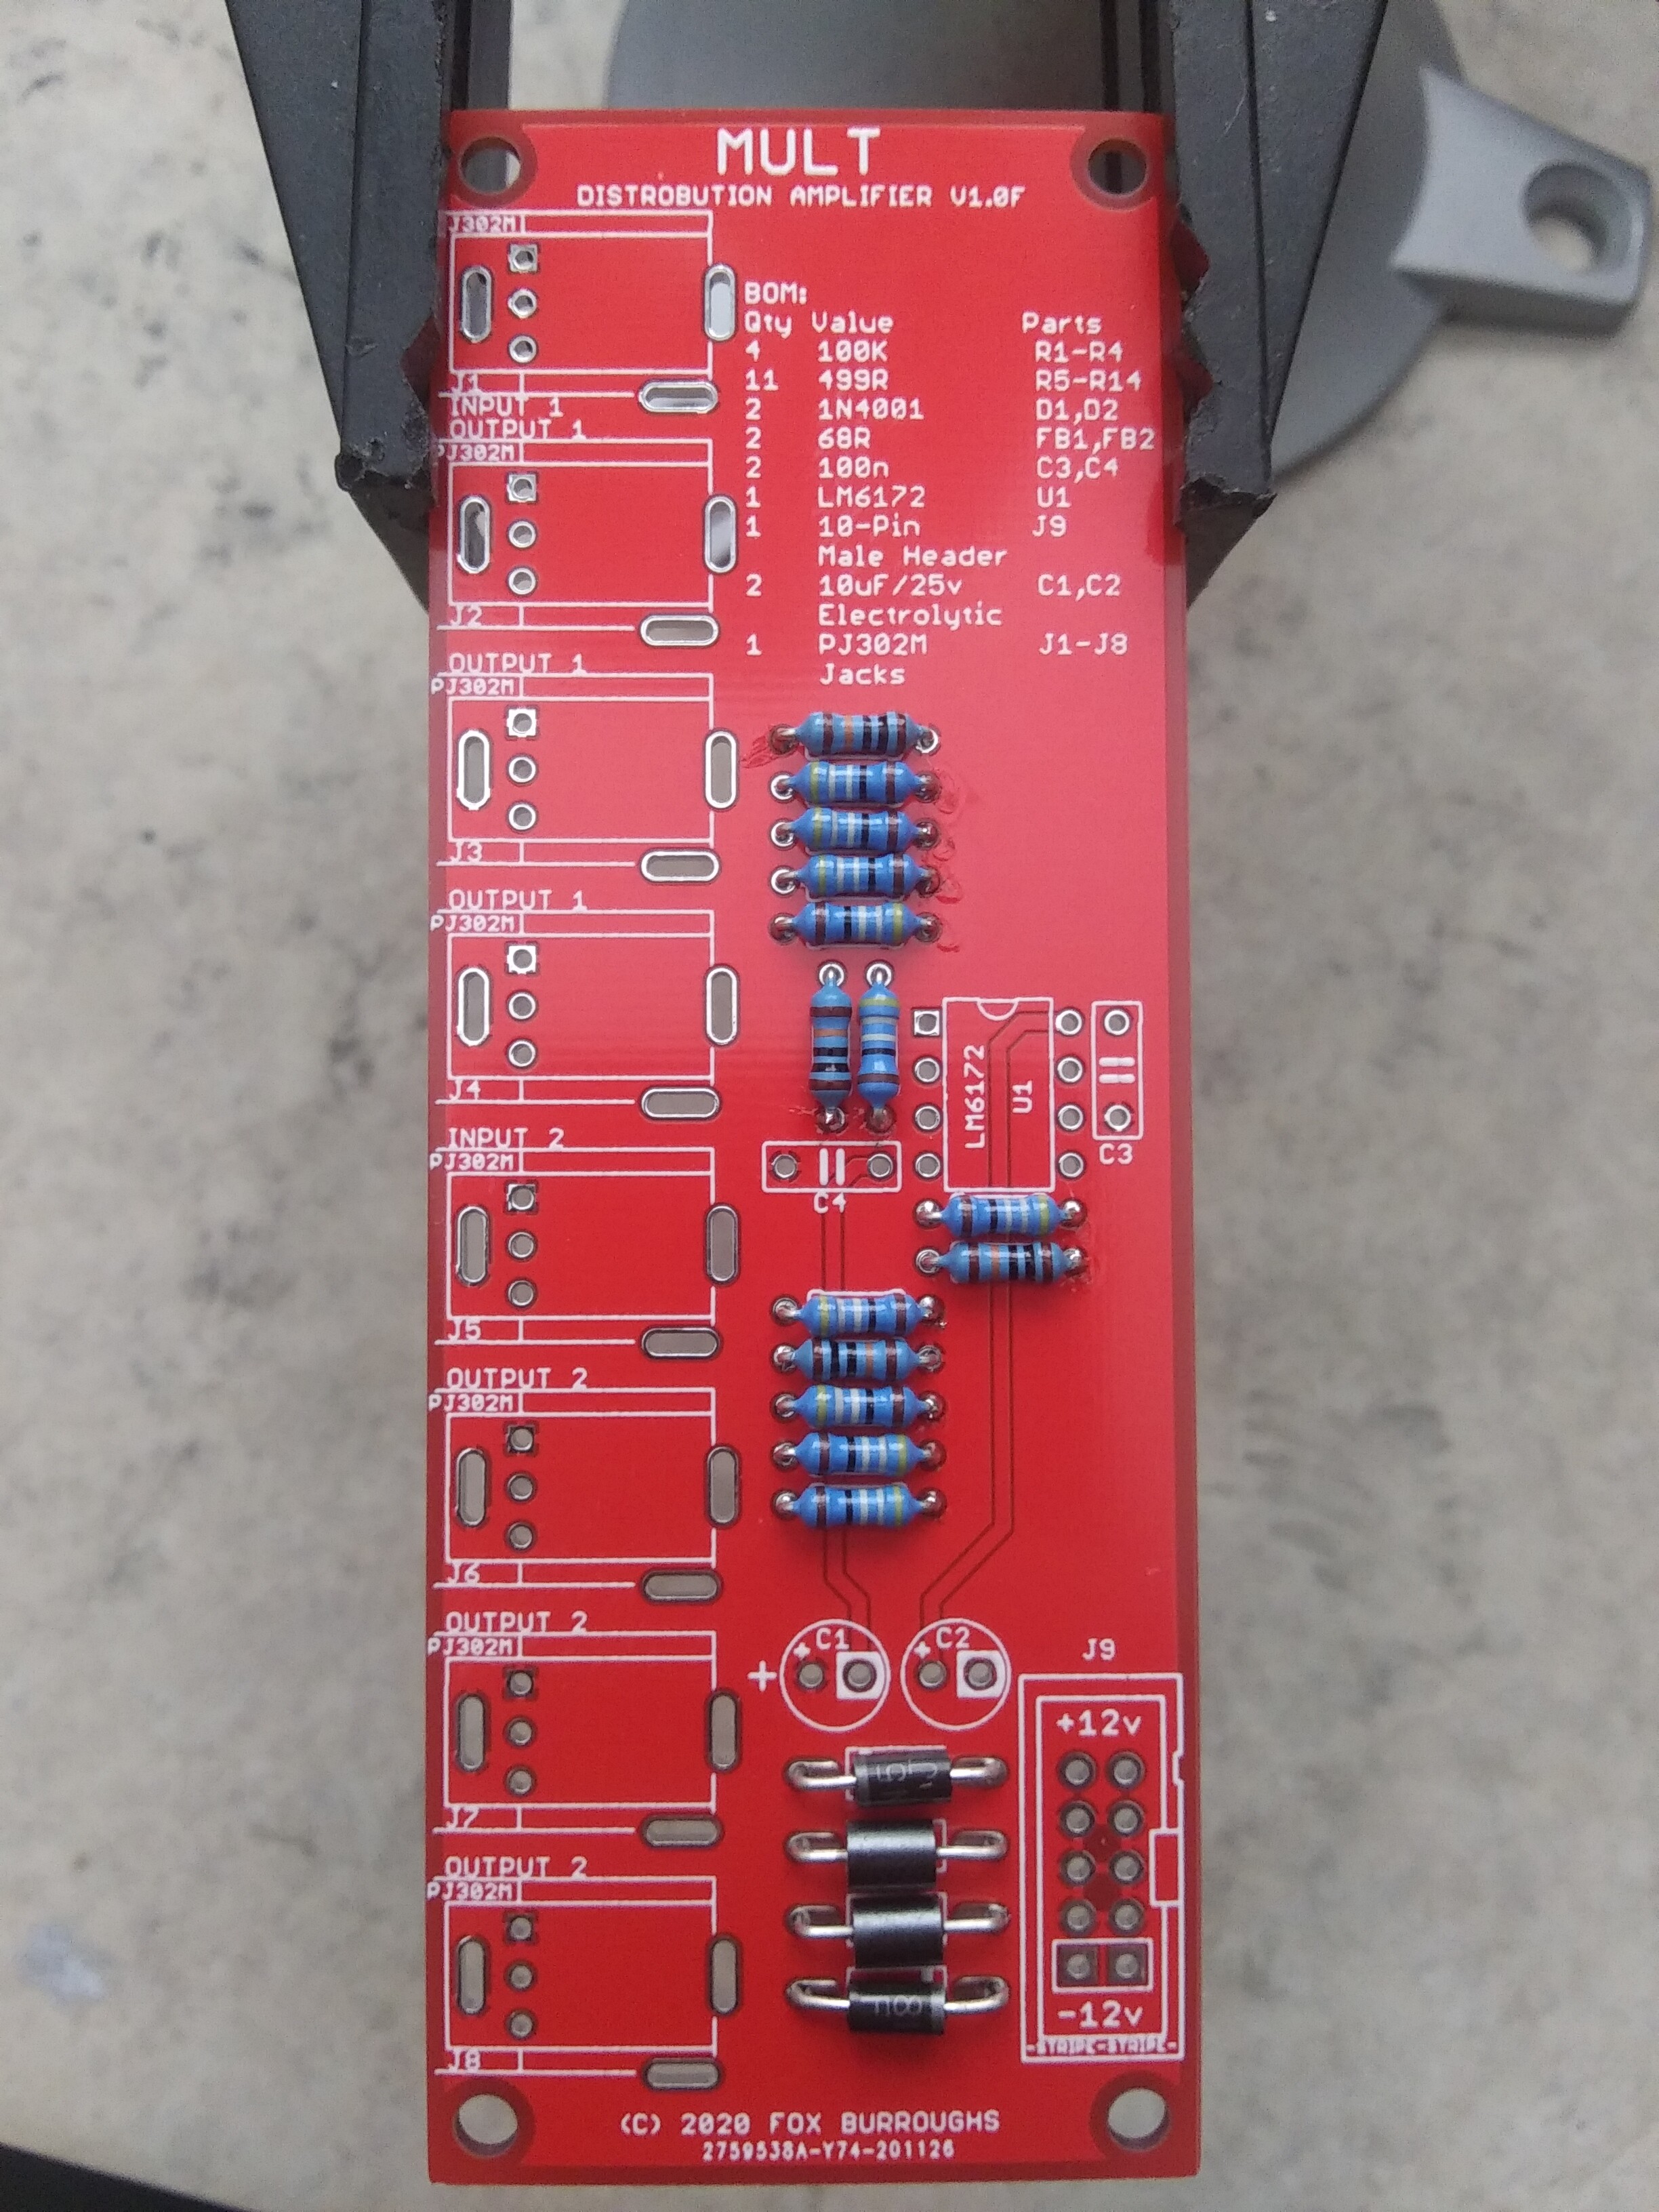
Step 3: caps
C3, C4: 100nF (MMLC or film box)
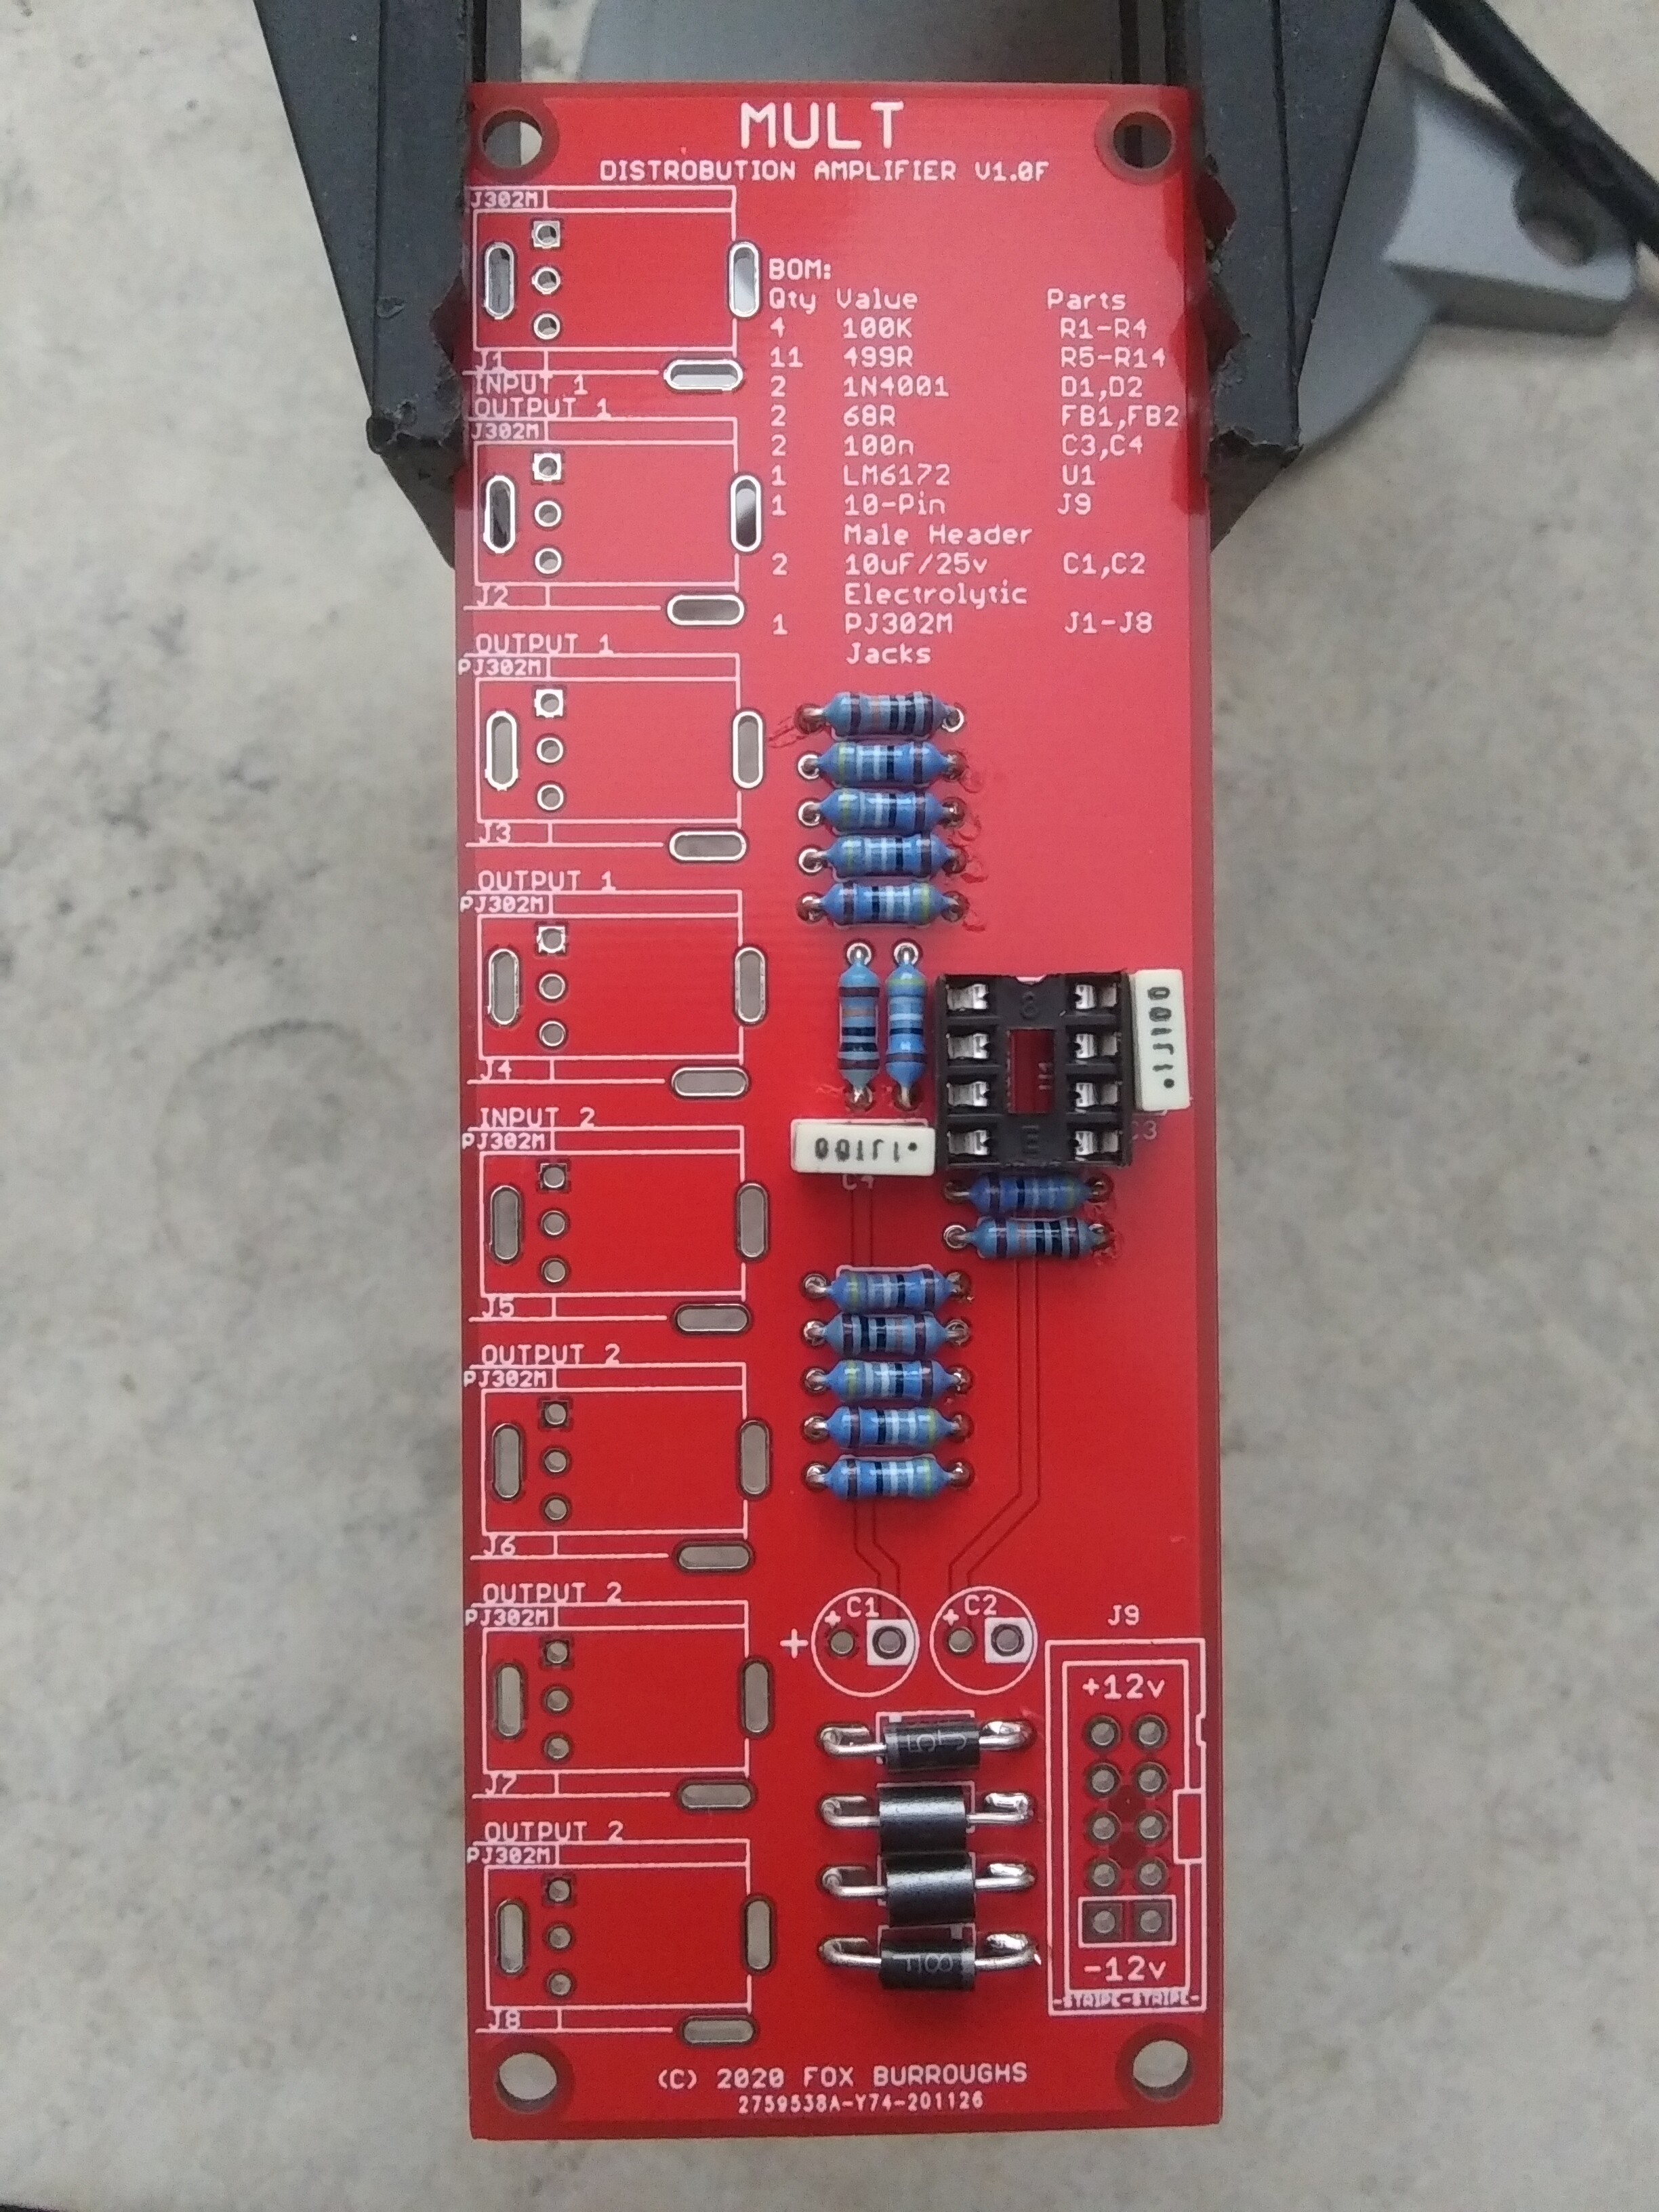
Optional: 8-pin DIL socket
Step 4: Electrolytic caps, power connector
C1, C2: 10uF 25v Electrolytic Capacitors
J9: 2x5 pin male header (or shrouded connector
Pay attention to the polarity. The stripe points to the negative pin.
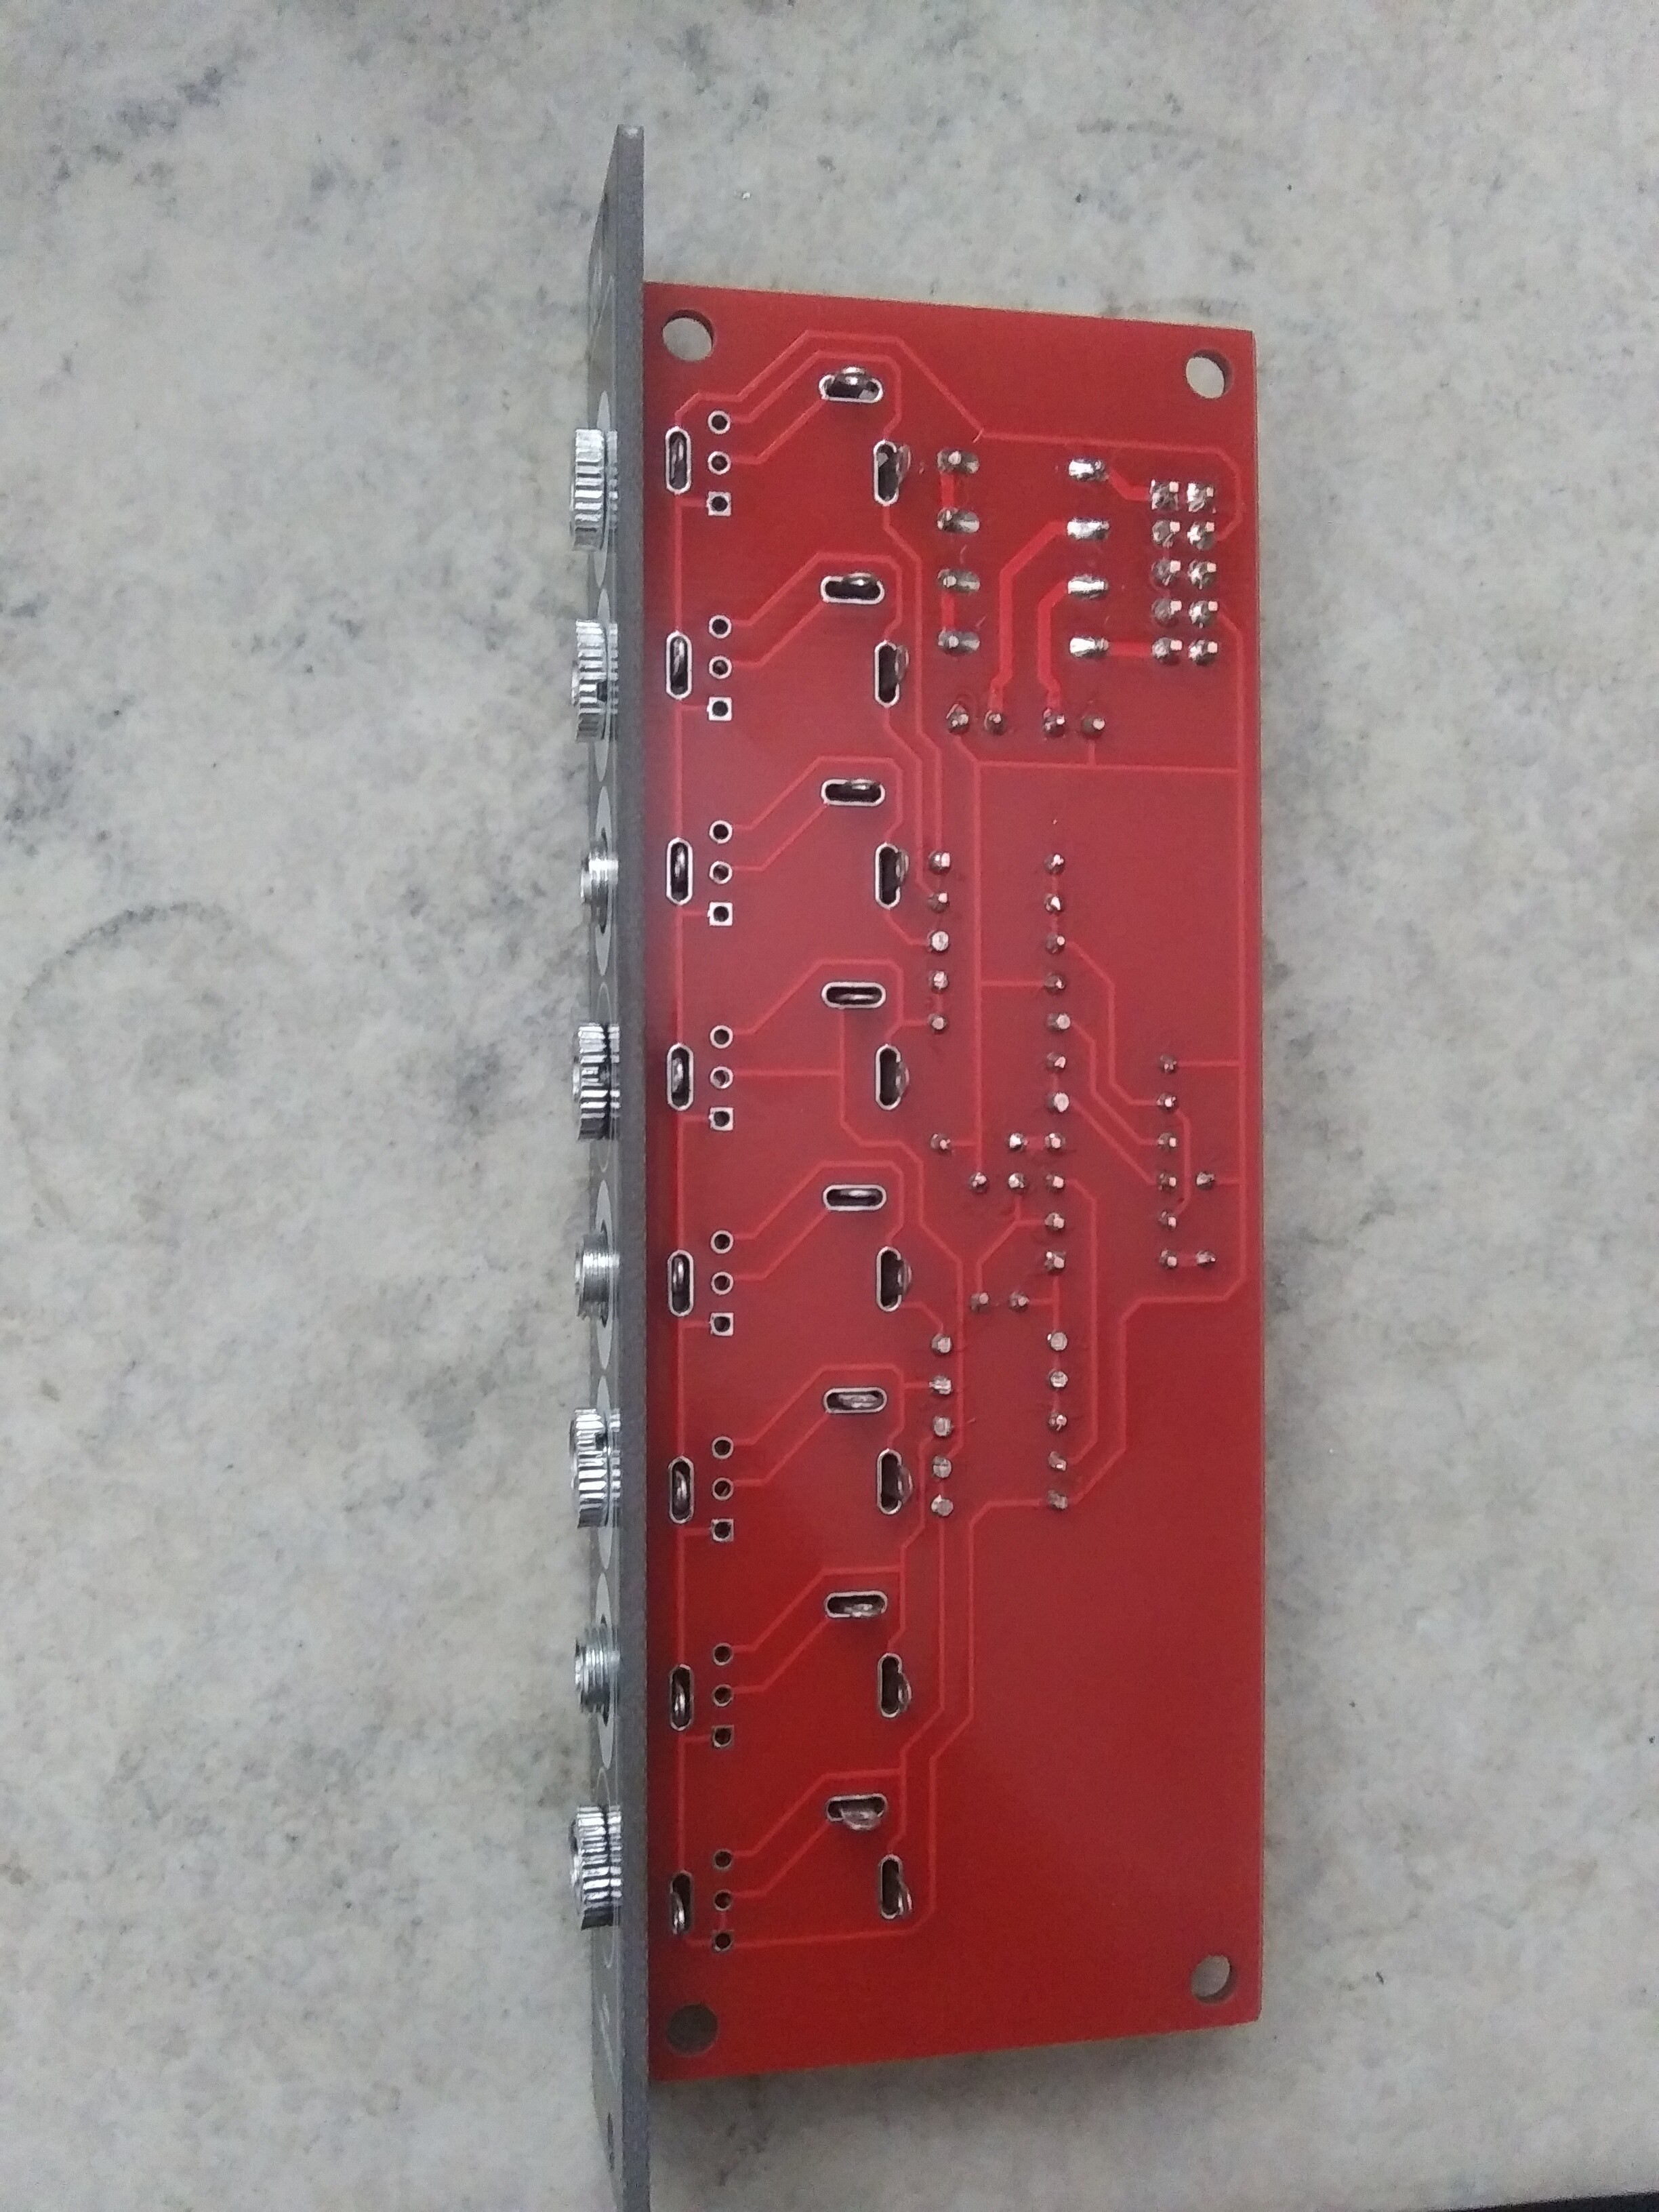
Step 5: jacks
Place jacks in circuit board. Do not solder.
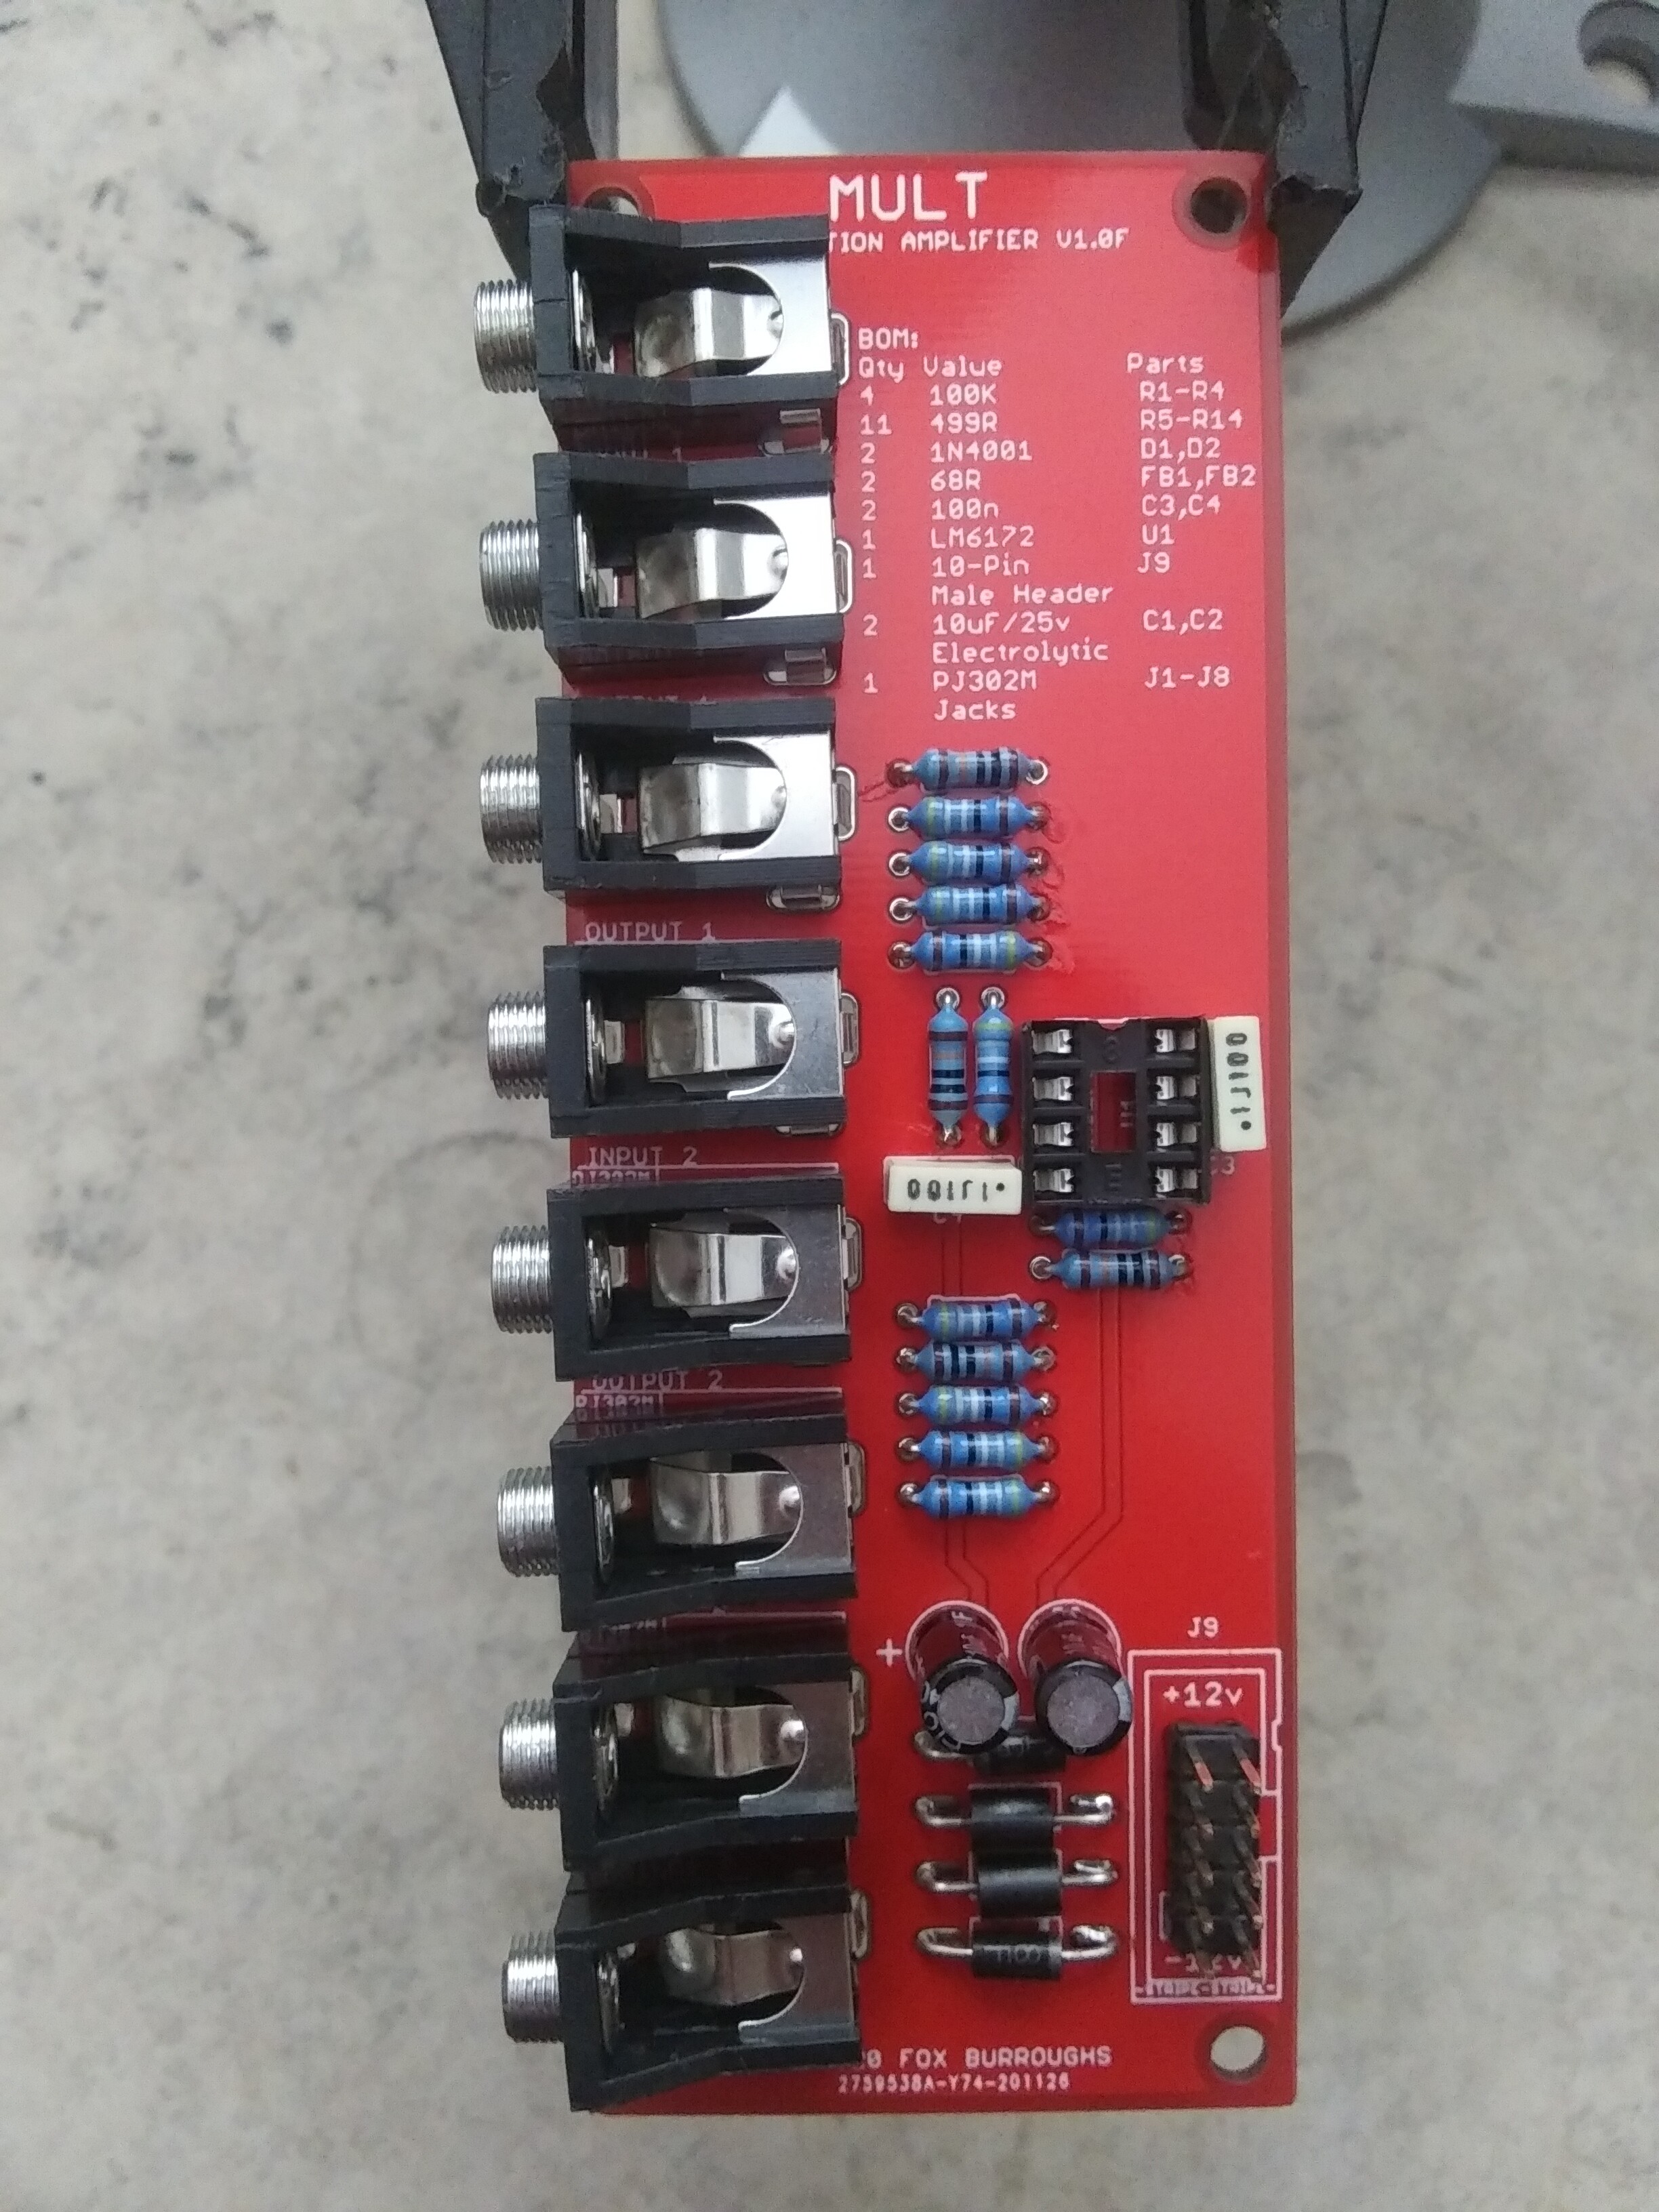
Step 6: faceplate
Line up faceplate and add nuts to jacks. Finger tighten and once the jacks are straight, solder jacks.
Tighten nuts fully,
Step 7: IC
U1: LM6172
May optionally be soldered directly or inserted in socket.
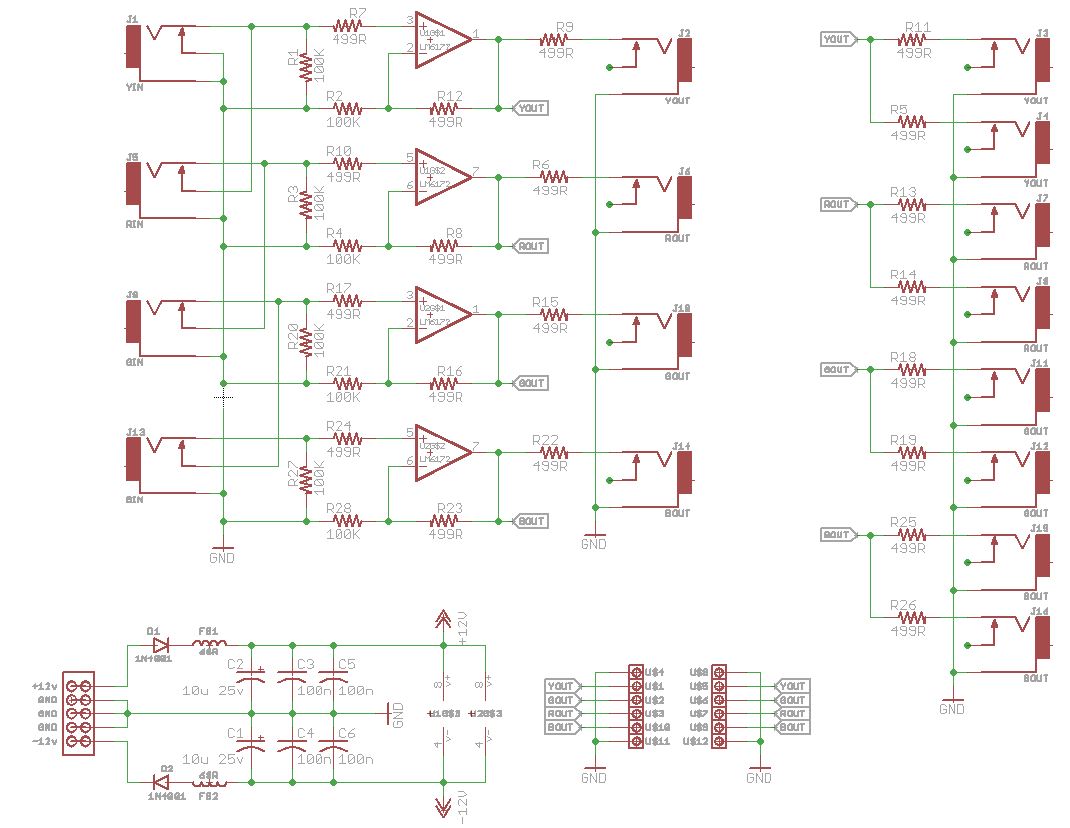
Expand for Schematics
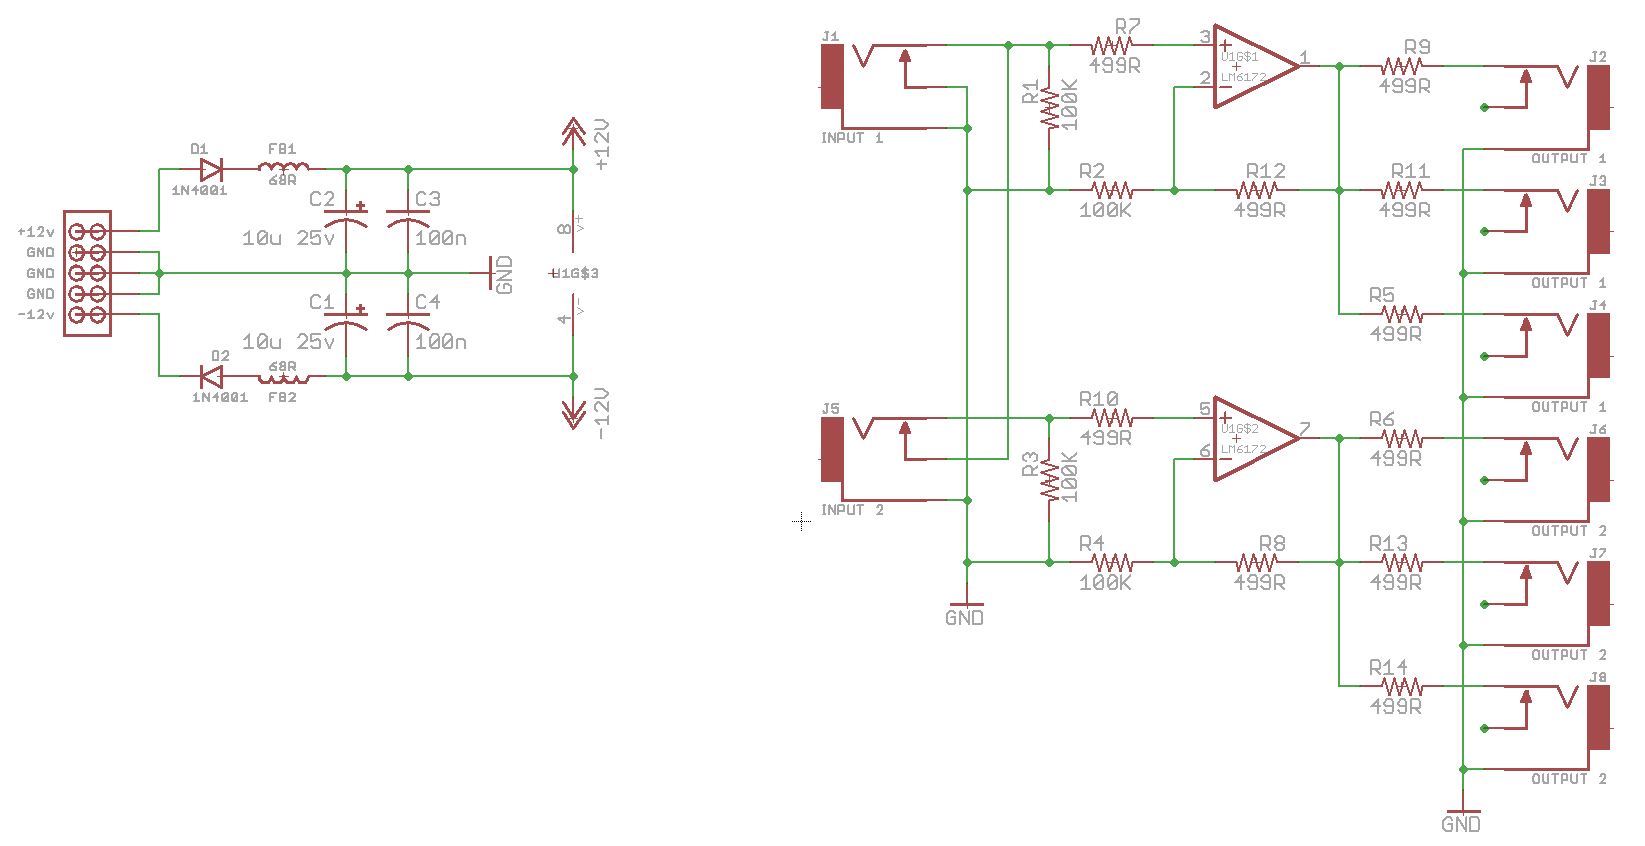
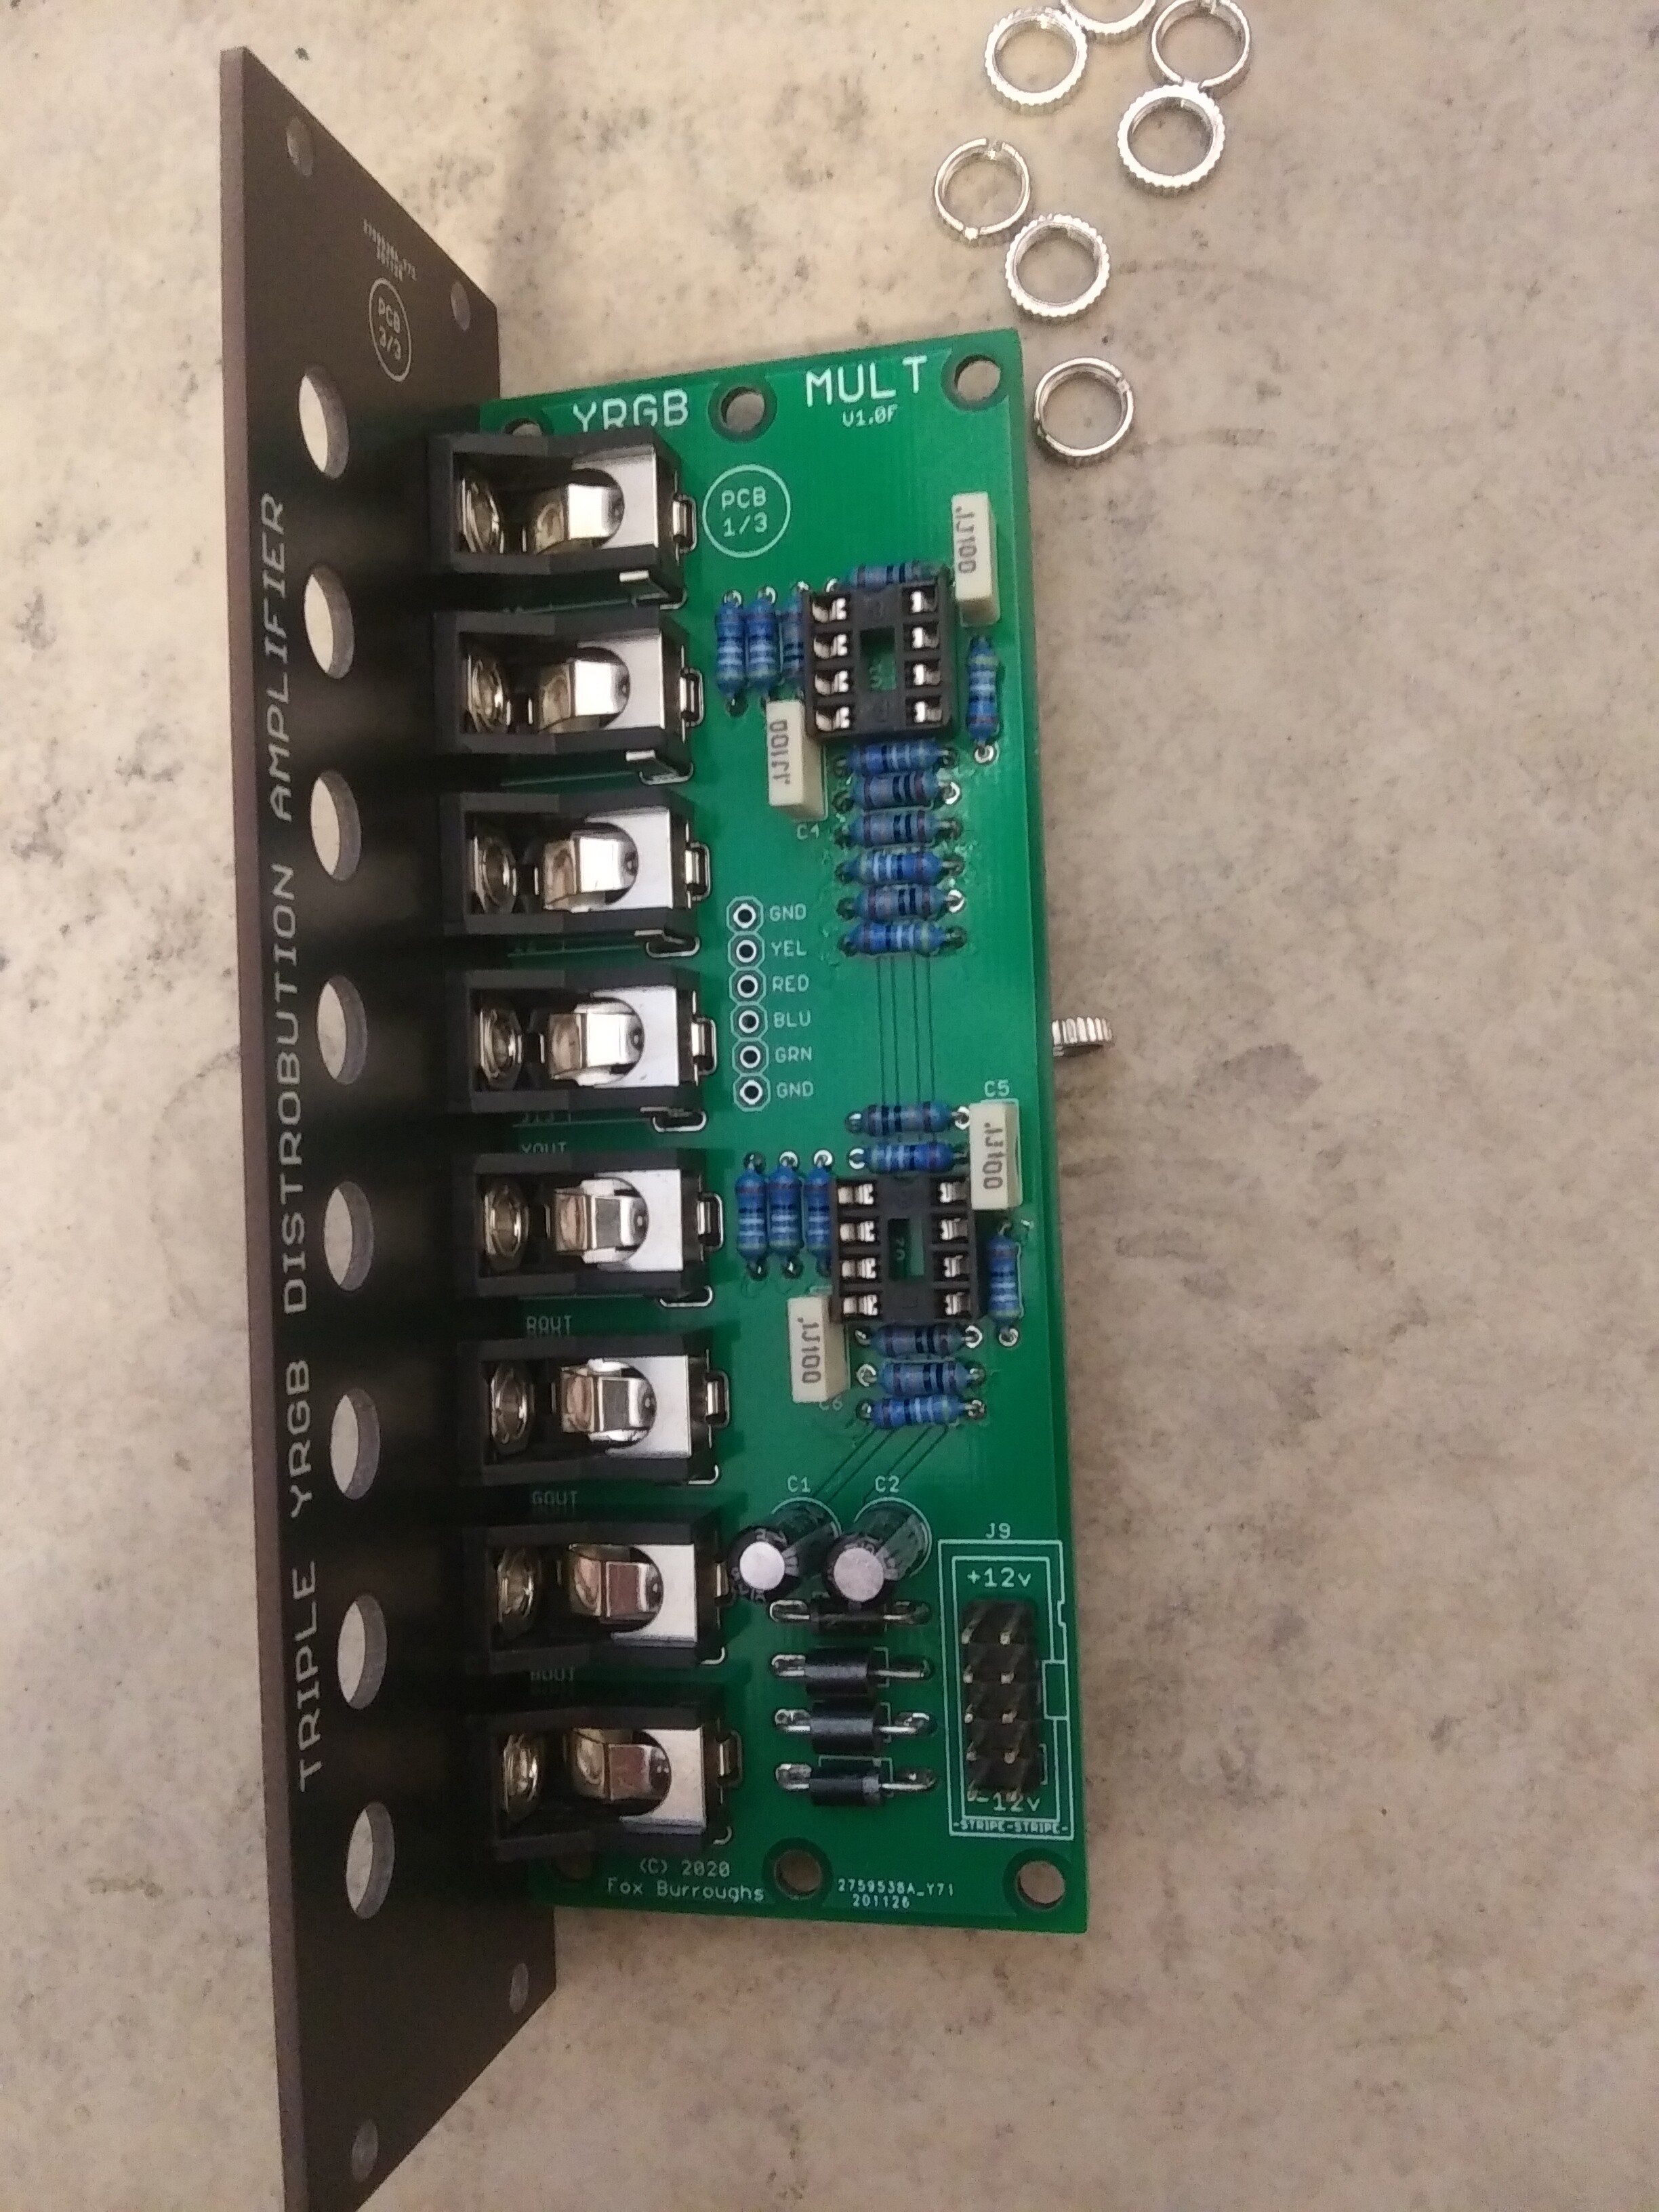
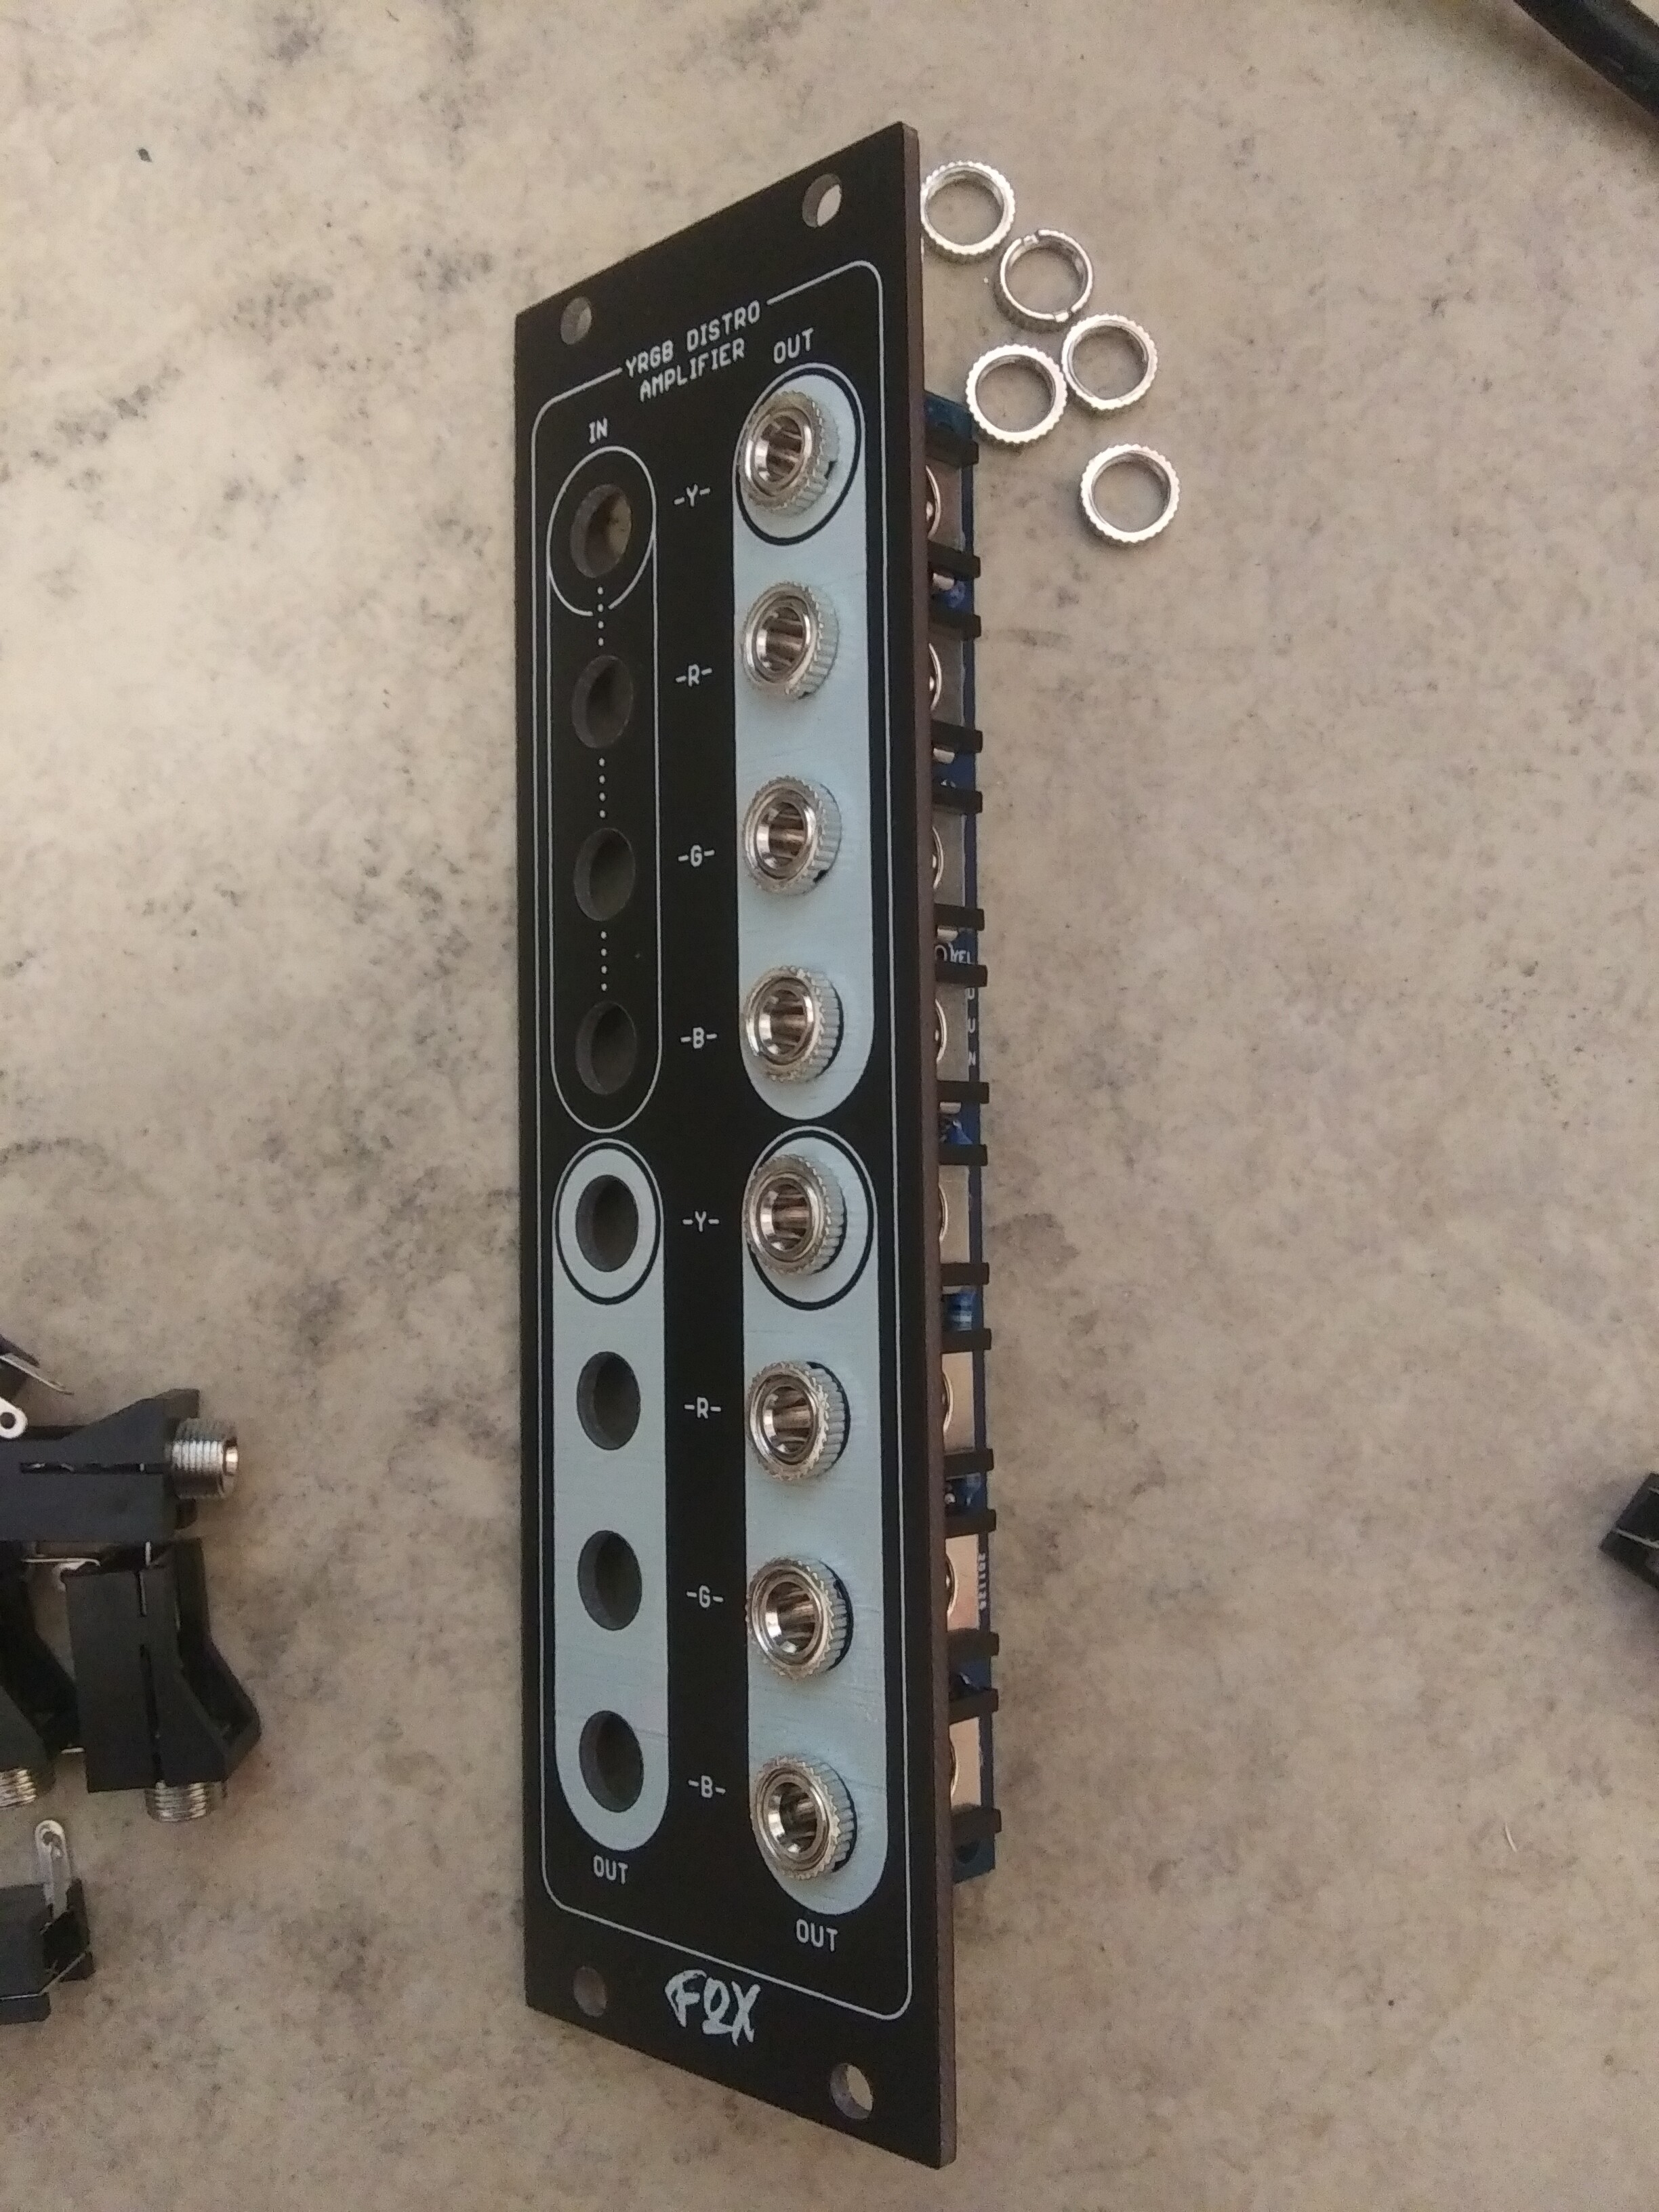
#3 — Fox · 2020-12-08
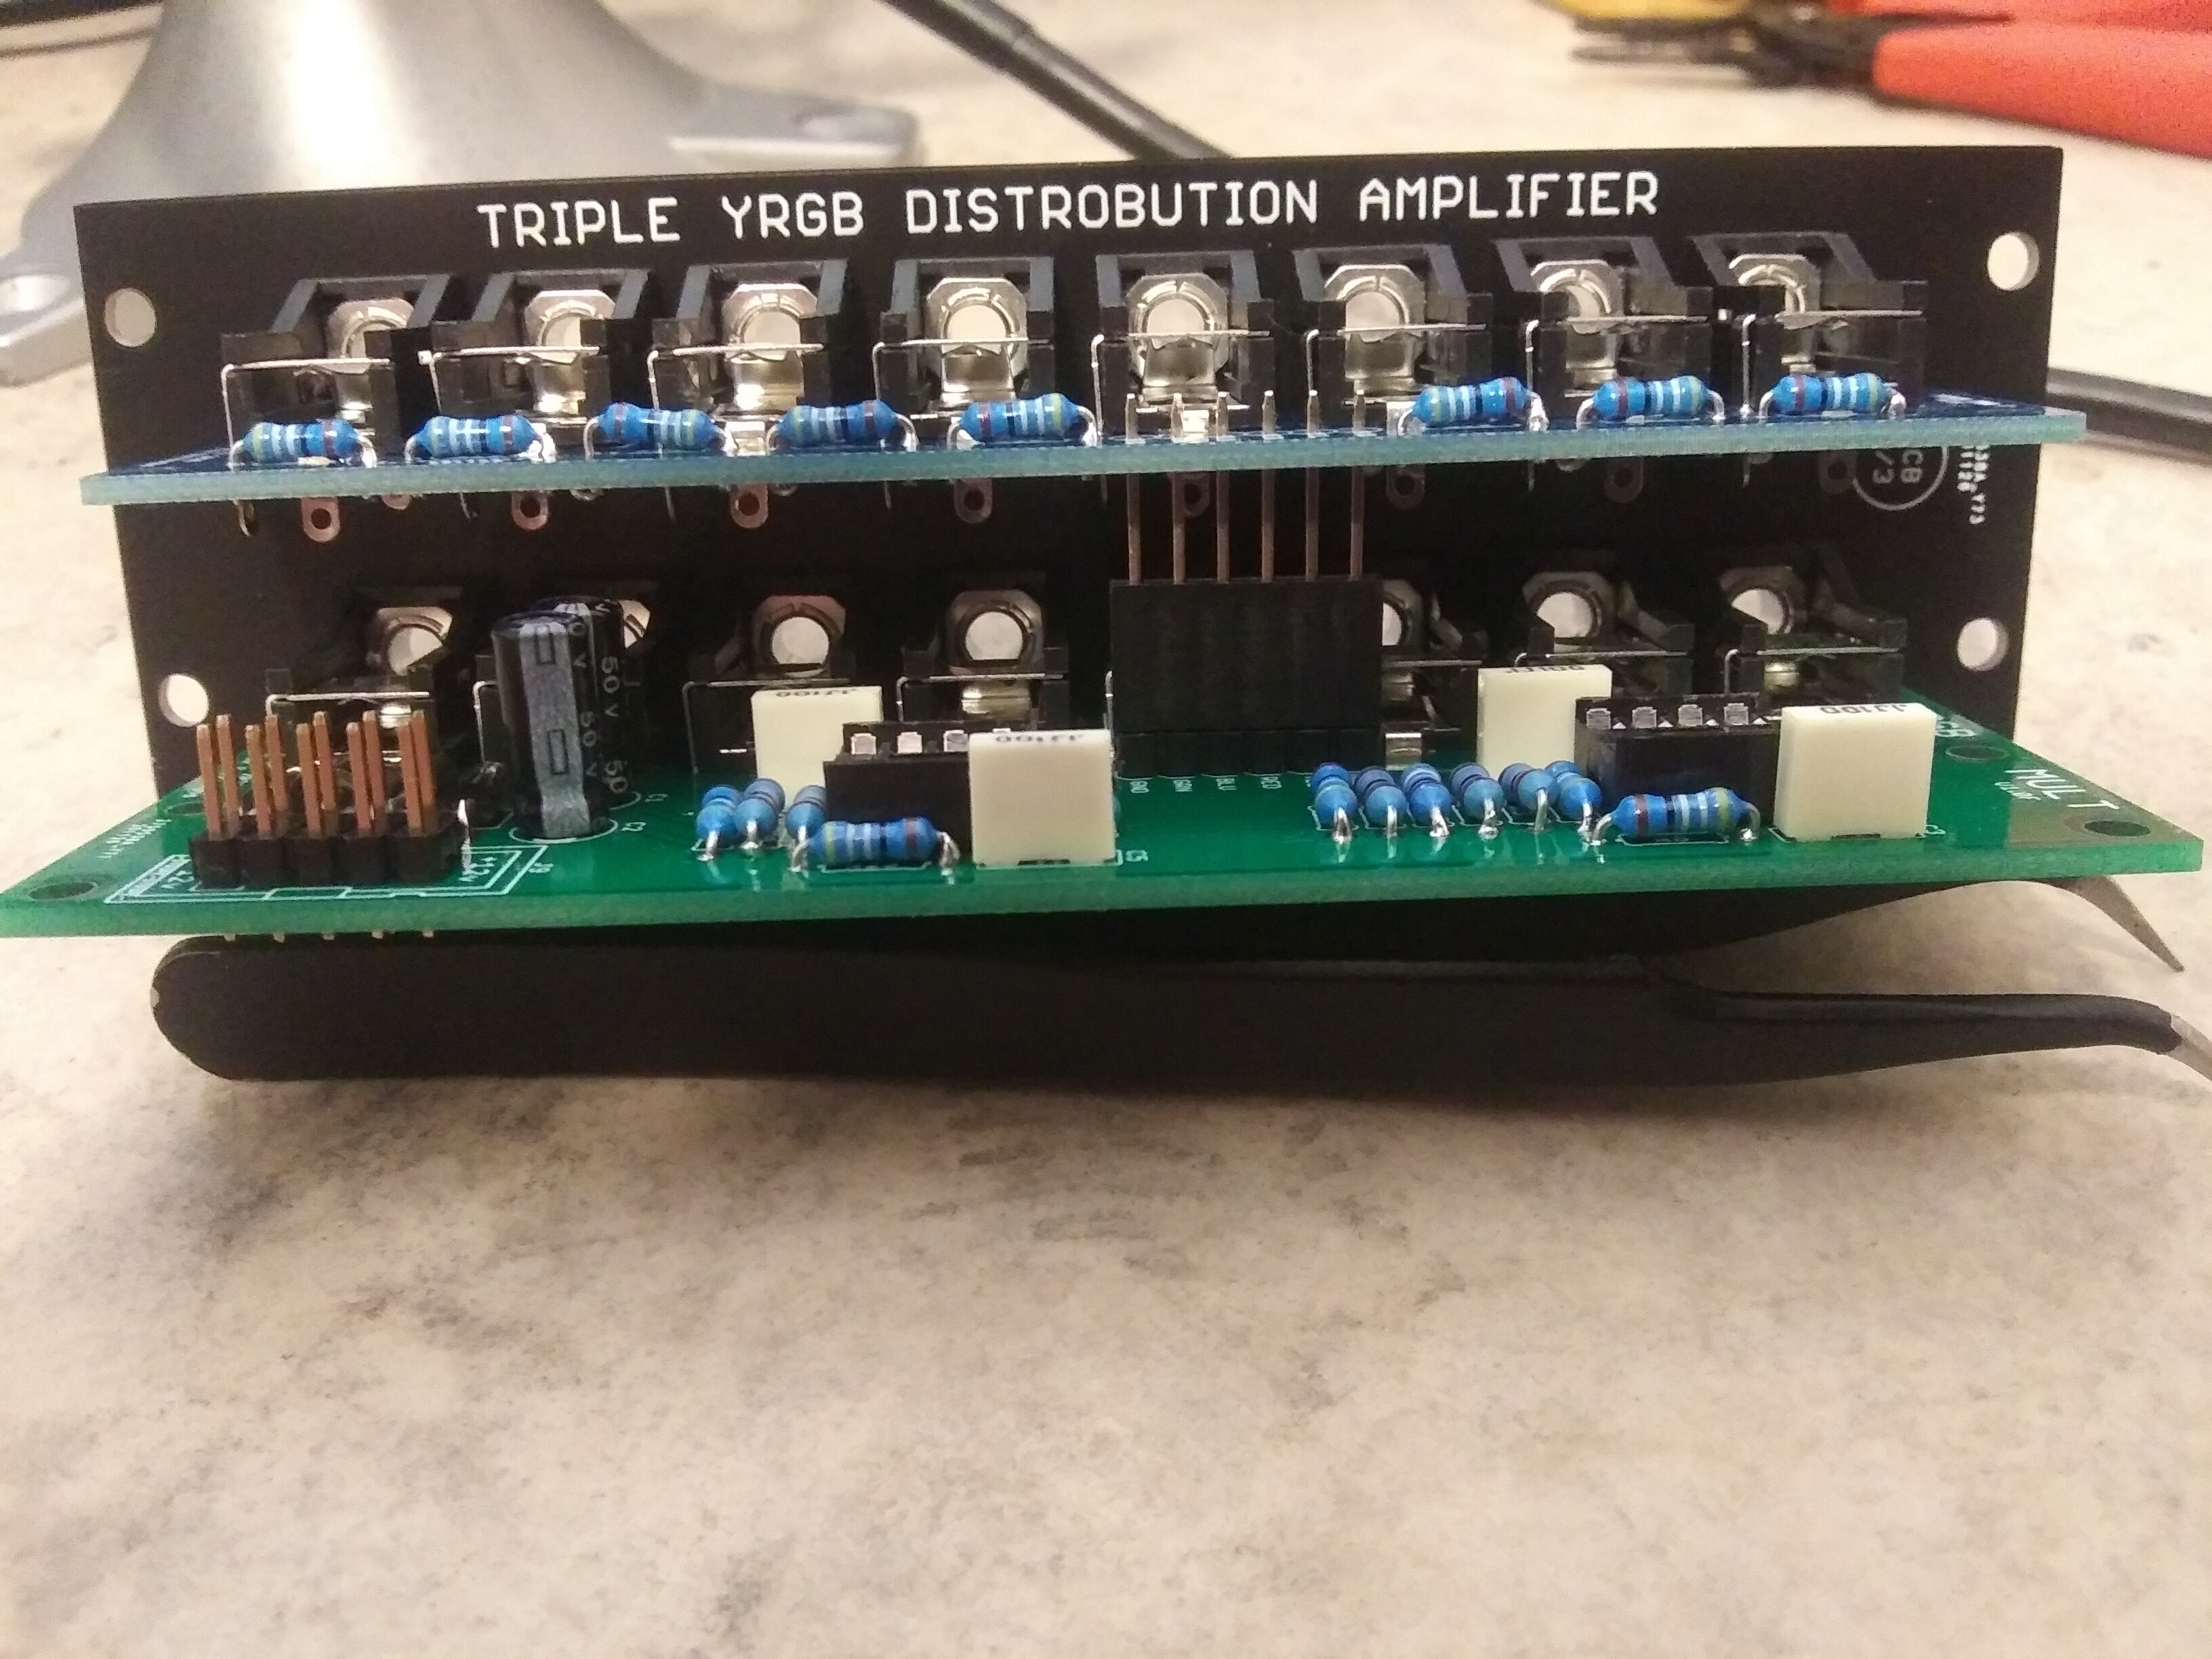
Triple YRGB Distribution Amplifier
BOM, Build guide and Schematics
Expand for BOMQtyValueParts8100K resistorR1 - R4, R20, R21, R27, R2820499R resistorR5 - R19, R22 - R264100n capacitorC3, C4, C5, C621N4001 diodeD1, D2268R ferrite beadFB1, FB22LM6172 op ampU1, U212x5 (10-Pin) male headerCONN1210uF 25v electrolytic capacitorC1, C216PJ302M jacksJ1 - J1616-pin female stackable headermisc16-pin male pin headermisc
Expand for Build GuidePCB 1:
Populate shortest parts first.
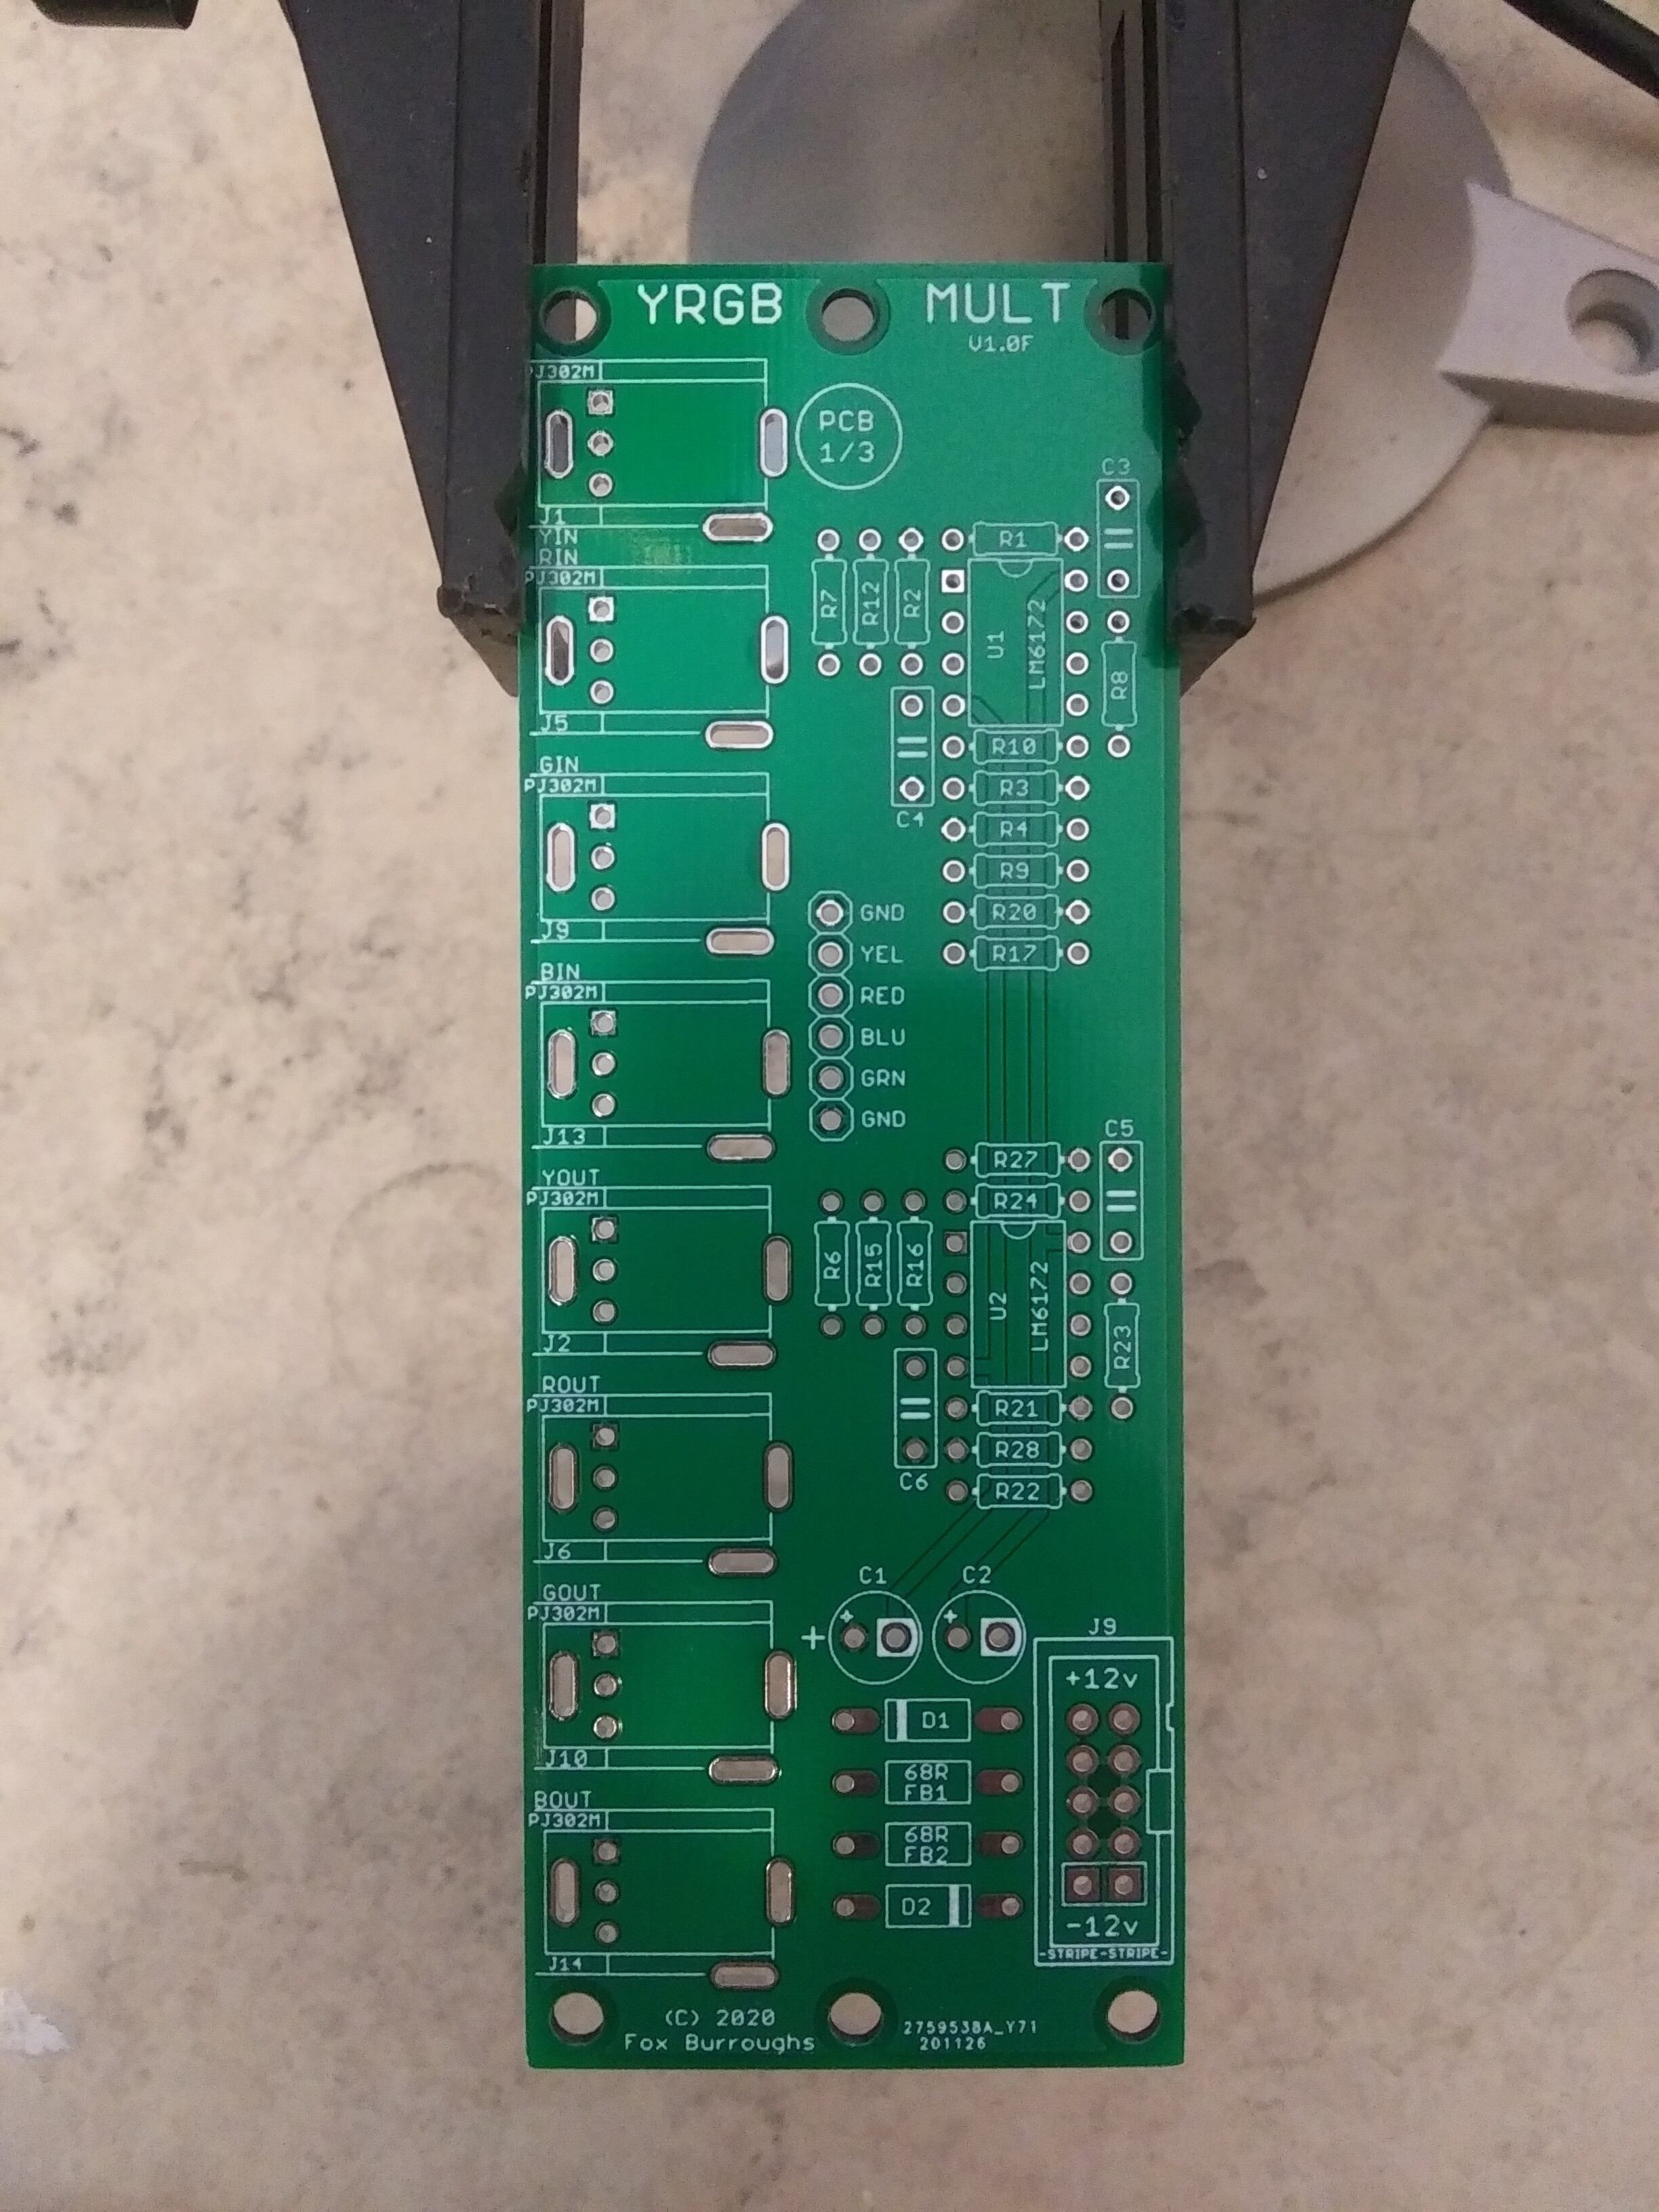
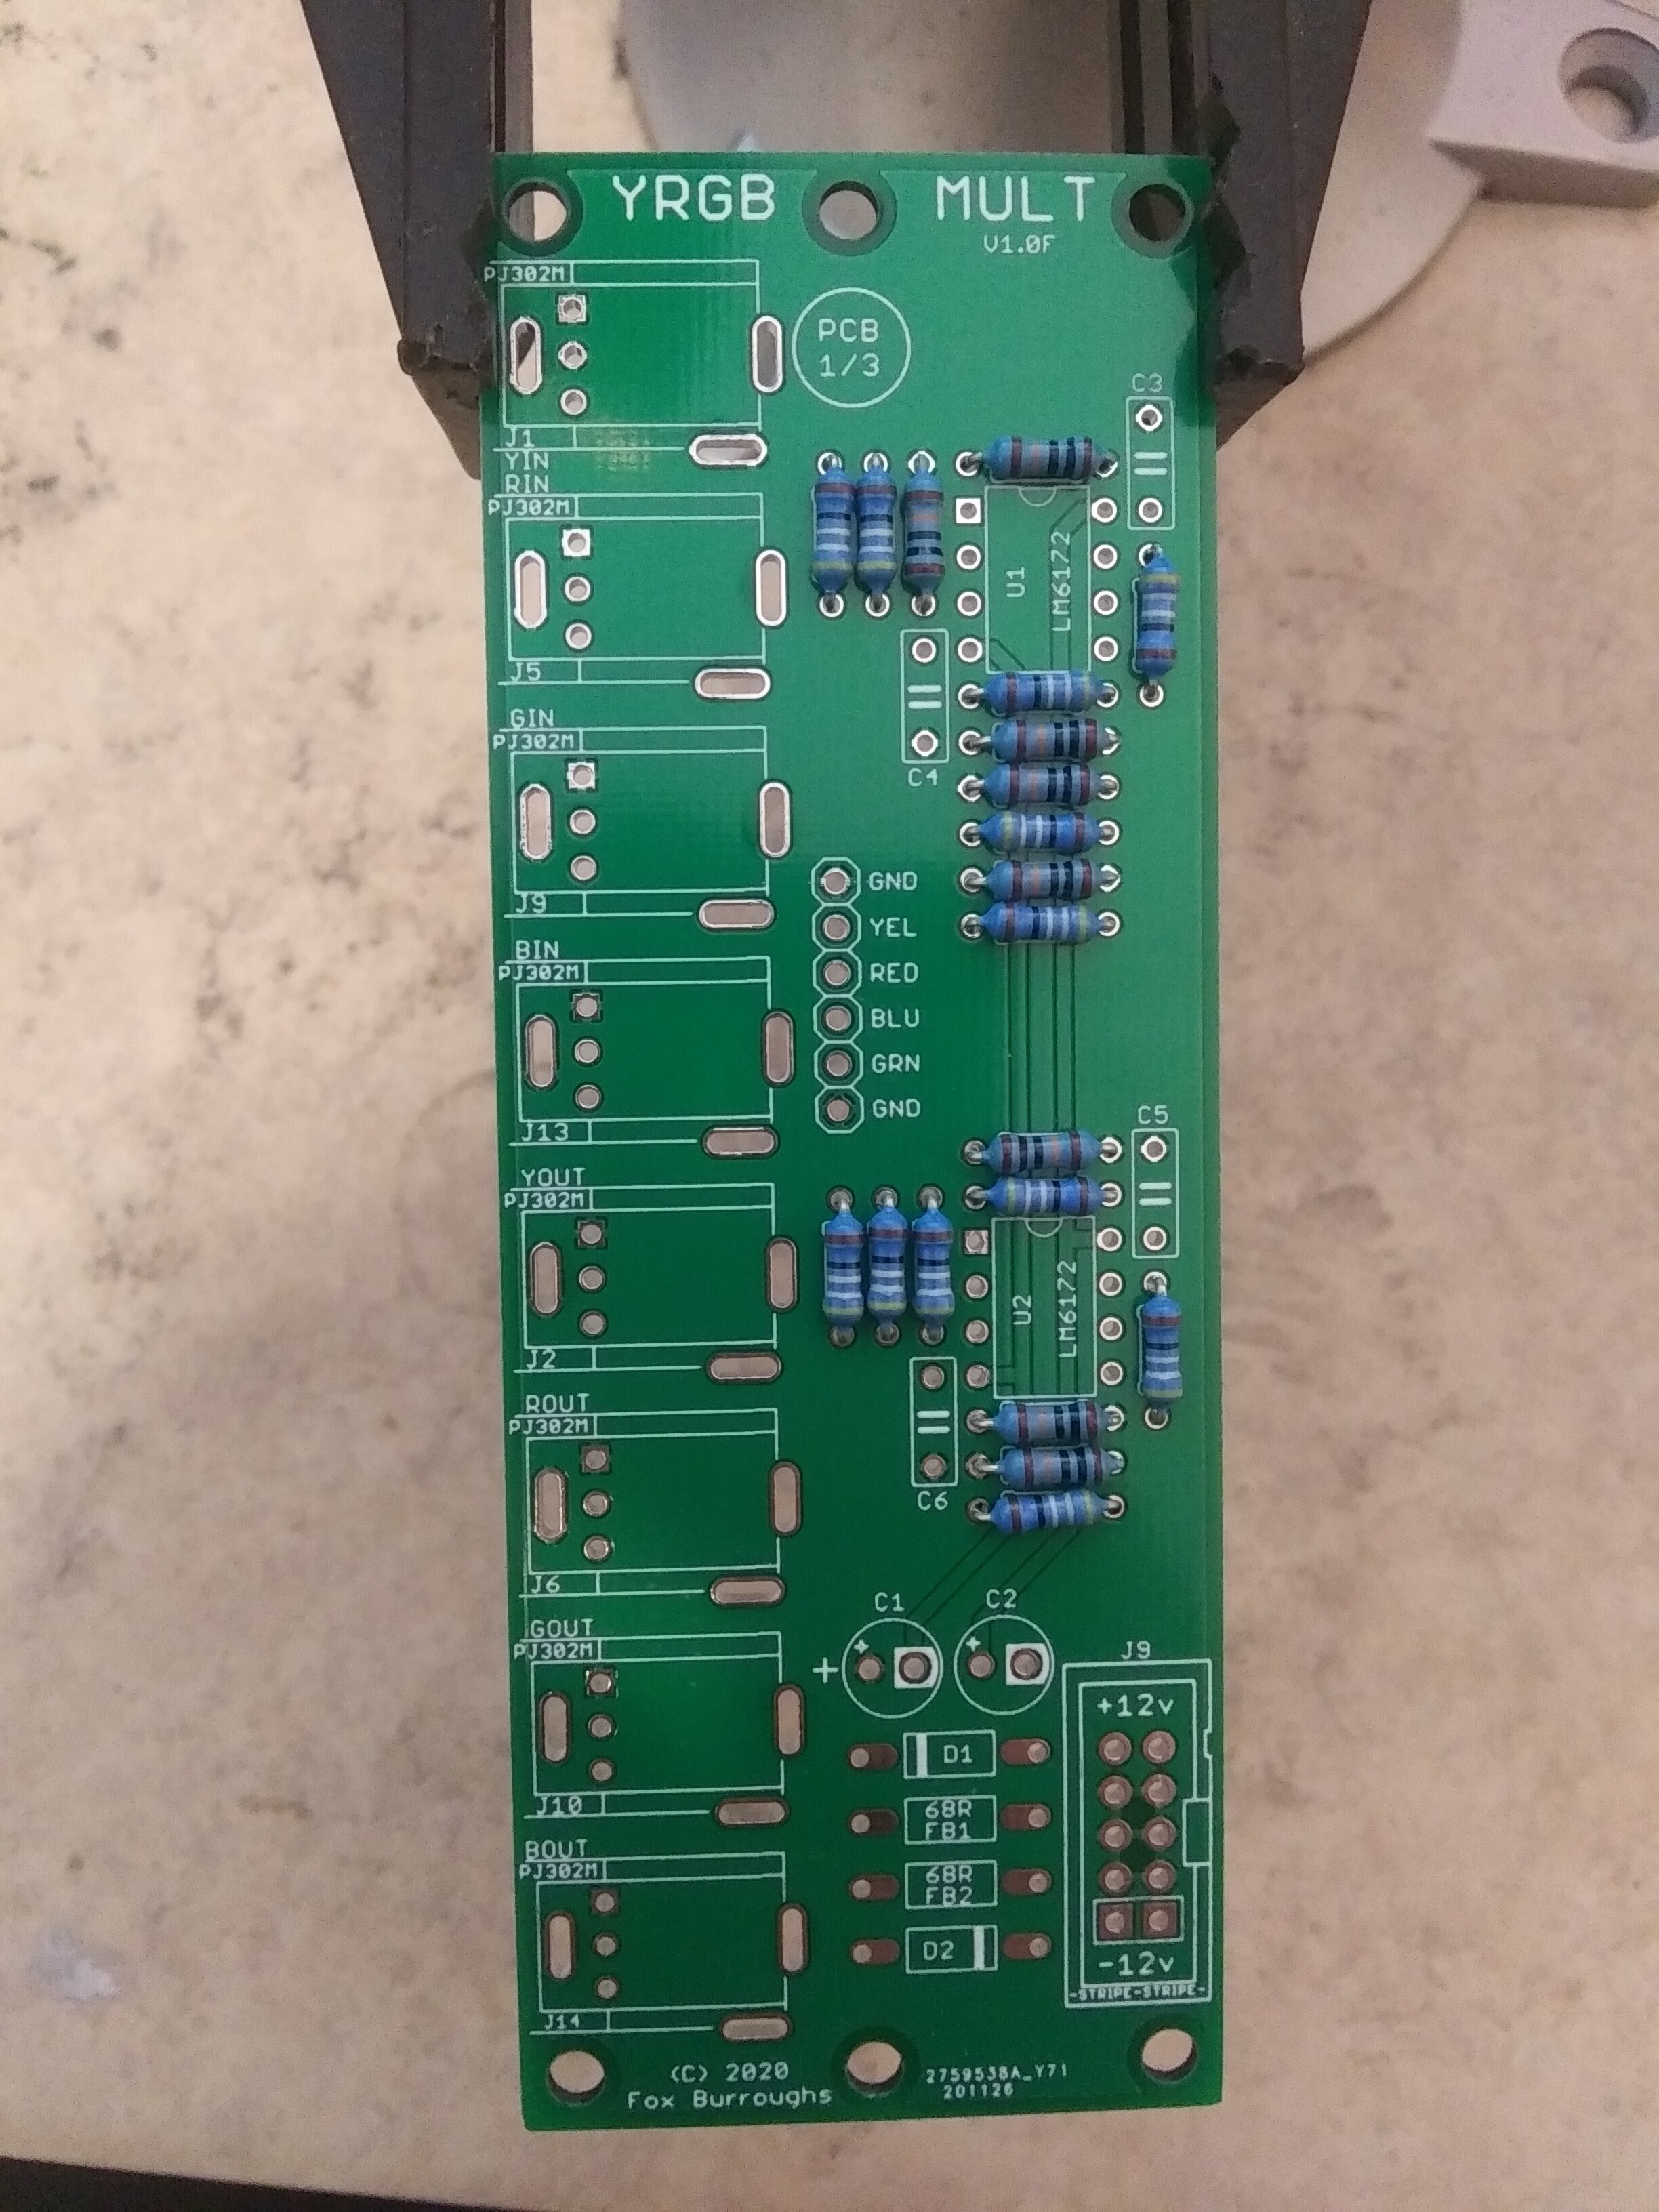
Step 1: 100k Resistors
R1-R4, R20, R21, R27, R28: 100k

Step 2: 499R Resistors
R5 - R19, R22 - R26: 499R
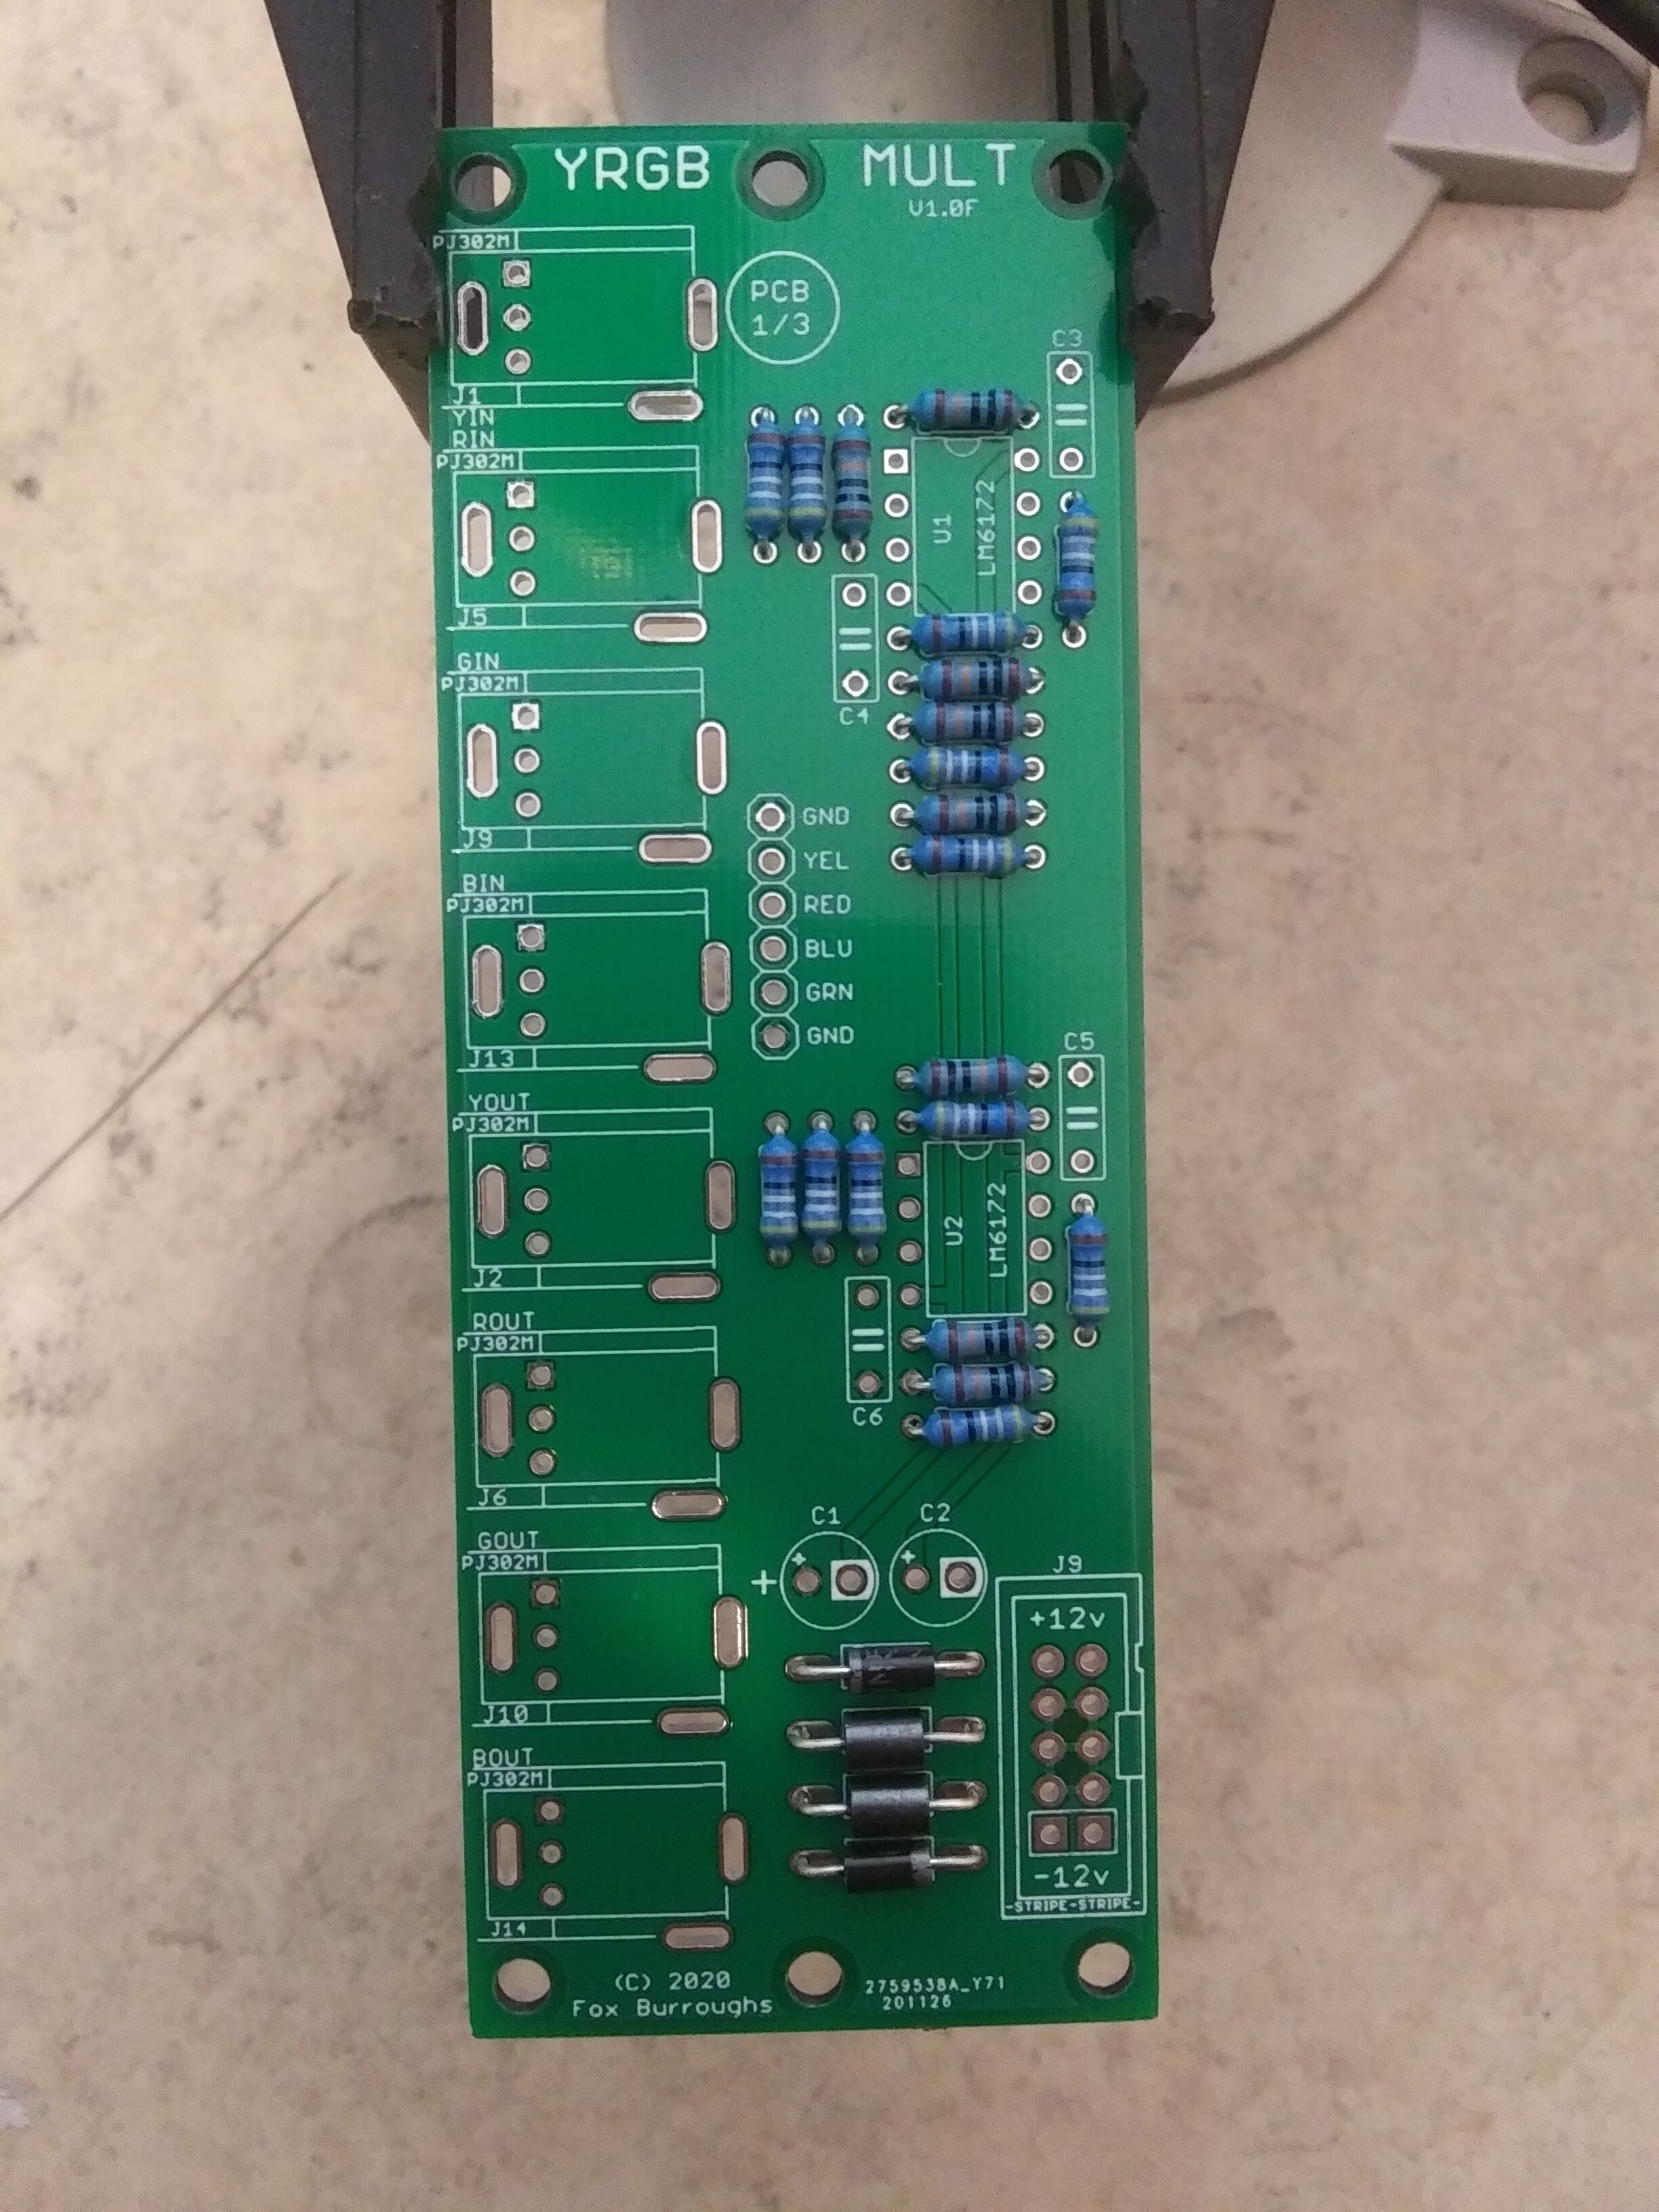
Step 3: beads, diodes
FB1, FB2: 68 Ohm @ 100MHz
D1, D2: 1N4001 (alternate 1N5819)
Step 4: sockets
optional: 2x 8-pin DIL sockets
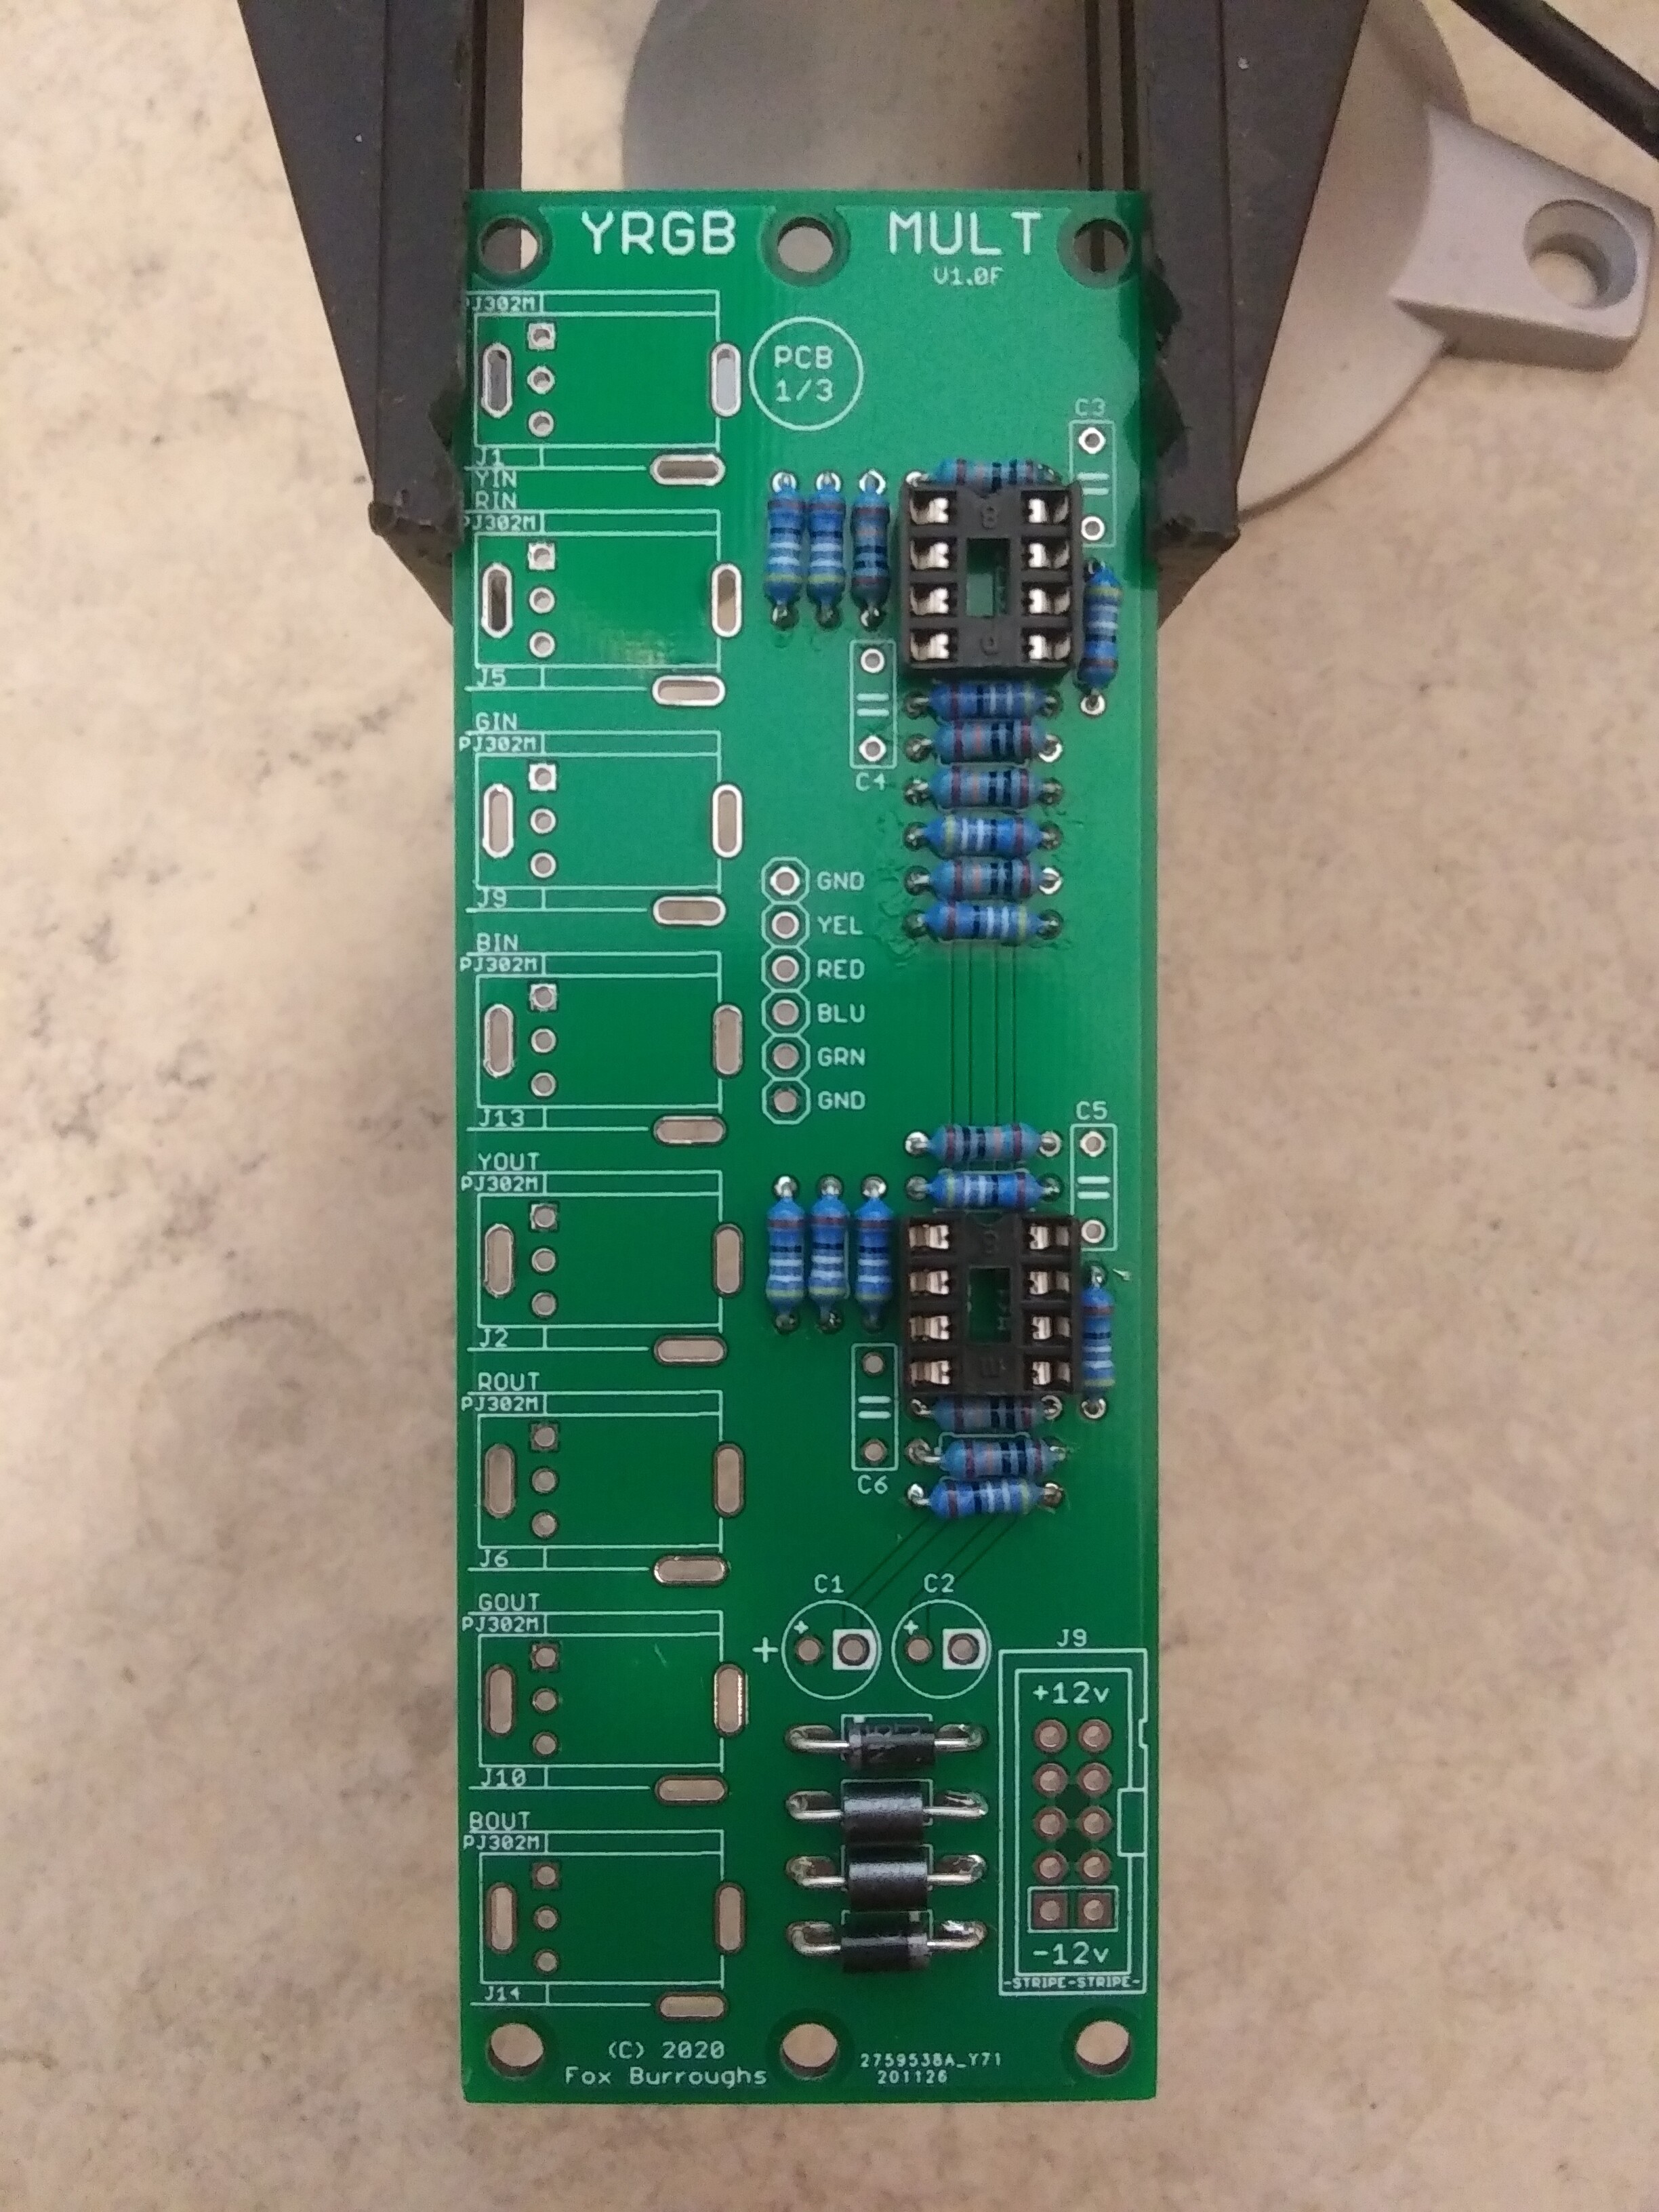
Step 5: capacitors
C3 - C6: 100nF (ceramic, MMLC or film type)
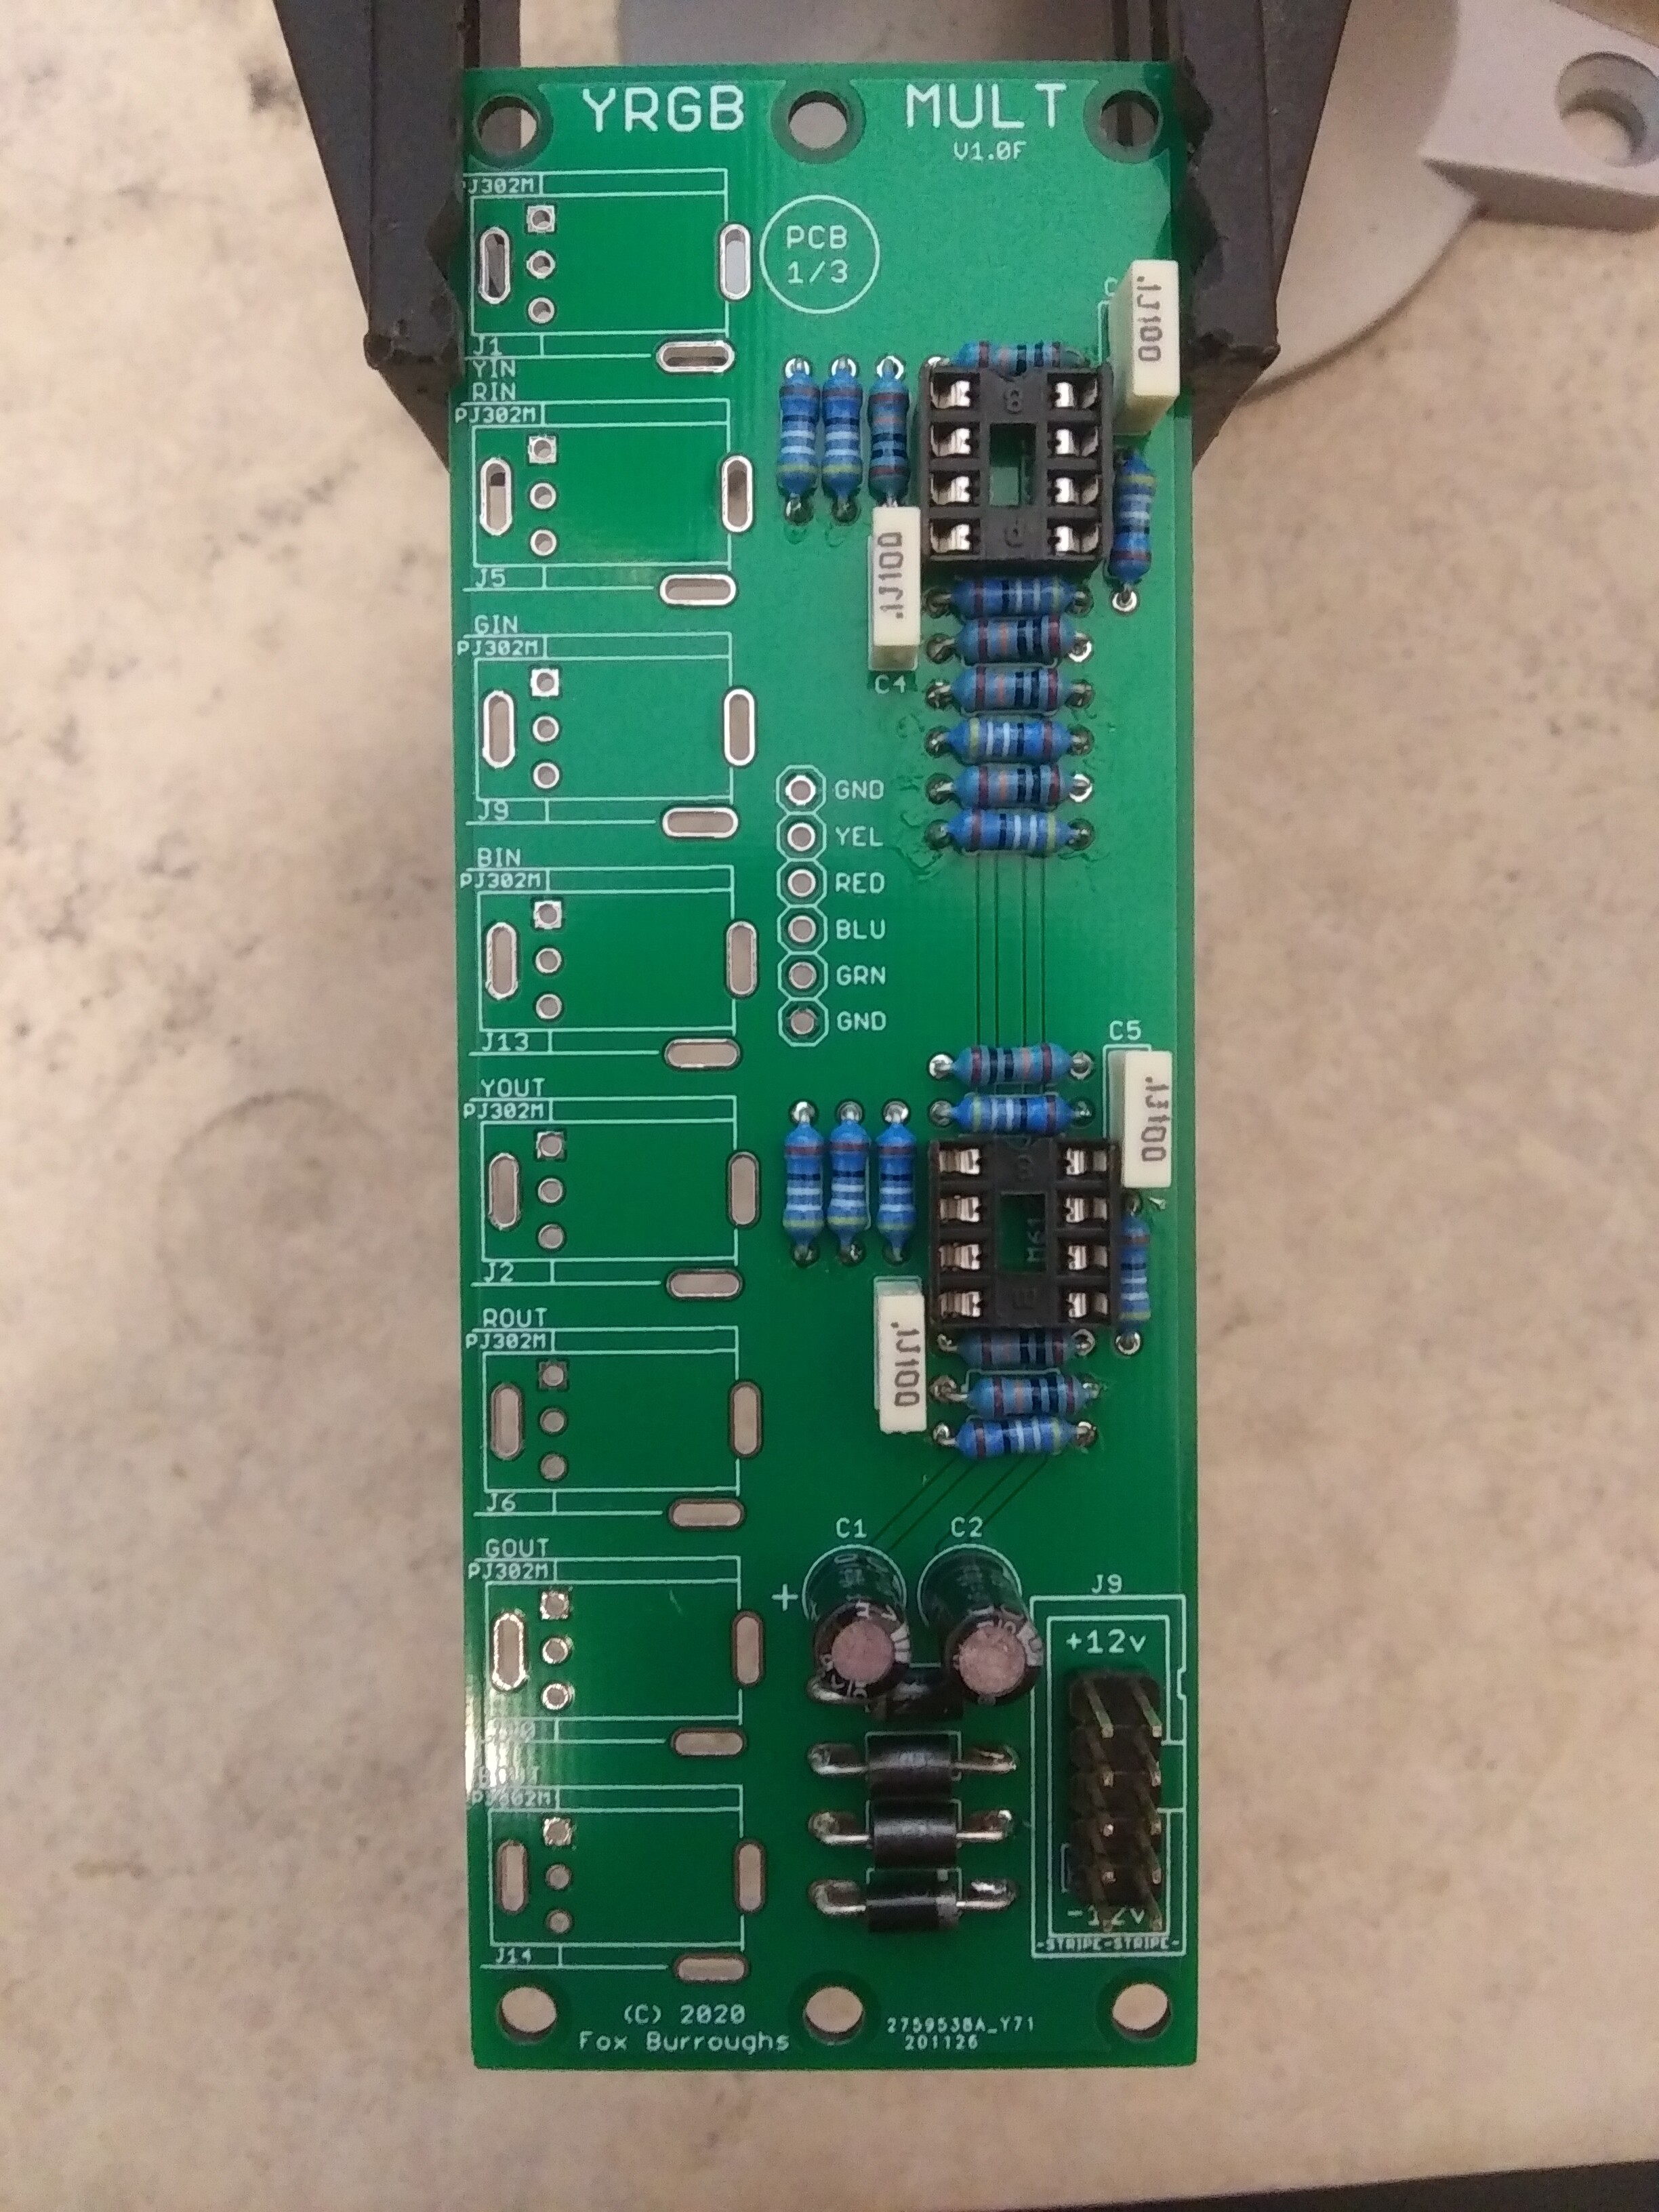
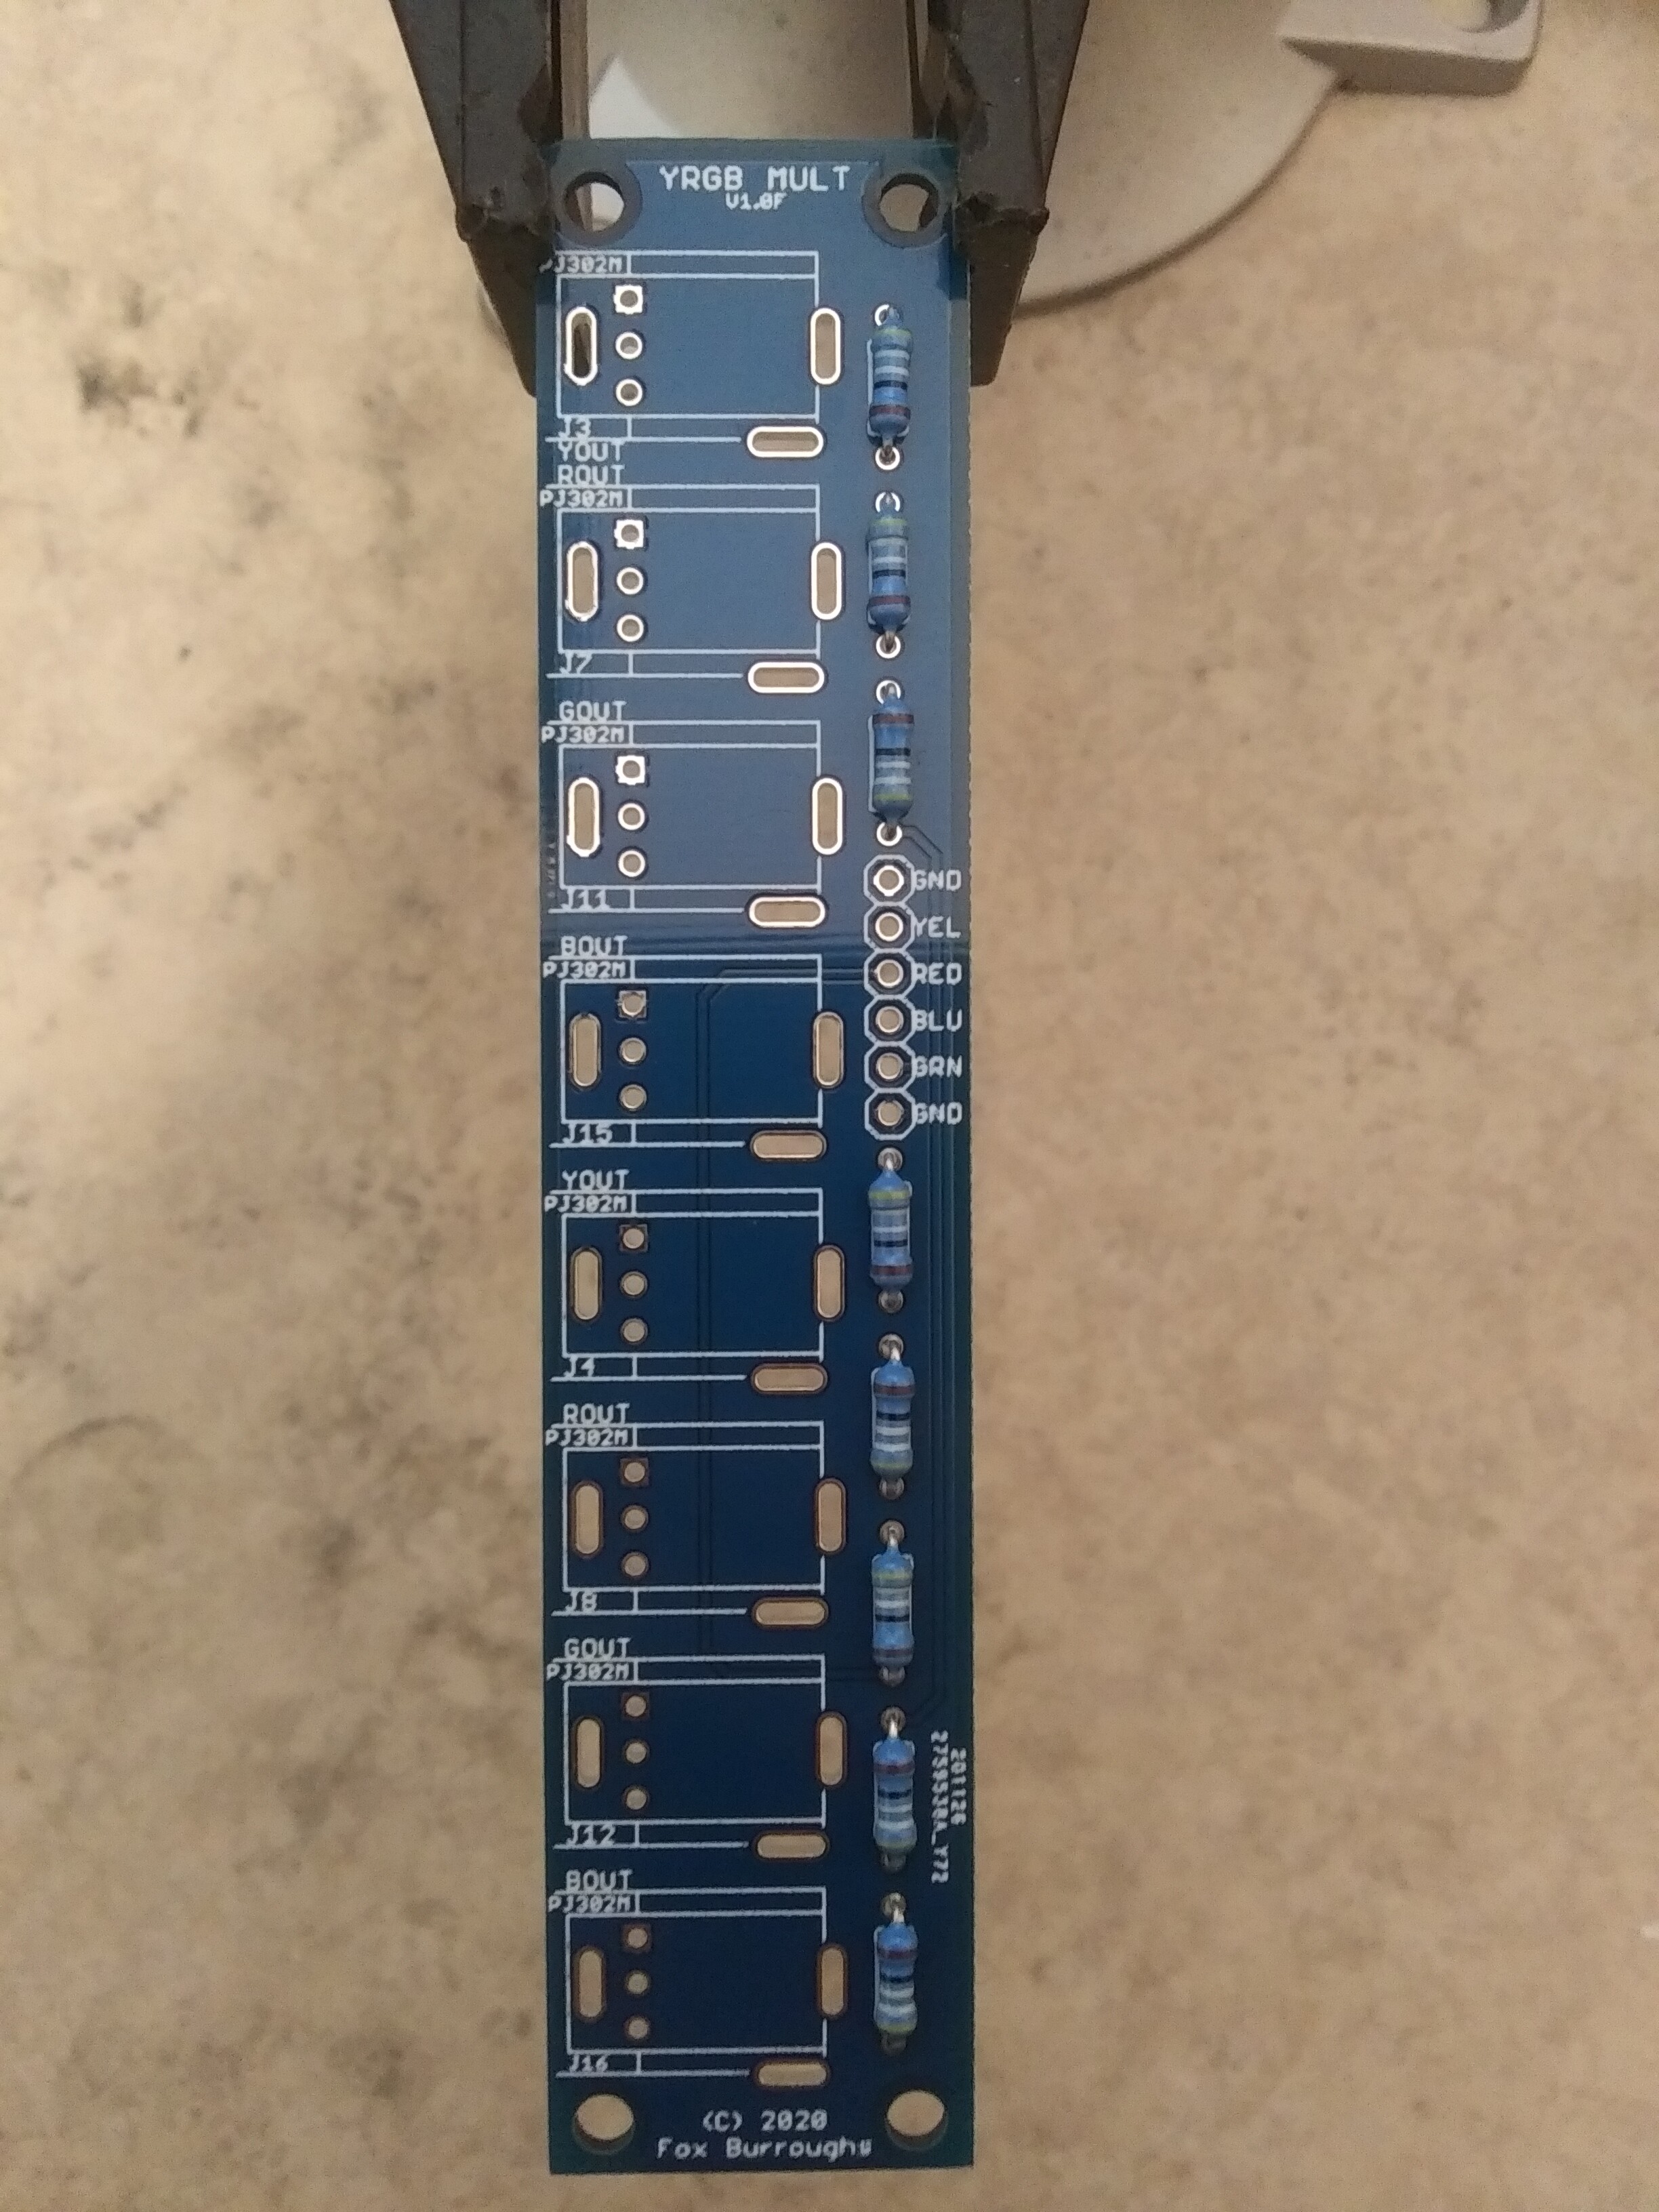
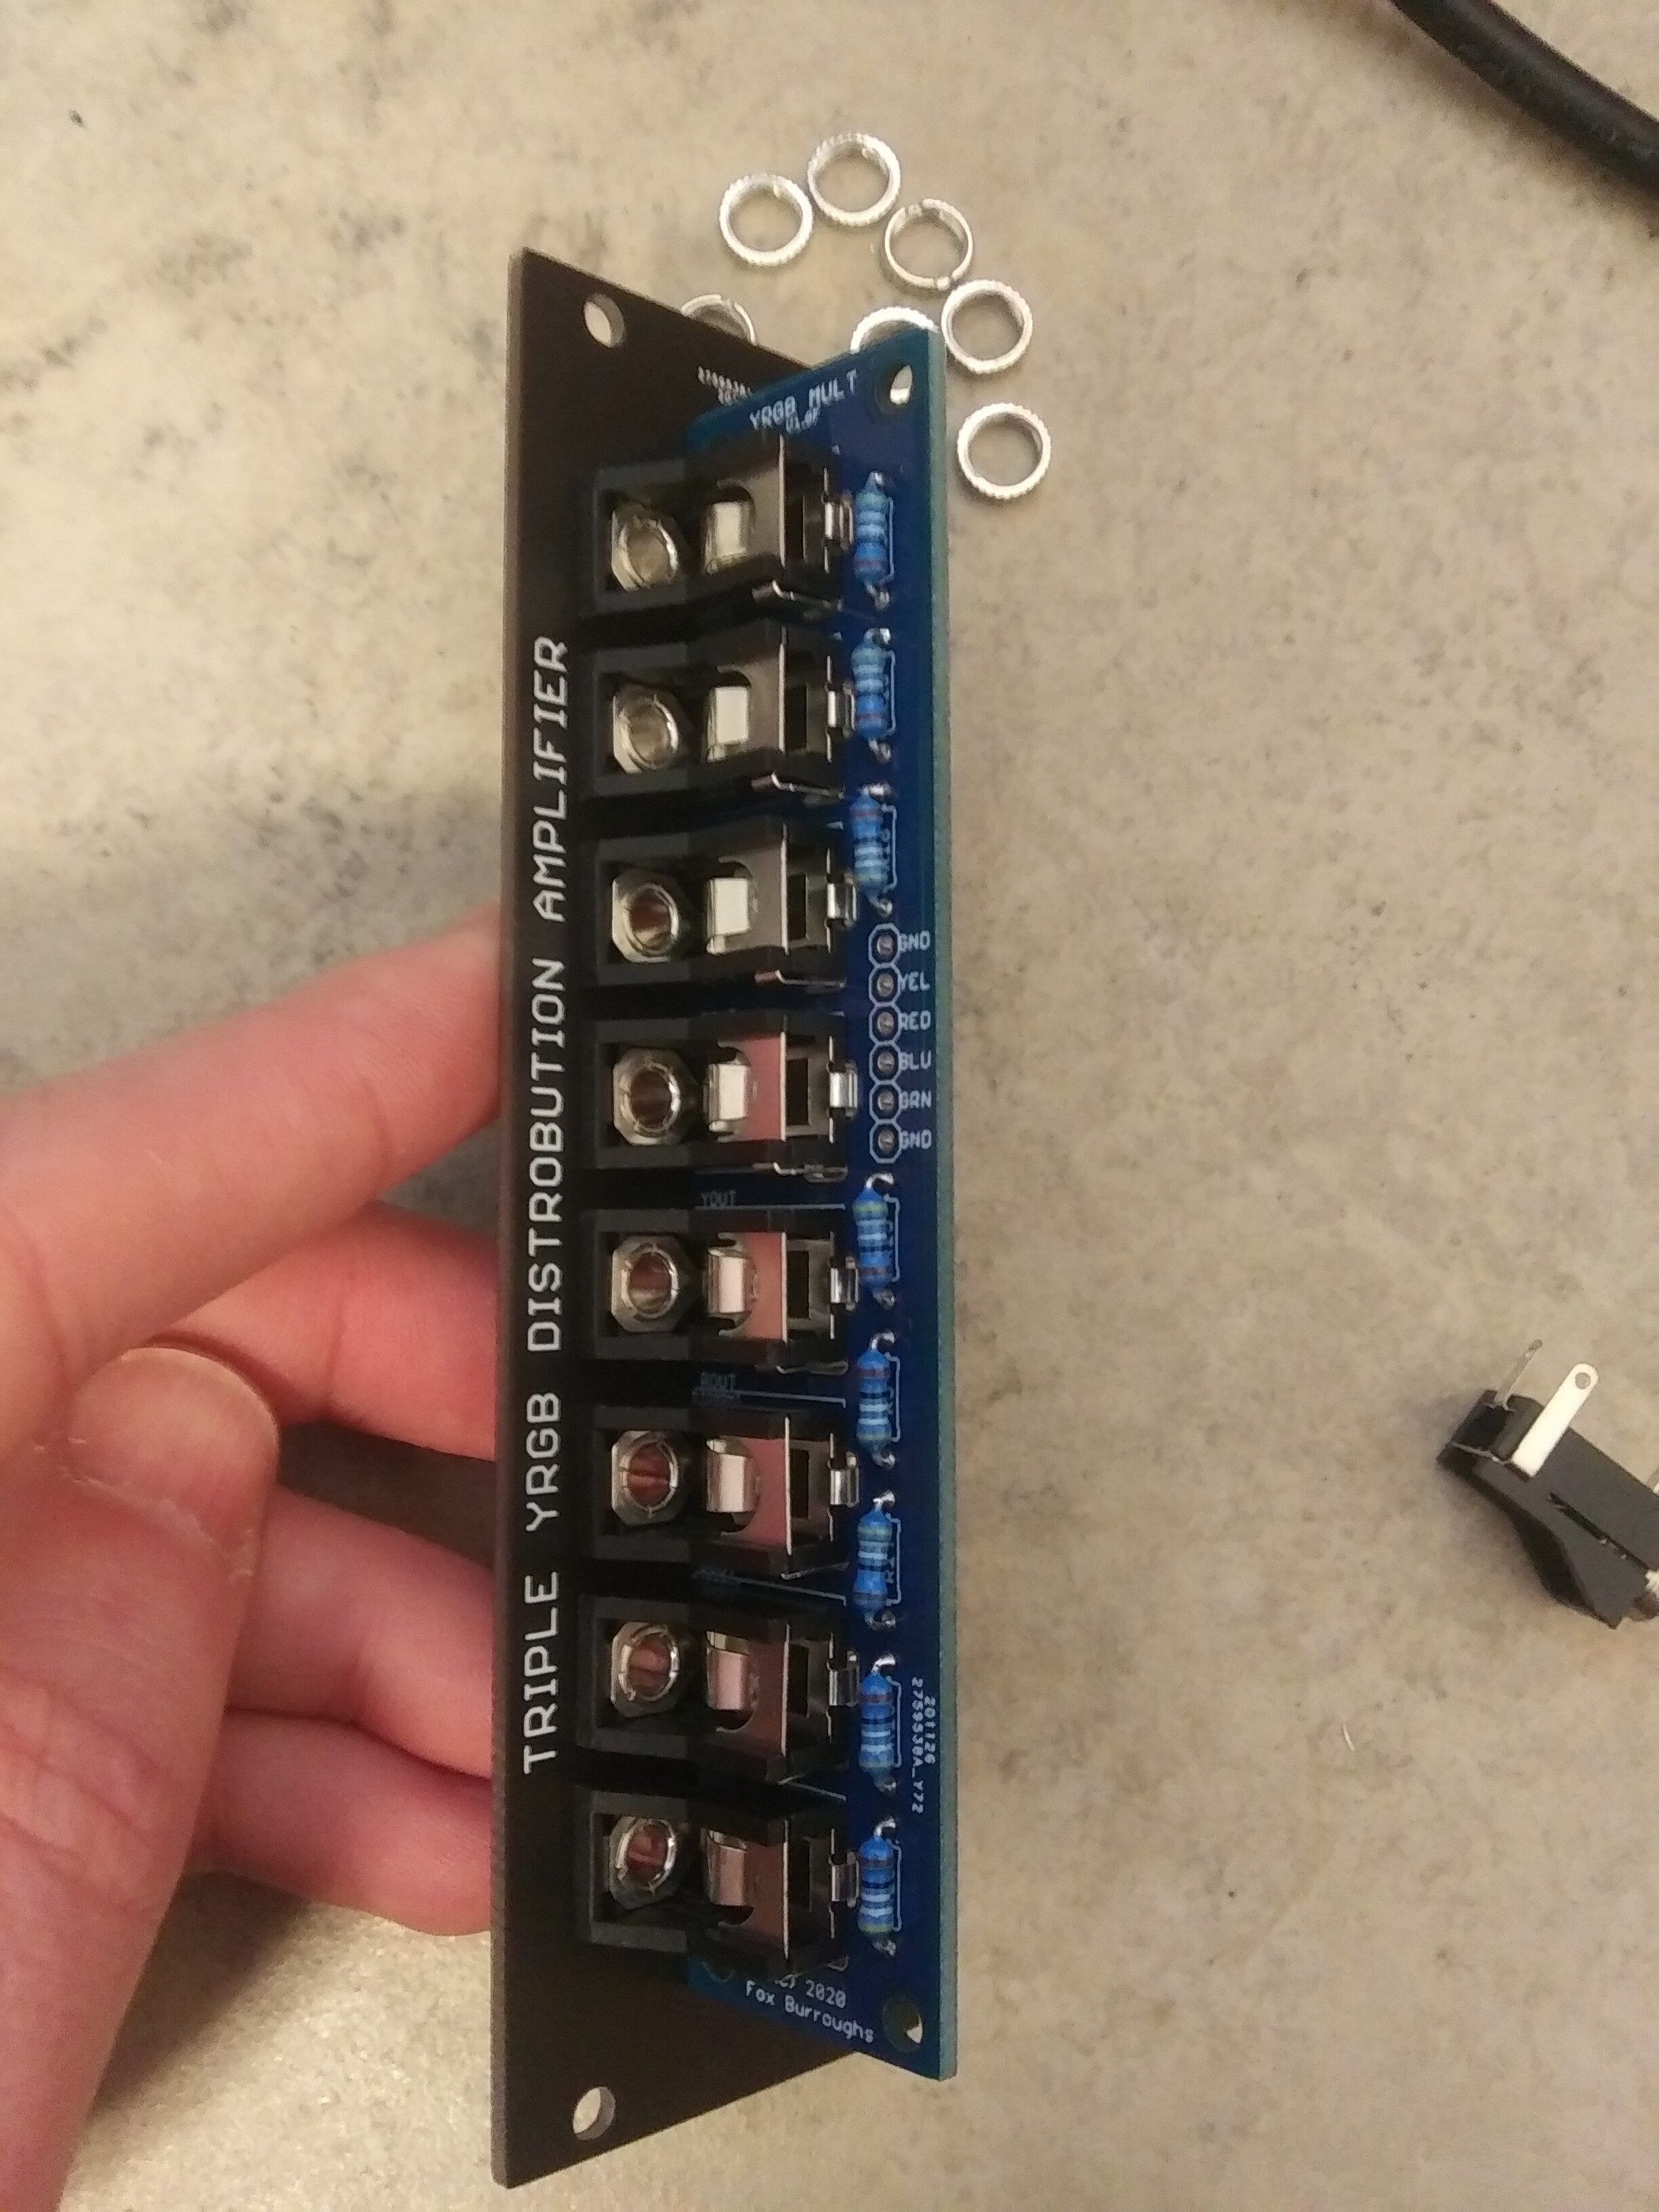
PCB 2:
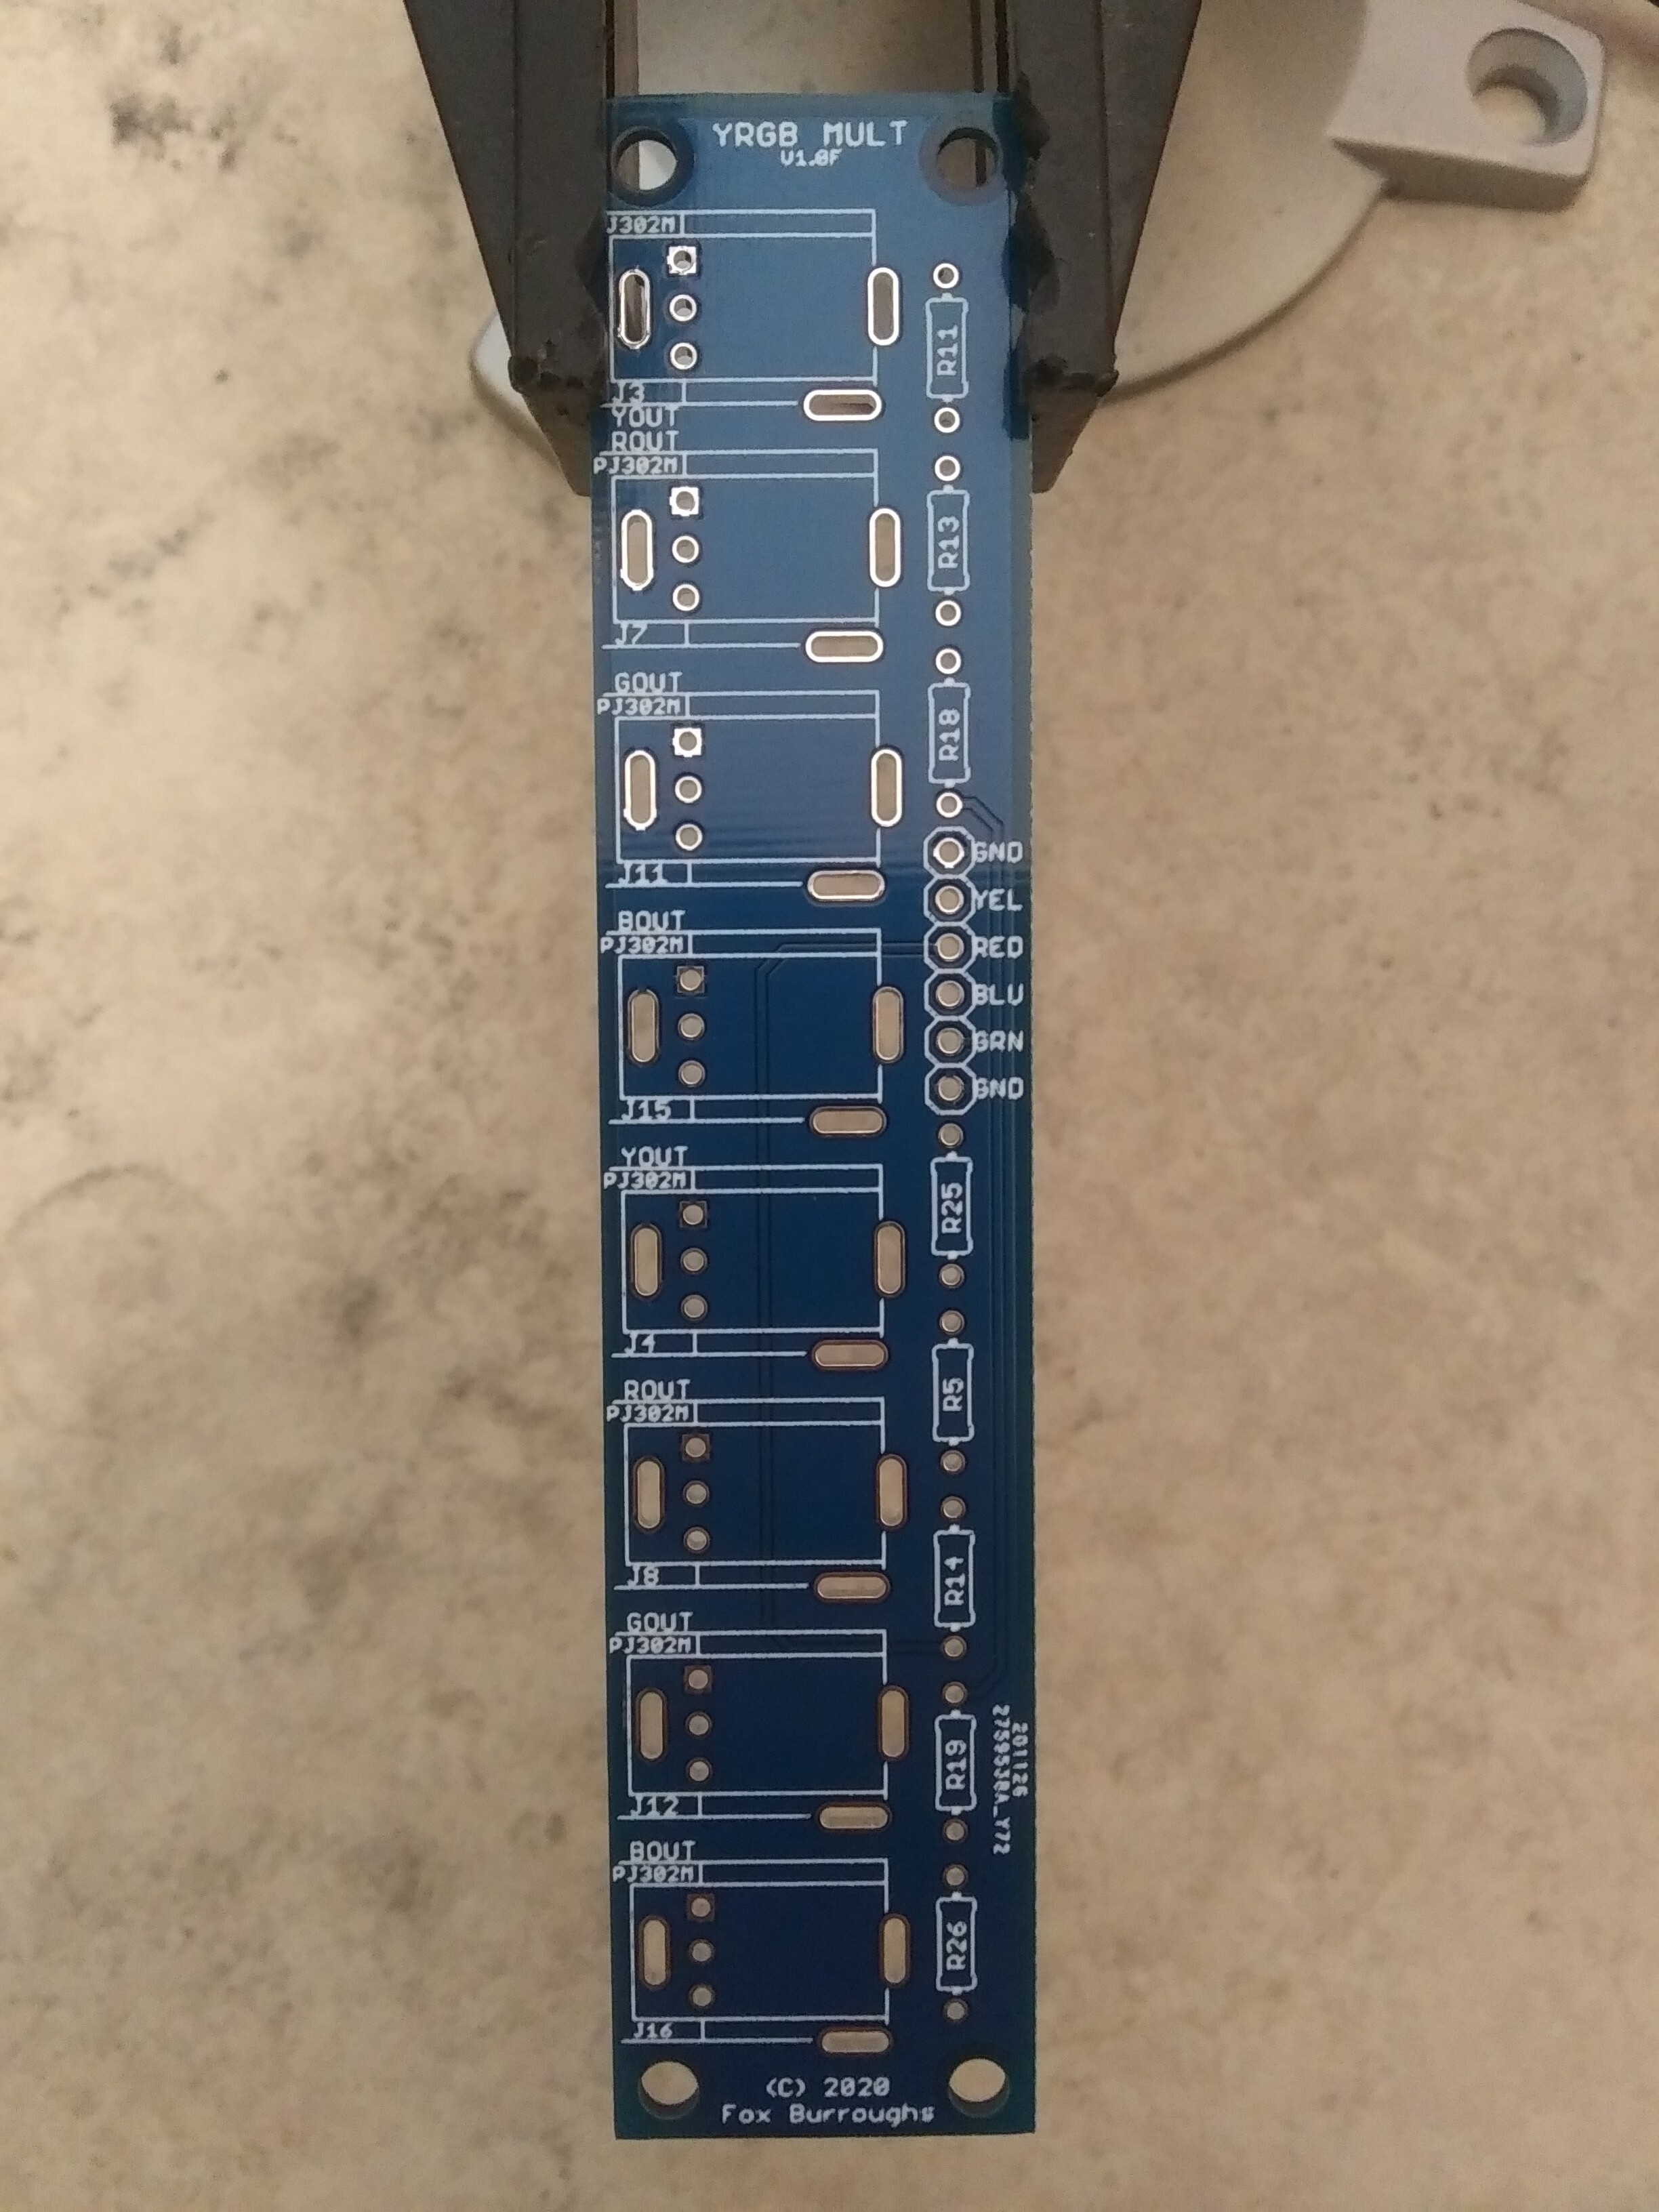
Step 6: resistors
R5, R11, R13, R14, R18, R19, R25, R26: 499Ohms
All resistors on this board are 499R
Step 7: PCB 1 jacks
Place jacks in pcb 1 (green). Do not solder.
Line up faceplate and add nuts to jacks. Finger tighten and once the jacks are straight, solder jacks.
Remove faceplate before step 8.
Step 8: PCB 2 jacks
Place jacks in pcb 2 (blue). Do not solder.
Line up faceplate and add nuts to jacks. Finger tighten and once the jacks are straight, solder jacks.
Place both pcbs into faceplate and tighten nuts fully.
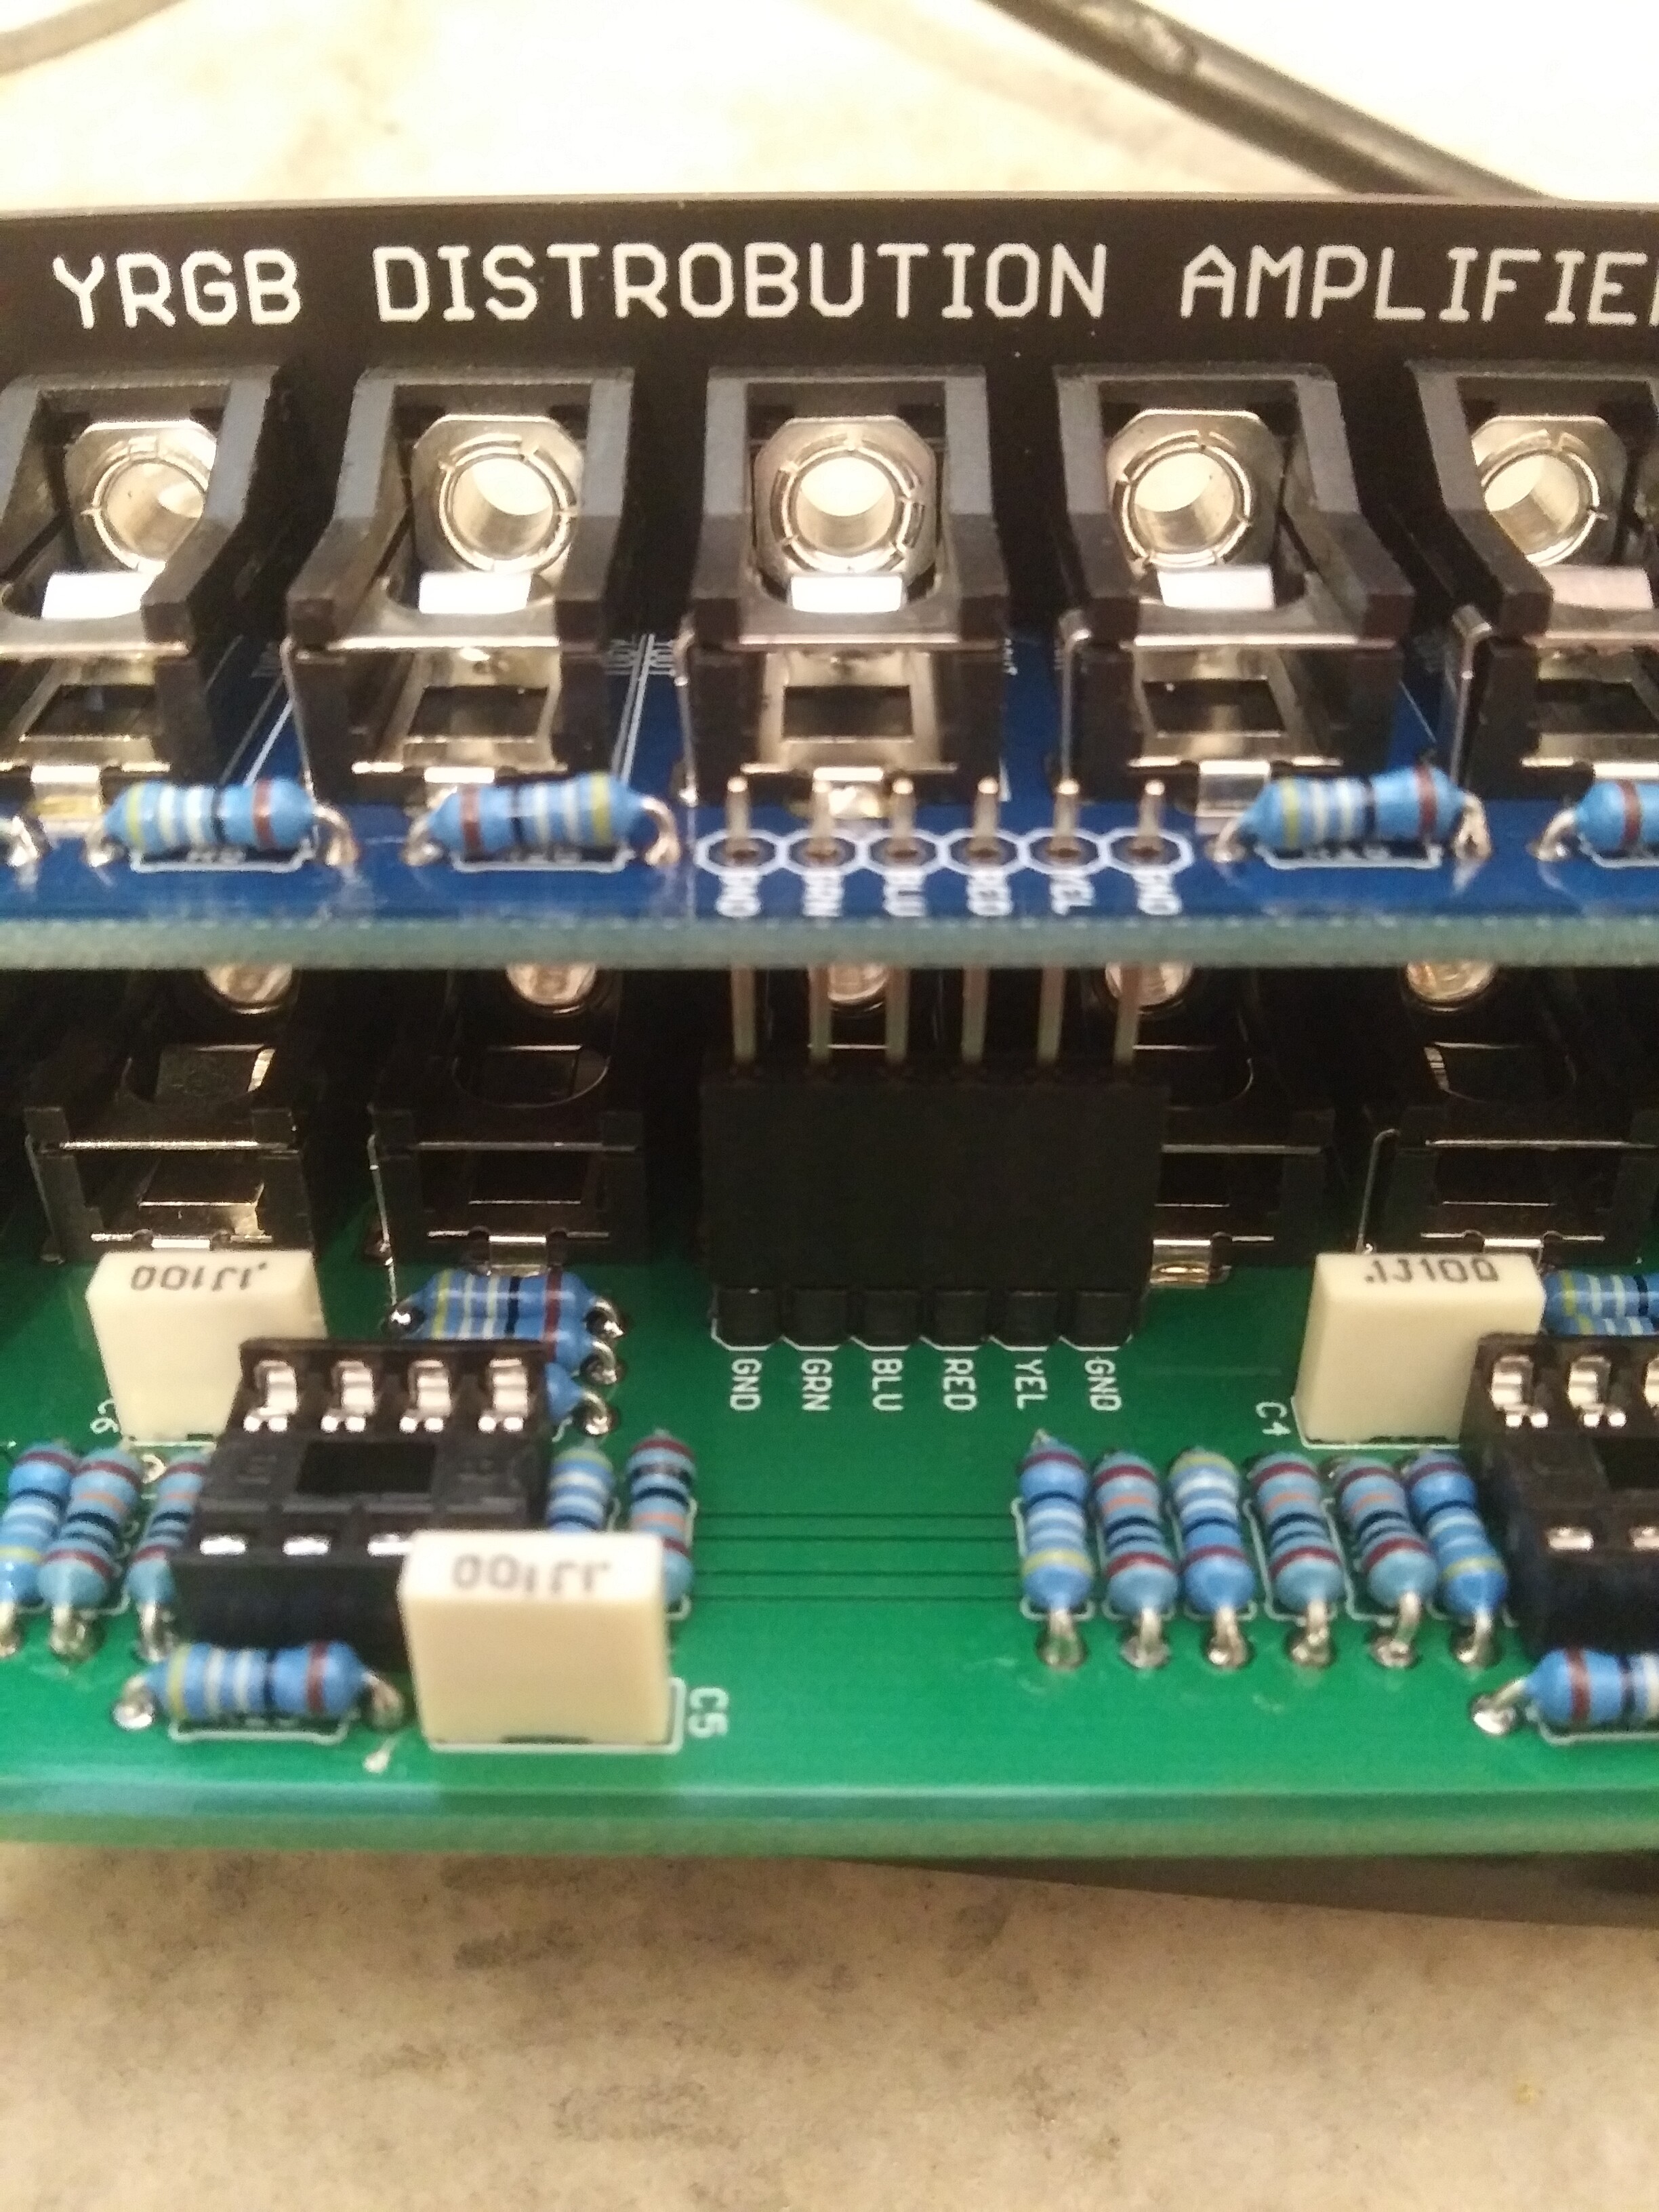
Step 9: backside header
Users may choose to use a ribbon cable or one 6-pin stackable header and one 6-pin male pin header.
Start by connecting the male and female headers together, then insert it between the boards and solder each side.
Expand for Schematics
#4 — 337is · 2020-12-08
Great work. Happy to support and eager to build.

DM sent.
#5 — meudiademorte · 2020-12-08

would take both
Shipping to germany
#6 — Robbertunist · 2020-12-08
Hi Pascal, any chance you’re in Berlin?
#7 — Robbertunist · 2020-12-08
Any of ye in need of a buffered Multiple & interested in one or both of Fox’s designs? @horacio2222@VanTa@destroythings
#8 — meudiademorte · 2020-12-08
Nope, Saarbrücken. So Far away from u.
#9 — Robbertunist · 2020-12-09
It is the other end of Germany for sure, thanks for answering anyhow @meudiademorte

@Fox, how much is the postage to Germany? It still might make more sense to ship a few to one person in Germany and they then distribute them from here, because postage within Germany is cheap. I’ve got plenty of the right angled Thonk jacks & LM6172s here.
& can even build a unit or two if someone doesn’t have the soldering know how or equipment.
#10 — Fox · 2020-12-09
Robbertunist wrote:
how much is the postage to Germany?
I am going to find out shipping cost tomorrow. The post office has already closed today.
Looking online, a few shipping options may be:
“First-Class Package International Service” = 14.75 USD, delivery date “varies by location.”
“Priority Mail International® Small Flat Rate Box” = 37.45 USD, delivery may be 6-10 days.
I cannot guarantee these prices, but I will find out for sure tomorrow.
#11 — Robbertunist · 2020-12-09
Thanks for checking @Fox
If anyone has any tips regarding good service providers or suggestions regarding postage costs to Europe, we’re all ears 
#12 — joem · 2020-12-09
It’s hard to beat the USPS prices that Fox quoted, for individuals/small companies. (Larger companies can get negotiated rates from some shipping companies.) Shipping internationally from the US pretty much always costs a lot. Might be able to get it down a little by shipping in an envelope of some kind instead of a box (if it’s just PCBs), but then you run the risk of damage with international shipments especially.
That said, putting a few pcbs together and masking-tape them together so they don’t slide against each other makes for a pretty tough little thing. A tight sandwich of cardboard with masking-taped PCBs in between, put in some sort of envelope can be a decent method. I believe that’s how Pusherman shipments are packaged, and I’ve seen similar done with a few other PCB sellers.
#13 — Fox · 2020-12-09
It’s always been tough for individuals. I hate it when the shipping is more than the products.

joem wrote:
That said, putting a few pcbs together and masking-tape them together so they don’t slide against each other makes for a pretty tough little thing. A tight sandwich of cardboard with masking-taped PCBs in between, put in some sort of envelope can be a decent method. I believe that’s how Pusherman shipments are packaged, and I’ve seen similar done with a few other PCB sellers.
Good tips. I am going to find some packaging materials to have at my house so I don’t have to buy the stuff every time I visit the post office.
#14 — wednesdayayay · 2020-12-09
if anyone is selling built modules I’d be up for one of each
#15 — Robbertunist · 2020-12-09
Cheers @Joem for all the tips, they’re good ones & I’ve received such a delivery a couple of times & everything was fine thankfully. Masking tap was a bit annoying but it did it’s job
@Fox, I’m much happier to receive recycled materials. Firms here often have bins (yellow for recycling contents) full of clean bubble wrap & boxes of various sizes. I’ve even found padded envelopes
@wednesdayayay, I’d happily oblige but the Atlantic is an issue as well as customs. @Fox, if you’ve a bit of free time, collect some of those “value added” dollars

#16 — reverselandfill · 2020-12-09
Fox wrote:
Good tips. I am going to find some packaging materials to have at my house so I don’t have to buy the stuff every time I visit the post office.
I buy my packaging material at RAJA packaging. I only use paper & cardboard boxes. NO plastic!
For padding, I use a document shredder and old magazines / recycled paper
#17 — Robbertunist · 2020-12-09
Count me in for 4 of each @Fox
#18 — brdaniell · 2020-12-09
2 A please! Love the parts list on the pcb
#19 — jestern · 2020-12-09
Fox wrote:
Dual 1:3 Distro Amp
Hey this is right on time, @Fox, I’ll get 3x Dual 1:3 Distro Amp
#20 — mrfang · 2020-12-09
I’m interested in 2 PCB/panel sets of each!
#21 — Fox · 2020-12-09
@meudiademorte: 1x Each - DM’d @Robbertunist: 6x Module (A), 4x Module (B) - DM’d @brdaniell: 2x Module (A) - DM’d @wide_closed: 1x Each - DM’d @jestern: 3x Module (A) - DM’d @mrfang: 2x Each - DM’d @wednesdayayay - DM’d
I am contacting everyone now. If you don’t hear from me in the next hour, please DM me.
#22 — wednesdayayay · 2020-12-10
it would be super cool for the distro amp to have a +1V present at the outputs when nothing is plugged in!
I hadn’t considered that before but it could be very helpful to have some more static voltages in the system
just a thought for future revisions or other modules
#23 — saiteron · 2020-12-10
@Fox would love to pick up three PCB/panel sets for the YRGB distro amps if they’re still available!
#24 — Fox · 2020-12-10
wednesdayayay wrote:
I hadn’t considered that before but it could be very helpful to have some more static voltages in the system
Neat idea. I was working on a board that took a single input and shifted it both upward by +0.25v, +0.5v, +0.75v and downward by -0.25v, -0.5v, -0.75v. Alternatively without an input, the outputs present the above mentioned static voltages. I wasn’t sure how it could be used so I haven’t shown it off. Maybe I will.
@saiteron Sure thing, I will message you right now.
#25 — wednesdayayay · 2020-12-10
that sounds like it would be a fun modulation pal!
if you took a LFO into it and then used waveshapers/comparators/slews on the different outputs it would give a wide palette of system control.
I love the creativity keep it coming!
#26 — csboling · 2020-12-10
@Fox I’ll buy one YRGB distro amp! Awesome projects!
#27 — Fox · 2020-12-10
Excellent! Messaging now…
#28 — Maytoast · 2020-12-13
Any built ones being made? Do you have a website these will be available from? Looking rad!
#29 — saiteron · 2020-12-13
if Fox doesn’t sell any built ones, i will be building 3 soon with 2 for sale. ordering parts this coming week and should be able to build before the end of the month.
#30 — allthesixes666 · 2020-12-20
Hi, if you still have two of Module (B) left, could I take them both please?
Let me know, with shipping to the UK
thanks
#31 — Fox · 2020-12-20
DM’ing
I have 30 more of these coming soon as well as the next (soon to be tested) revision of the RGB switcher.
#32 — jsonpayload · 2020-12-31
Anyone in the US up for selling a built version of Module B?
#33 — Fox · 2021-01-04
As soon as my op amps get here, I will have some built/ tested modules available. Each will come with a 5-6" power cable. Feel free to DM me and place claim.
- Module (A) - 1:3 Distribution Amplifier - $74 (2 available)
- Module (B) - Triple YRGB Distro Amp - $80 (5 available)
@wednesdayayay @jsonpayloadEDIT: Updated Stock
- Module (A) - 1:3 Distribution Amplifier - $74 (1 available)
- Module (B) - Triple YRGB Distro Amp - $80 (1 available)
- Quad Inverter - $79 (2 available)
#34 — Midcitysteve · 2021-02-18
Hey @Fox did you ever get another round of pcbs made? Id like 2x module A and 1x module B shipped to the US. Thanks.
#35 — Robbertunist · 2021-06-27
If anyone in Europe is looking for these either built or as PCB&Panel sets, I’ve got a few of both buffered Mults available.
#36 — homegrown · 2024-07-08
Just got my Fox multb and daisy and super excited to build them. Not a big deal but thought I’d give a heads up that there is a missing step in the build guide (for the trip YRGB mult) to populate the two 10uF electrolytics.