Teletect Finisher
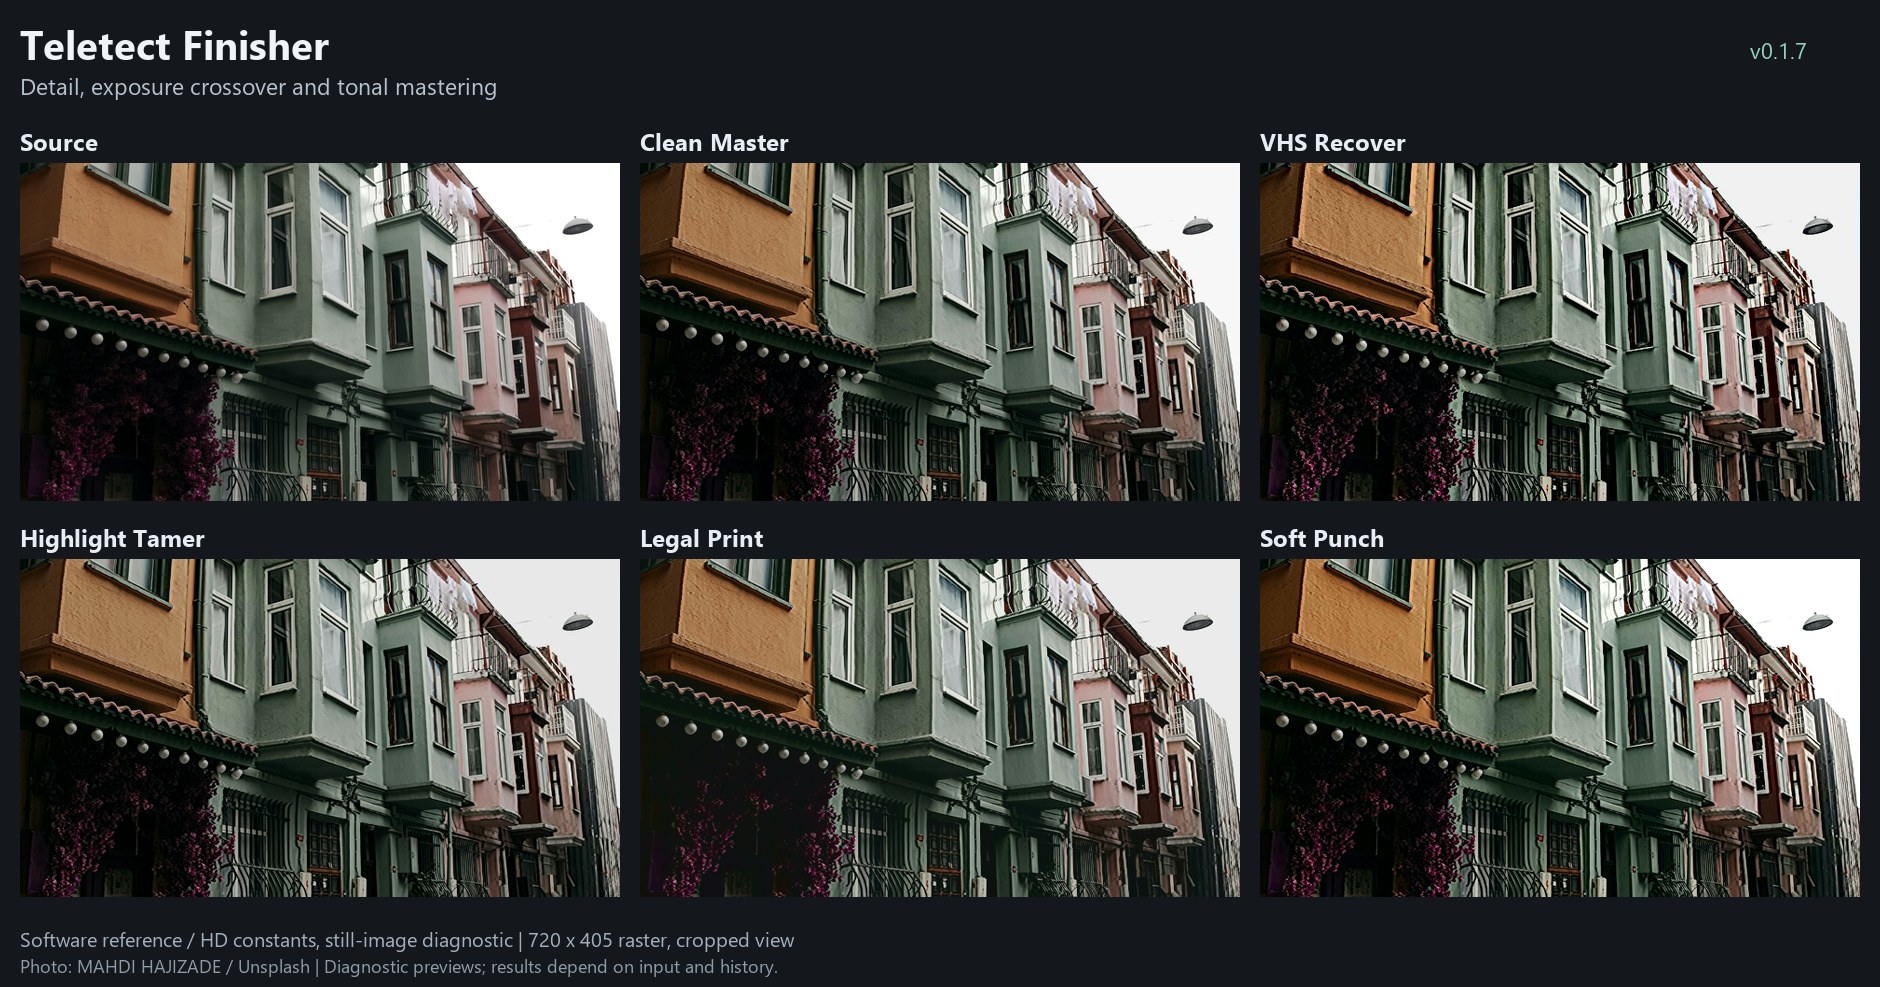
Teletect Finisher factory presets on one photograph: Clean Master, VHS Recover, Highlight Tamer, Legal Print and Soft Punch. Software reference renders; your results depend on the source.
Overview
Teletect Finisher is the last stop before your recorder or display. It is a mastering-style processor that makes a picture look finished rather than effected: subtle detail recovery, a diode-style Exposure crossover that desaturates highlights, a saturation trim, photo-style Shadows and Highlights controls that keep black and mid-gray anchored, a slow automatic Leveler, and a full-range or legal-range output clamp.
Every control is gentle by design. Finisher is meant to sit at the end of a chain and stay there, for camera feeds, tape transfers and the output of other Videomancer programs.
Note
Teletect Finisher is a processing program. It needs a source connected: a camera, playback, or another Videomancer program upstream.
What’s In a Name?
In audio, a mastering or "finishing" chain is the final set of gentle tone and level adjustments made to a mix before release. Finisher brings that idea to video: small corrections that make a picture sit well, rather than effects you are meant to notice.
Quick Start
-
Load Clean Master. Compare it against the source with Mix (Fader 12) at 0% and 100%; the difference should be subtle.
-
Raise Detail (Knob 1) until edges look crisp but not outlined. Try Detail Width (Switch 7) in both positions.
-
Turn Highlights (Knob 3) below center to recover bright areas, and Shadows (Knob 6) above center to open up dark detail.
-
Set Saturation (Knob 4) to taste. Center is unchanged color.
-
If the output feeds broadcast or legacy equipment, set Output Range (Switch 8) to Legal.
Parameters
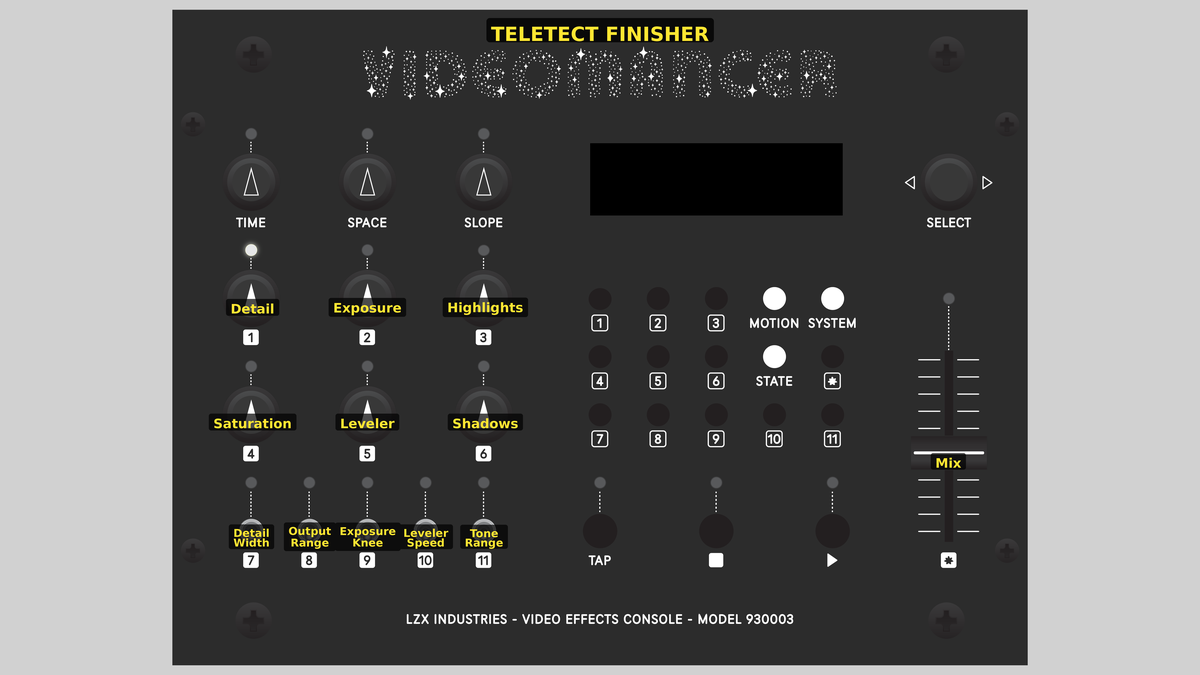
Videomancer’s front panel with Teletect Finisher active.
The controls are arranged in columns, each with its switch directly below: Detail and Saturation over Detail Width (left), Exposure and Leveler over Exposure Knee (middle), and Highlights and Shadows over Tone Range (right). Switch 8 (Output Range) and Switch 10 (Leveler Speed) sit between the columns.
Knob 1 — Detail
| Property | Value |
|---|---|
Range |
0% – 100% |
Default |
19% |
Detail is horizontal YUV peaking, from off up to about four times the luma high-pass gain, with chroma at half that strength. Large corrections are capped so edges don’t overshoot into hard outlines. Detail Width (Switch 7) sets the frequency band. Detail sharpens what is in the source; it is not a noise reducer and cannot restore detail that isn’t there.
Knob 2 — Exposure
| Property | Value |
|---|---|
Range |
0% – 100% |
Default |
25% |
Exposure models the diode coupling of a unique analog processor in approximate RGB. A weaker color channel is pulled up toward the strongest channel when the difference between them exceeds a threshold. Raising Exposure lowers that threshold across the full range. The result brightens and desaturates strongly colored areas, the way highlights burn toward white on film, while neutral grays and black stay fixed. The strongest channel is never raised, so the picture can’t sum above its original peak. At 0% Exposure is bypassed exactly.
Knob 3 — Highlights
| Property | Value |
|---|---|
Range |
-100% – +100% |
Default |
0% |
Highlights is a bipolar, photo-style control. Below center it recovers (darkens) highlights; above center it lifts them. It acts only above mid-gray, with a smooth onset, so black and mid-gray stay anchored. Tone Range (Switch 11) sets how strong it is.
Knob 4 — Saturation
| Property | Value |
|---|---|
Range |
0% – 200% |
Default |
100% |
Saturation scales color from none (0%) through unchanged (100%, center) to double (200%).
Knob 5 — Leveler
| Property | Value |
|---|---|
Range |
0% – 100% |
Default |
0% |
Leveler is a slow automatic brightness trim. It nudges the overall level up or down, by at most about an eighth of the range, to keep the picture consistent as the source changes. It adds or subtracts a correction rather than compressing contrast, and its estimate holds through blanking. Leveler Speed (Switch 10) sets how fast it follows.
Knob 6 — Shadows
| Property | Value |
|---|---|
Range |
-100% – +100% |
Default |
0% |
Shadows is bipolar and anchored at black. Below center it deepens shadows; above center it lifts dark detail. A curved mask protects the very darkest values and fades the correction out by mid-gray, so both full-range and nominal video black stay where they are.
Switch 7 — Detail Width
| Property | Value |
|---|---|
Off |
Fine |
On |
Broad |
Default |
Fine |
Fine sharpens with taps one pixel either side in SD, two in 720p and three in 1080 formats. Broad blends in taps twice as far out, adding a lower-frequency emphasis while keeping the fine detail. Both positions sharpen color as well as brightness.
Switch 8 — Output Range
| Property | Value |
|---|---|
Off |
Full |
On |
Legal |
Default |
Full |
Full passes the entire 10-bit range. Legal clamps the output to legal video levels for equipment that expects them.
Switch 9 — Exposure Knee
| Property | Value |
|---|---|
Off |
Soft |
On |
Hard |
Default |
Soft |
Hard has no effect below the Exposure threshold and a sharp corner where it begins, like a real diode. Soft rounds that corner over a broad region, so the crossover fades in gradually. Both have the same slope beyond the knee and reach the same result at maximum Exposure.
Switch 10 — Leveler Speed
| Property | Value |
|---|---|
Off |
Slow |
On |
Fast |
Default |
Slow |
Slow follows the scene gently; Fast reacts more quickly to cuts and lighting changes.
Switch 11 — Tone Range
| Property | Value |
|---|---|
Off |
Gentle |
On |
Deep |
Default |
Gentle |
Gentle or Deep range for Highlights and Shadows.
Fader 12 — Mix
| Property | Value |
|---|---|
Range |
0% – 100% |
Default |
100% |
Mix blends the original and processed pictures. Use it to compare before and after, or to dial back the whole treatment at once.
Presets
Teletect Finisher has five factory presets. Controls not listed in a preset take their default values.
| Control | Clean Master | VHS Recover | Highlight Tamer | Legal Print | Soft Punch |
|---|---|---|---|---|---|
Detail |
16% |
38% |
19% |
22% |
28% |
Exposure |
22% |
35% |
51% |
29% |
25% |
Highlights |
-12% |
-23% |
-37% |
-12% |
17% |
Saturation |
100% |
109% |
94% |
100% |
125% |
Leveler |
9% |
13% |
6% |
9% |
0% |
Shadows |
9% |
17% |
0% |
6% |
14% |
Detail Width |
Fine |
Broad |
Fine |
Fine |
Fine |
Output Range |
Full |
Full |
Full |
Legal |
Full |
Exposure Knee |
Soft |
Soft |
Soft |
Soft |
Soft |
Leveler Speed |
Slow |
Slow |
Slow |
Slow |
Slow |
Tone Range |
Gentle |
Gentle |
Gentle |
Gentle |
Gentle |
Mix |
100% |
100% |
100% |
100% |
88% |
Background
Diode crossover exposure
Exposure is modeled on a unique analog processor design that couples its color channels through diodes. A diode conducts only once the voltage across it passes a threshold, so a weak channel is pulled toward a strong one only when they differ by enough. Finisher reproduces that behavior digitally in approximate RGB. Large color differences are reduced, which desaturates and brightens vivid areas, while near-neutral tones pass untouched. The lift is capped at about 80% of the gap between channels so color is reduced but never inverted.
Anchored tone controls
Many brightness controls move everything, including black. Finisher’s Shadows and Highlights are shaped masks: Shadows works between a protected black toe and mid-gray, Highlights works above mid-gray, and both have smooth, zero-slope onsets. Black, mid-gray and the controls' center positions are always neutral, so you can adjust tone without shifting the picture’s foundations.
Precision
All knobs and the fader keep their full 10-bit resolution. Gain curves are rebuilt during blanking and new control values are approached in small steps, so adjustments are smooth while you turn a knob.
Exercises
Exercise 1: Tape Transfer Cleanup
Learning Outcomes
Use Finisher to make a soft, flat composite or tape source look crisp and balanced.
Video Source
A VHS, Video8 or composite camera source.
Steps
-
Load VHS Recover.
-
Toggle Detail Width between Fine and Broad. Broad usually suits soft tape sources better.
-
Adjust Shadows until dark areas show detail without turning gray.
-
Bring Highlights down until bright skies and faces hold texture.
-
Toggle Mix between 0% and 100% to judge the result.
Exercise 2: Exposure Knee Comparison
Learning Outcomes
Hear the difference between the soft and hard diode crossover.
Video Source
Footage with saturated colors: neon signs, flowers or colored lights.
Steps
-
Set Detail to 0%, Saturation to 100% and Mix to 100%.
-
Raise Exposure to about 50%. Vivid colors brighten and desaturate.
-
Switch Exposure Knee between Soft and Hard. Hard leaves moderately colored areas untouched and changes only the most vivid ones; Soft blends the change in.
-
Turn Exposure to 100%. Both knees now reach the same result.
Credits
Teletect Finisher is by Teletect and is part of the Teletect Toolkit, released under the GPL-3.0 license. Preview images are reference-model renders of a photograph by Mahdi Hajizade on Unsplash.
Glossary
-
Diode crossover: A coupling between channels that only acts once their difference passes a threshold, like an analog diode beginning to conduct.
-
Knee: The point where a transfer curve changes slope. A soft knee rounds the change; a hard knee is a sharp corner.
-
Legal range: The video levels broadcast equipment expects, with headroom above white and below black. Full range uses every code value.
-
Leveler: An automatic control that slowly trims overall brightness to keep it consistent.
-
Peaking: Adding a scaled copy of an image’s edges back to the image to make it look sharper.